PCB Fabrication

Author: Diane Kim (Division Manager of E&C Hardware)

Verified By: Jordan Smallwood (Project Manager)

Approved By: Miguel Garcia (Quality Assurance)


Table of Contents

Introduction

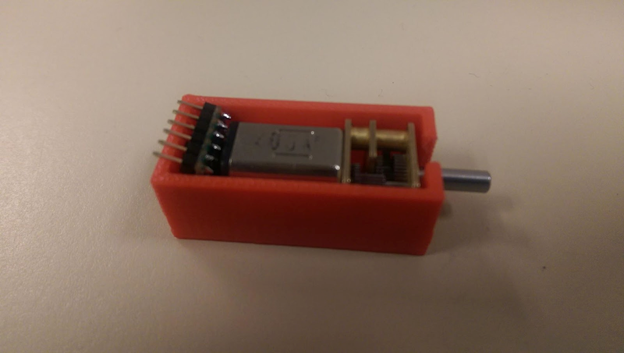
To fabricate our board, we use a PCB fabrication machine called the V-One from Voltera. Its function includes printing, soldering, and drilling.

Printing

V-One uses conductive ink to print the traces of the circuit. It will print the traces and bake it as well. The limits of the traces are:

  • Minimum 8 mil trace width and spacing
  • Minimum 0.65 mm pin pitch for SMT components
  • Minimum 0603 passive size
  • Minimum circuit size 1 x1 mm

Soldering

After the trace is done, the V-One can print the solder paste onto the desired traces. The user must manually place the pieces onto the board. After the pieces are place, the V-One will bake the board once more to heat up the solder paste. The limitations of soldering are:

  • Minimum 0.5 mm pin pitch for SMT components
  • Minimum 0402 passive size

Drilling

The V-One can also drill holes through the circuit board. The drill sizes are 0.7, 0.8, 0.9, 1.0, 1.6 mm for the diameter. Therefore, the smallest hole size is 0.7 mm which is 27.6 mil. To connect the top and bottom layer, rivets are used, and the given rivet sizes are 0.4 mm and 1.0 mm for the inside diameter.


Software

To communicate between Eagle CAD and the V-One, Gerber files are used. V-One has its own CAM processor that outputs the top, bottom, solder paste and drill layers. Once the Gerber files are converted from the Eagle CAD, it is uploaded into the Voltera software which allows the user to choose the desired action: print, solder, bake, or drill. Each process has its own procedure which the user can follow easily with the guidelines that are shown through the process on the right side of the window.


Procedure to Fabricate the Board

Drilling:

Drilling is done first. The board is placed onto the pad and then the drill size is chosen. For our board, we are using the 0.7 mm and the 1.6 mm drills.

Figure 1. Picture of the drill in action

Printing:

After the drilling is done, the top layer is printed first. The board is not moved therefore the previous alignment can be used. After the conductive ink is printed, the board is heated to bake the conductive ink.

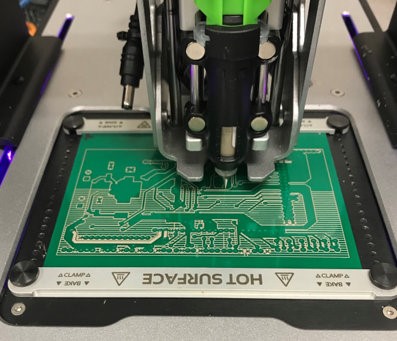
Figure 2: printing process

After the top layer is baked, the board is flipped to print the bottom layer. Since the board is moved, alignment is needed so that the top and bottom match. After the alignment is done the bottom layer is printed and baked.

Connecting Top and Bottom Layers:

The top and bottom layer are connecting using the rivets. The flat side of the rivets are placed into the through-holes connecting the top and bottom. To flatten the non-flat side of the rivets, the rivets pressing tool is used. After each rivet is pressed, the multimeter was used to confirm that there is a connection between the top and bottom pads.

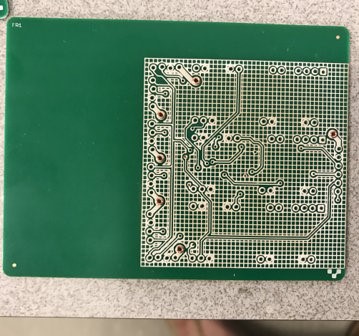
Figure 3: Rivets done

Cutting the Board

We needed to cut the board because the machine doesn’t have the function to do so. Therefore, we used the machines given access to mechanical engineering majors to do so.

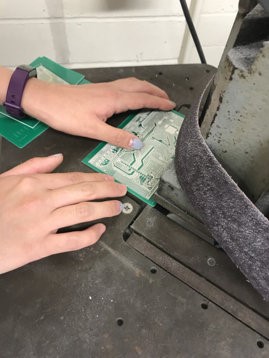
Figure 4: Cutting the excess part of the board

Soldering:

Alignment is needed once again since the board is moved so that the location of the pads is known to the machine. The solder paste is printed on the pads and the components are placed onto the correct locations and baked once more.

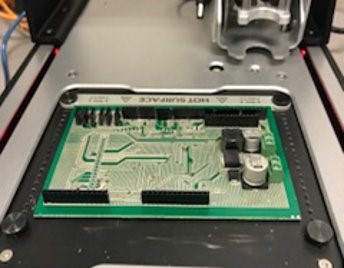
Figure 5. Picture of the soldering

After the surface-mount component is placed, the through hole components. For our board, we had male and female connectors that needed to be hand soldered. Following the guide form the soldering workshop blog post, the connectors were hand soldered
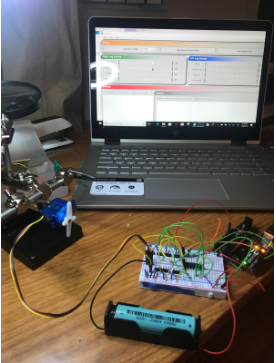
Final Testing:

The final product is shown below and the connections were checked using a multimeter. Basing off the interface matrix, the connection between the peripheral systems pinout and the ATmega2560 pinout was checked. All the connections were checked.

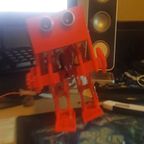
Figure 6: Final Project

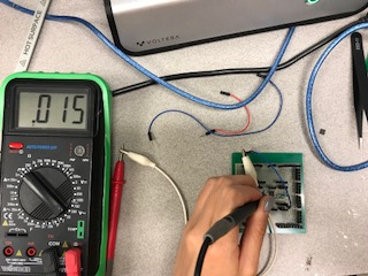
Figure 7. Testing the connection of the traces


Conclusion

The time taken to fabricate the PCB was 7 hours. It took two hours to draw the traces for each side, one hour to bake the traces, and another hour to solder on everything. When it came to testing the board, we weren’t able to due to technical problems. We were able to connect all the components onto the circuit board and the ATmega256. However, during the process, the board got shorted and damaged the board. We didn’t have enough time nor material to print out the board, therefore, we weren’t able to print out another one.

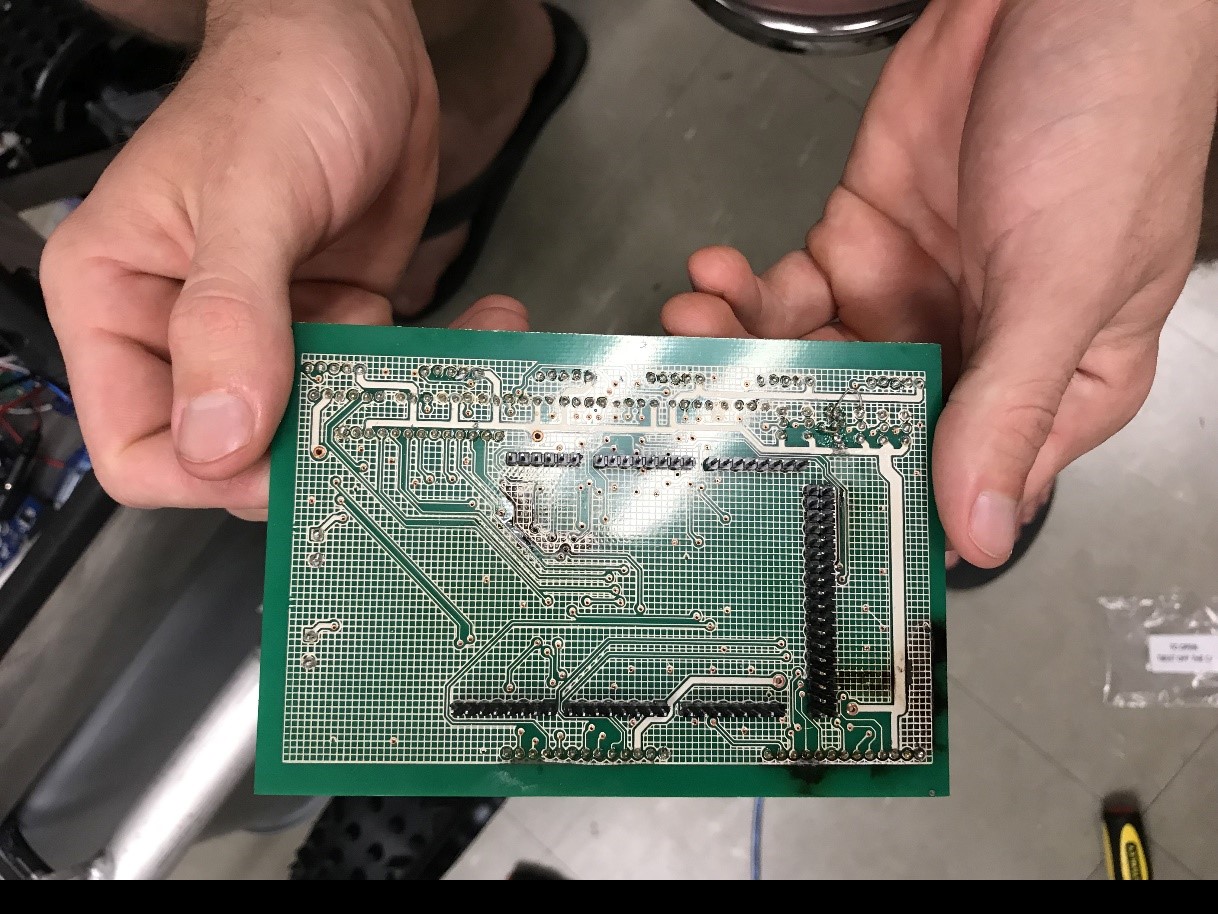
Figure 8: Image of the damaged board

Spring 2018: Biped FOBO Existing obstacle avoidance software test

Written By: Jorge Hernandez (Electronics & Control)

Verified By: Miguel Gonzalez (Project Manager)

Approved By: Miguel Garcia (Quality Assurance)


In order to avoid obstacles, we implemented the SEN136B5B sensor ultrasonic code within the given navigation program from projectbiped.com. I also did my own code which turned on an LED to detect when the ultrasonic detected 8cm or less. This was made because Micro Fobo already had navigation code which used Ultrasonic to turn Right when it detected 5 cm and I did not want to take credit for code that was not mine. Within the provided code, the only changes we had to make is to have the function found Obstacle read the value of 8 cm. If Micro FOBO’s ultrasonic read anything above 8 cms, it would provide a zero, or a false to the function found Obstacle. Below is the given code with the minor changes in order for Robot avoidance.

Fig.1 Initial Code Test

Below is a video of the testing performed which would essentially have Micro FOBO walk and when detecting an obstacle at 8cm’s, instead of the LED going on, it would stop Micro FOBO completely.

https://drive.google.com/open?id=1ppkFJqBtTFxKPoDTRbCh50Uc4DUi5A1O

Initially, we wanted to have the LEDs that were on top of Micro FOBO’s head turn on when it detected 8cm but in our dem,o there was a loose wire which caused miscommunication and could not make FOBO move at all. Below is a video on how we would have used the idea of Robot avoidance with the Arduino code provided as well.

// Jorge Hernandez
//Ultrasonic Sensor HC-SR04 and Arduino Tutorial
//Dejan Nedelkovsk
// defines pins numbers
const int trigPin = 9;
const int echoPin = 10;
const int ledPin=13;
// defines variables
long duration;
int distance;
void setup() {
pinMode(trigPin, OUTPUT); // Sets the trigPin as an Output
pinMode(echoPin, INPUT); // Sets the echoPin as an Input
Serial.begin(9600); // Starts the serial communication
}
void loop() {
// Clears the trigPin
digitalWrite(trigPin, LOW);
delayMicroseconds(2);
// Sets the trigPin on HIGH state for 10 micro seconds
digitalWrite(trigPin, HIGH);
delayMicroseconds(10);
digitalWrite(trigPin, LOW);
// Reads the echoPin, returns the sound wave travel time in microseconds
duration = pulseIn(echoPin, HIGH);
// Calculating the distance
distance= duration*0.034/2;
if (distance <9){  // if less than 9 cm's then the LED will turn on
  digitalWrite(ledPin,HIGH);
}
else{
  digitalWrite(ledPin,LOW); // if not, LED will stay on
}
// Prints the distance on the Serial Monitor
Serial.print("Distance: ");
Serial.println(distance);
}

References

  1. https://drive.google.com/open?id=1ppkFJqBtTFxKPoDTRbCh50Uc4DUi5A1O

Spring 2018: Biped Breadboard Build and Test

Written By: Jorge Hernandez (Electronics & Control)

Verified By: Miguel Gonzalez (Project Manager)

Approved By: Miguel Garcia (Quality Assurance)


Our design ended up being breadboarded which fit inside of Micro FOBO’s head. The reason we had to resort to breadboarding is due to the fact of using a wrong chip. Originally Fobo operated on the CD-4017 decoder chip as we used the PCA9685 16-channel PWM driver on our PCB. Due to this error, in order to move Micro Fobo we need to use the 4017 decoder and with limited time, we breadboarded and tested.  In order to build and use the 4017 decoder to drive the 8 micro servos Micro Fobo uses, I drew up a schematic and pinouts to simplify which derive from projectbiped.com.

Fig1. Pin Out and connection of 4017 decoder

To clarify figure 1

  • RH= PWM connection to Right HIP
  • RLL= PWM connection to Right Lower Leg
  • RA= PWM connection to Right Ankle
  • RUL= PWM connection to Left Upper Leg
  • LH= PWM connection to Left HIP
  • LLL= PWM connection to Left Lower Leg
  • LA= PWM connection to Left Ankle
  • LUL= PWM connection to Left Upper Leg
  • NC= no connection
  • GND= ground connection
  • VCC= connection to 5 v

In figure 2 one can see the actual completed breadboard.

Fig.2 Completed 4017 breadboard connection

Fig.3 Testing each servo using FOBO Poser


Using this breadboard shield gave us full control of each individual servo when connecting a 4.7 V battery to it. The program used to calibrate was provided by Projectbiped.com which was called FOBO poser. The breadboard build and test were successful when testing individual micro servos. The walking test will be a more challenging task as it uses all 8 micro servos simultaneously.

Below is a video of the actual calibration.

Video

References

  1. https://drive.google.com/open?id=171cSjTzGN8j88Nwz8zHqaluC846qZIKd

Spring 2018 AT-ST Rapid Prototyping

By: Danny Pham (Manufacturing and Design Engineer)

Verified By: Intiser Kabir (Project Manager)

Approved By: Miguel Garcia (Quality Assurance)

Table of Contents

Introduction

3D printing using a plastic can cause inaccuracies in the dimensions and measurements of the piece that you are printing. Even if the pieces are designed to be simple shapes, dimensions can be skewed because plastic can become deformed while the 3D printer melts the plastic. To counter this, we printed many copies of different pieces. Despite our efforts, pieces continued to be skewed and we had to sand down the pieces in order for the pieces to fit in our prototype.

All of the components we printed are not simple shapes. The connectors have small edges and holes that 3D printing can not avoid making inaccuracies for. In order to remedy this, we printed many copies of a few complex pieces with different 3D printer settings to see if a change in accuracy, layers, and density would fix some of these errors. As you can see in the image above, many of the pieces came out very well. Some of the holes and edges in the pieces had to be sanded out in order to fit other pieces, but the main design and function of the pieces was printed correctly.

Printing components

Figure 1: These are the components we printed that will be put together to build the legs of the robot.

We printed the pieces with PLA so the printed components are brittle and easy to break. We had to replace these with new reprints and increased the number of layers and density so that the components weren’t as easy to break when putting the bot together.

Figure 2: One of the few pieces that broke when we were putting together the pieces.

The main piece that gave us the most trouble to print was the rotating shaft. Because it’s design is complex, the shapes are easy to deform. The component was also not flat, so we had to use a more supporting material as a platform for the material to sit on while it was 3D printing. When we printed the rotating shaft vertically, it was very easy to snap. After we changed the 3D printing setting to print it sideways instead of vertical, it was very sturdy yet it looked messy. Changing some accuracy settings allowed us to create a good rotating shaft that looked clean and was sturdy enough to rotate on the robot without breaking.

Figure 3: Rotating Shaft

The first print of the rotating shaft. It is a complex piece to print because of alternating circles and different sizes throughout the shaft. It was also very easy to snap because we printed it vertically.

Figure 4: Future print of the rotating shaft using higher precision settings and sideways printing instead of vertical.

The printed motor case fit the motor pretty well. The only thing I did not account for was having space for the wires to stick out without constraining the motor in the case. A simple solution to fix this was to cut out a bit of the edge on the side so that the wires can stick out while allowing the motor to fit in the case.

Figure 5: Printed case for the motor to sit in. It contains a hole on the side so the shaft can rotate freely without issue.

The pieces we printed required a lot of sanding just to fit each other. Almost all of the pieces had some inaccuracies in dimensions and shapes because of 3D printing. Some pieces were too big to fit in the holes for other components. We tried modifying the size of the holes and edges on Solidworks for reprinting, to account for 3D printing inaccuracies, and many other issues came up. These issues included having holes too big, dimensions still deformed, and more cost for paying for reprints. We decided that sanding down the components to fit each other would work best in saving money and also fixing the issue of deformities in the components.

Figure 6: 1 leg build

One leg put together after sanding down the pieces. Each component of the leg fit pretty well and the leg moved pretty well. The connections were not too tight or too loose.

Figure 7: Image of the printed components fitting together after a lot of sanding down.

Figure 8: Final prototype fully built

We will be designing a new box to fit the ultrasonic sensor, servo, and other electronics.

Conclusion

After putting the components together, the robot came out similar to the Solidworks model. There were some minor errors in the prototype. Some of the pieces were a loose fit instead of snug, but overall, the pieces connected to each other well and the motion of the leg was not disrupted. The shaft rotated cleanly and the leg moved in a Theo Jansen motion as intended.

References

  1. https://grabcad.com/library/theo-jansen-type-biped-walking-robot-strandbeest-1
  2. https://drive.google.com/open?id=10GJDTiolPUA9C2i3yNMLMN5Ndx_wRcU-
  3. Final 3D Model: Linked when blog is published

Spring 2018 AT-ST Final Model

By: Danny Pham (Manufacturing and Design Engineer)

Verified By: Intiser Kabir (Project Manager)

Approved By: Miguel Garcia (Quality Assurance)

Introduction

After the preliminary design review presentation, we decided to steer away from the split leg option that the previous semester used because it was difficult to balance. There were many complications with the previous design that caused the robot to fail, such as the unstable design of the legs and feet. To give us some ideas, Hill let us borrow a Theo Jansen Biped kit that moved with the Theo Jansen leg design using a fan. We decided that since the kit was well balanced, we could try to incorporate the use of motors instead of a fan into the leg design of this kit in order to make a walking robot that could walk and turn.

Figure 1: Theo Jansen BiPed Kit

This is the fully built Theo Jansen Biped Kit that moves by using the fan to rotate the shaft. It includes an automatic weight shifting mechanism and three gears that connect the fan and the shaft.

After building the kit, we saw that the main action that moved the kit was a fan that moved three gears in a gear system. A shaft that runs through the kit is rotated by a gear connected to the shaft. The rotating shaft moves the entire Theo Jansen kit. We modified the design of the kit so that instead of using a fan to move the kit, a motor on each leg would move each leg. First, we removed the fan and the gear attached to the fan.

Figure 2: Theo Jansen Model on SolidWorks.

We found the entire kit on a Solidworks file on grabcad. The link is sourced below. This is an image of the kit on Solidworks after I removed the fan.

The kit above includes a rotating shaft that moves both legs simultaneously at different motions to create the walking motion. Since we are implementing a motor to do that for each leg, we split the shaft in half and implemented that on each side so that one shaft will move one leg, and the other shaft will rotate the other leg.

Figure 3: Original Rotating Shaft and the edited Shaft.

Image of the original rotating shaft and the edited shaft that is cut in half. We will be using the half shaft on each leg instead of just one shaft for both legs. Each shaft will be connected to their own motor through the gears.

Figure 4: Leg Design on SolidWorks.

The edited rotating shafts and a gear are connected to each leg. The frame of the kit and the automatic weight shifting mechanism are removed from the model. This will be the framework of the legs.

After removing the chassis of the kit, we designed our own frame with the same concept as the kit model. The chassis will hold the rotating shaft in place while it rotates. It is also connected to the rest of the frame and will be the main anchor that holds the robot together. We added a general box on top of the frame to hold the electronics.

Figure 5: The legs are connected together with the shafts.

The legs are connected together with the shafts to three frame pieces that hold the legs and the body together. It also holds a box on top to fit electronics and other miscellaneous parts.

We initially planned to just stick the motor directly onto the rotating shaft on each end so that the motor rotated the shaft directly. However, Hill recommended that to balance the center of mass well, the weight of the legs should be closer together. If we went with having the motor on each side of the shafts, the weight would be shifted farther apart and make it more difficult to balance the robot. We decided to move the motor right in front of the legs so that the weight of the motor would be directly on the same plane as each leg. Since the weight would be closer to each other, the kit would have an easier time to walk while balancing itself. We created a case for our motors and modified our existing frame pieces to hold these motor cases. Since we are not putting the motors directly to the shaft, we created a two gear system.  The motor spins one gear and the one gear will spin the other gear that is directly attached to the shaft so that the motor will rotate the shaft. We went with a gear system that moved from small gear to big gear and that will create more torque for the robot to move.

Figure 6: AT-ST with the motor case.

This is the robot after attaching gears and motor cases to the robot. We added two more frame pieces on the side to hold the motor cases and to hold the top box in place. This will add more stability to the robot and allow us to keep the motors closer to the center of the robot.

After finishing the leg and chassis design, we redesigned the box to hold the ultrasonic sensors, servo, and other electronic parts. First, we made the box longer to hold the 3DoT board and have space for the ultrasonic sensor and cables.

Figure 7: A transparent image of the redesigned box.

A transparent image of the redesigned box. I cut out holes in the front of the box to fit the ultrasonic sensor. A hole in the front bottom side of the box was also cut out for wires to come into the box from the two motors in front. I created small panels sticking out from the bottom side of the box so the 3DoT board will fit perfectly between the panels. Finally, I created a roof with a servo mounted to it so that the servo will act as the weight shifting mechanism.

Figure 8, Final 3D Model.

Final 3D model of the robot. It contains the servo, ultrasonic sensor and the other electronic components in the box. There is a two gear system on each side of the robot.

Conclusion

There are a few things I would fix for this model. Because there are gaps between components in the model, it would be nice to hide some of the wires with panels that covered these gaps. I would also fix some of the screw holes for the model. In Solidworks, it is easy to reach these holes to put screws in, but for the actual model, it can be impossible to reach. Finally, I would adjust some holes in the box. When you 3D print the part, the 3D printing can deform the part so that your dimensions for size and holes are off. We had to sand down the parts to fix that. The issue for this type of design is that these components were not meant to be 3D printed. The design worked as intended but could be improved on. A solution to this is to redesign each component so that it is held together by screws instead of the connections and edges already on the kit components. Redesigning the components to basic connector shapes and using more screws to hold each part together will allow for easier 3D printing but maintaining the function of this design.

References

  1. https://www.adafruit.com/product/1841
  2. https://grabcad.com/library/theo-jansen-type-biped-walking-robot-strandbeest-1
  3. https://drive.google.com/drive/folders/10GJDTiolPUA9C2i3yNMLMN5Ndx_wRcU-?usp=sharing

Spring 2018 AT-ST Cable Tree

By: Samuel Yoo (Electronics and Controls Software Engineer)

Danny Pham (Manufacturing and Design Engineer)

Verified By: Intiser Kabir (Project Manager)

Approved By: Miguel Garcia (Quality Assurance)

Table of Contents

Introduction

This blog post shows the wiring design for the AT-ST robot. It will show how the wires connect from the board inside the box to the servo, ultrasonic sensor, and the motors outside of the box on the final model images.

The wiring for the AT-ST robot contains only ribbon wires. There were two different types of cables, one with the female-to-female connector and the female to male connectors. The female to male connectors were store bought and used for the ultrasonic sensor and the servo. The female-to-female connectors were made from components and used for the dc motor only.  There are two methods of making these type of wires; the first one is soldering a wire with a male connector and a female connector with male pins. After soldering the part together place, shrink wire on the connections and heat up the wire to get a good conductivity. The other method is getting a ribbon cable, housing, and female pins. With the listed components, first, remove some of the plastic off the wire to get the metal. Then taking the female pins, crimp them on the ribbon cable. After that step is done for each wire piece, insert them into the housing.

Wiring 

  • Wires – Red
  • Board – Black box Green outline
  • Connectors – Black box

Figure 1: Front Image of the wiring design.

Description: Front image of the wiring design. It shows wires connecting from the motors through the hole in the box to the board. The wires connect from the ultrasonic sensor inside the box directly to the board.

Figure 2: Top View of the wiring

Description: Top image of the wiring. The wires connect directly from the servo to the board.

Figure 3: Side view of the wiring design.

Description: Side view of the wiring design. It shows the wires connecting to the board from the servo and the motors.

Figure 4: Front angle view.

Description: Front angled image of the board. It shows a better view of the hole on the bottom side of the box and the wires connecting from the motors into the box.

Conclusion

The connectors for the wiring made it much easier to connect and disconnect the electronic parts. Some other issues with this design are that since the final model is not closed, there are a lot of gaps that wires come through that aren’t hidden. A simple solution to hide the wires is to design new panels that would go on the front that will hide the motor wires.

References

  1. Final 3D Model Blog post: Linked when Published
  2. Interface matrix: https://www.arxterra.com/at-st_interface_matrix/

Spring 2018 AT-ST Theo Jansen Leg

By: Danny Pham (Manufacturing and Design Engineer)

Verified By: Intiser Kabir (Project Manager)

Approved By: Miguel Garcia (Quality Assurance)

Introduction

The Theo Jansen Leg design is a design by Theo Jansen consisting of rods connecting to each other. One of the rods in the design is a static point that holds the whole leg in place and another rod which rotates in a circular motion. By rotating this specific connector in a circular motion, the whole leg moves in a circle and creates a walking motion.

Figure 1: screenshot of animation of Theo Jansen leg motion.

Description: The gif of the Theo Jansen leg shows the simulation of a walking motion by rotating a connector in a circular motion.

The reason the Theo Jansen Leg works well with motors is because the connector spins in a circle similar to a motor. One way to look at this is spinning a crank wheel.  If you attach a motor to the connector, the motor will spin that connector in a circular motion and create the walking motion for the leg. The motor is essentially turning a crank wheel that allows the rest of the leg to simulate the walking motion. A servo would not work with this design because servos only turn 180 degrees. A motor can spin this continuously and allow the leg design to walk forward without any interruptions.

Figure 2: Measurements regarding the Theo Jansen Leg Design.

Description: These measurements are used by Theo Jansen for his leg design. The green circle represents the connector spinning in the circular motion or the crank wheel. The red line represents the circular motion that the leg moves in to create the walking motion.

One main issue to look out for using this design is controlling how the foot pivots on the ground while walking. Keeping the foot parallel to the ground is essential in order to have stability in the leg while walking. If the foot is not parallel to the ground when it is in contact with the ground, the motion is disrupted by the angle of the connector next to the foot. This will disrupt the stability of the leg and cause the leg to fall over or not walk at all.

Conclusion

The Theo Jansen leg design works well with motors. This leg design will work with our requirement of moving the legs of our robot with motors. The main priority for this design to function with our robot is having stability while the motor is running the leg. The parallel foot to the ground is essential for keeping the leg motion smooth and stable.

References

  1. https://en.wikipedia.org/wiki/Jansen%27s_linkage
  2. http://scottburns.us/walking-mechanism/
  3. https://en.wikipedia.org/wiki/Jansen%27s_linkage#/media/File:Strandbeest-Walking-Animation.gif

Spring 2018 AT-ST Walk Code

By: Samuel K Yoo (Electronic & Control – Software)

Verified By: Intiser Kabir (Project Manager)

Approved By: Miguel Garcia (Quality Assurance)

Table of Contents

Introduction

During the creation of AT-ST, this is a program that allows AT-ST to walk. Note that this program is used for the current model and might need to be updated later on. The code is very straightforward as it only uses the motor and controls the speed. There are commented code for the servo to make it shift the weight of the bot.

Code

Figure 1: screenshot of code pt 1

Figure 2: Walk Code pt 2

Explanation

This code should not be used in the future irritations of the AT-ST. The major explanation of why it should not be used it because of the code being adjusted with some physical deformities with the leg. If the future irritations are going toused this AT-ST, then the code should be used to make the robot walk. However, a more appropriate approach to creating a walking motion code is setting the AIN pins and BIN pins to clockwise and counterclockwise. Keep in mind if the robot is facing you, the left motor must spin counterclockwise and the right motor must spin clockwise. The AIN pins should be programmed to the right motor and BIN pins should be the same with the left motor. To program the motor for a motor driver this table should be used

Figure 3: Table for motor control

The PWM should also be tested on each motor to determine what speed the motors are truely rotating at. This can be done with the shaft encoder, which I have not programmed with. There will be a link in the References for those who would want to learn how to program it.

References

  1. https://roboticbasicsblog.wordpress.com/tag/rotate/
  2. https://playground.arduino.cc/Main/RotaryEncoders

Spring 2018 AT-ST Which Way

By: Samuel K Yoo (Electronic & Control – Software)

Verified By: Intiser Kabir (Project Manager)

Approved By: Miguel Garcia (Quality Assurance)

Table of Contents

Introduction

In this code we are creating a which way sub routine. There are two methods of doing this, one being, code one which is the switch case decision. The other method is the index method which saves a huge amount of coding. The method used for the AT-ST is the index method.

Code

Figure 1: Whichway Code Screenshot

Figure 2: Code Screenshot Cont.

Figure 3: Code Continue

Explanation

The maze.h file contains the maze array which should be given in the EE444 lab training, but if not, there would be a link to it in the Reference. The code in the maze.h file also contains the two tables and the structure for the main programs. The enterRoom, turnInMaze, stepInMaze and roomInMaze all use the index. The index moves the values on the table to point at the appropriate row and column for each desired value. This method is really good and saves a lot space as mentioned above.   

References

  1. http://web.csulb.edu/~hill/ee444/Labs/Lab%204%20Arrays/Lab%204%20(C++).pdf
  2. http://web.csulb.edu/~hill/ee444/maze.h

Spring 2018 AT-ST Final Code

By: Samuel K Yoo (Electronics & Control – Software)

Verified By: Intiser Kabir (Project Manager)

Approved By: Miguel Garcia (Quality Assurance)

Introduction

This is the final code for the AT-ST for Spring of 2018. There are many problems with the code, not only with missing sections, but there is also no test for the other values. The robot can walk forward and turn, however, the code to test for the maze has not been done along with missing parts.  

Code

Figure 1: Final Code Screenshot

Figure 2: Continue

Figure 3: Continue

Explanation

This code has a lot of missing code. The biggest code that is missing is from the void loop, which uses the whichway code and the Bluetooth integration. For the future electronic and control engineer of the AT-ST read the 3DoT manual ahead of time. The coding for the bluetooth is extremely difficult. The lab sequence is not that difficult to understand however the bluetooth is. Another advice is to test the robot as quickly as possible to find the errors both in the program and physical movements. The walking program should work immediately, however, a physical error with one of the legs cause a lot of hardships. The code forward only works with the spring 2018 model. The program takes one small step with the messed up leg and four to five steps with the good leg. This will cause it to steer toward a direction, however, it still moves forward. The whichway code should be pretty much be the same, however, add the hitwall from lab 5 of the training sequence.

Reference

  1. http://web.csulb.edu/~hill/ee400d/Technical%20Training%20Series/3DoT/3DoT%20Training%20Documentation.pdf