Table of Contents
Arduino IDE 3DoT Tutorial
In order to program your 3DoT to operate autonomously, we need to set up a programming environment. If you are experienced with programming microcontrollers, you can use your language and compiler of choice (e.g. avr-gcc). If this sounds foreign to you, we suggest getting started with Arduino using the tutorial on this page.
Arduino, first and foremost, is an open‐source computer hardware and software company. The Arduino Community refers to the project and user community that designs and utilizes microcontroller‐based development boards. The 3DoT board is based on the Arduino family of ATmega32U4 boards.

Figure 1.1. 3DoT Boards
The most common programming approach is to use the Arduino IDE, which utilizes the C++ programming language. This gives users access to an enormous Arduino Library that is constantly growing thanks to the open‐source community.
Shown in Figure 1.2 is Arduino IDE once the application has been opened. It defaults into a blank sketch where programming can begin immediately. First, you will need to add the 3DoT board to the Arduino IDE.

Figure 1.2. Arduino IDE Default Window
Adding the 3DoT Board
Follow these step-by-step instructions along with associated pictures to add the 3DoT board to the Arduino IDE.
- Navigate to File / Preferences
- Paste the following link into Additional Board Manager URLs: https://arxterra.com/downloads/package_3DoT_index.json
- Close the preferences window and navigate to Tools / Board: / Boards Manager…
- Type “3DoT” in the search bar. The board Should show up.
- Click inside of the box that contains the text “3DoT by Arxterra” and the “Install” button should appear. Click Install.
From now on you can select the 3DoT board just like any other Arduino board.

Figure 1.3. Step 1: Navigate to File / Preferences

Figure 1.4. Step 2: Add link to “Additional Board Manager URLs:”

Figure 1.5. Step 3: Navigate to the Boards Manager

Figure 1.6. Step 4: Search for 3DoT

Figure 1.7. Step 5: Install the 3DoT Board
Uploading Arduino Sketches to your 3DoT Board
OFF-PRG-RUN Switch
The Arxterra 3DoT board has two switchable modes of operation: Program and Run. Use the program PRG mode to upload your sketches and the RUN mode to run your program.
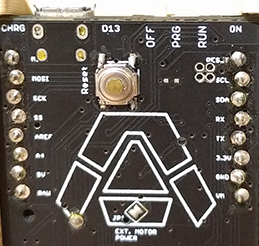
Figure 1.8. OFF-PRG-RUN Switch
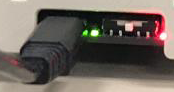
Figure 1.9 Switch in PRG position
Note that in order to switch from RUN -> PRG you must first turn off the 3DoT and then switch back to PRG. (RUN -> OFF -> PRG)
Select the 3DoT Board
Connect the Arduino board to the PC via a micro USB cable. Select the Tools pulldown menu and go to Board. This list is populated with the currently available Arduino Boards able to be programmed using Arduino IDE, select “Arxterra 3DoT”
.

Figure 2.0. Select Arxterra 3DoT Board
Select the Port
If Arduino IDE was downloaded before plugging in a 3DoT board, when plugging in the board, the USB drivers should have installed automatically. The most recent version of Arduino IDE should automatically recognize connected boards and label them with the respective COM port they are using. Select the Tools pulldown menu and then Port. Here, it should list all open COM ports and, if an Arduino board is recognized, will list its name. Select the “Arxterra 3DoT” connected to the PC. If the setup was successful, the Arxterra 3DoT and COM port should appear in the lower right‐hand corner of the Arduino window. These steps are shown below in Figure 2.1.

Figure 2.1. COM Port Setup
Testing 3Dot With Arduino – 3DoT Blink
One common procedure to test whether the board being used is properly set up is by uploading the sample sketch “Blink”. This sketch is included in all Arduino IDE releases and can be accessed by
File > Examples > 01.Basics > Blink
shown in Figure 2.2.

Figure 2.2. Access “Blink” sketch.
Like the Arduino UNO, the 3DoT surface‐mounted LED is wired to digital pin 13 and is located between the USB port and the switch. Press the “Upload” button in the upper‐left corner to upload “Blink” to the board. This sketch will blink the LED at a specified interval and is an easy way to confirm if the board was set up properly and code uploaded successfully.
Summary
- Connect 3DoT Board to PC via a microUSB cable
- Select connected board in Arduino IDE ( Tools > Boards > Arxterra 3DoT )
- Select proper COM port ( Tools > Port > COMx (Arxterra 3DoT) )
- Open “Blink” sketch ( File > Examples > Basics > 01.Blink )
- Click “Upload” button to upload the program to connected board
- Confirm board is working properly by observing blinking LED
Installing the ArxRobot Library
The 3DoT extension to the Arduino library adds a powerful set of functions allowing you to seamlessly control your robot. These functions include support for the ArxRobot Android and iPhone App plus access to the Arxterra telerobotic community. In addition, the library allows you to easily customize your robot by adding new commands and telemetry channels.
To install the ArxRobot library, navigate to the Arduino Library Manager found at Sketch > Include Library > Manage Libraries..

Search for the ArxRobot Library and click Install. Done!
Getting Started with the ArxRobot Library
Making a Bluetooth Controlled Robot
With the ArxRobot Library installed, you can navigate to File -> Examples -> ArxRobot Library to find three example sketches:
- ArxRobot_Basic
- ArxRobot_Telecomm_Servo
- ArxRobot_Telecomm
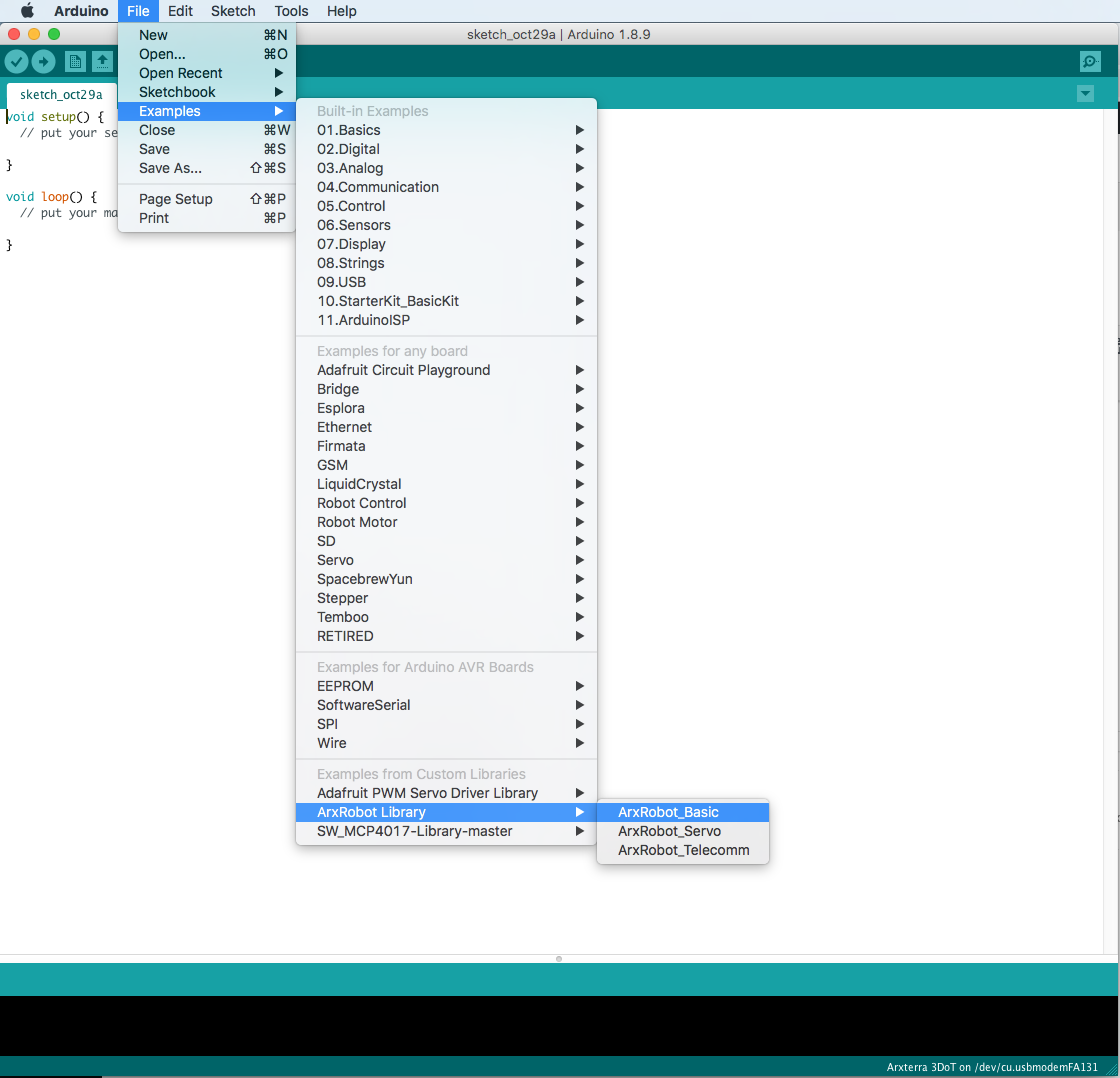
The ArxRobot_Basic example is a barebones sketch that handles all the background robot operations, including Bluetooth commands. This means that uploading the Basic example code will make your robot ready to connect to Bluetooth and go!

Figure 2.3. ArxRobot_Basic Script.
The Telecomm Servo example, covered after the next article, guides you through adding a custom servo command.
The Telecomm example guides you through adding custom commands and telemetry and overriding the default commands.
Connecting To the App and Control Panel
See the next section!
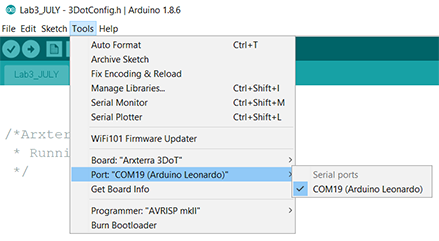
The 3DoT board communicates with the PC using two serial (COM) ports. Which port is active depends on the switch position (program or run). In the previous section you selected the COM port used to upload your program (i.e., switch in program mode). To run the serial monitor or plotter, you need to identify and select the COM port that is active in run mode.
Now that you are ready to test your code switch from programming mode to run mode.
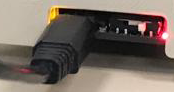
Figure 2.3. Switch in RUN position
Now go to tools again and switch the com port to the new one that appears.
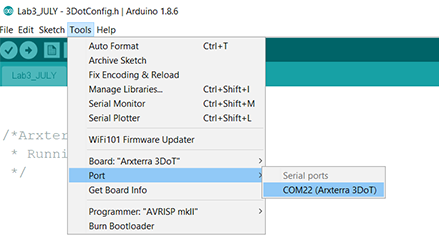
Figure 2.4 Select Serial Port
Now you can open serial monitor from tools menu or select the magnifying glass in the top-right hand corner.
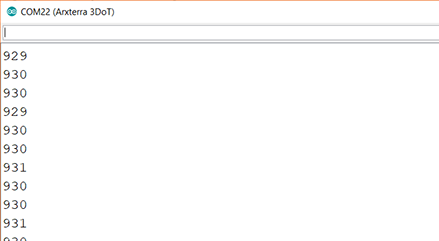
Figure 2.5. Serial Monitor Window
Troubleshooting
The 3DoT COM port/Serial port is not detected
Ensure the 3DoT is in programming mode and the USB cable you are using is not a charge-only cable.
If the programming LED on the 3DoT does not blink when the board is switched to programming mode, move the switch back and forth to ensure it is well seated in the center position. If it still does not blink, you may have overwritten the bootloader using incorrect programming settings. See “3DoT Bootloader and Fuse Settings“.
COM port is detected, but can’t upload sketch
Ensure the 3DoT is checked as the COM port to use (it may show up as either “Arxterra 3DoT”, or “Arduino Leonardo”, since they both use the same microcontroller), “Arxterra 3DoT” is selected as the board and “AVRISP mkII” is selected as the programmer. The COM port my change as the device is switched on and off, especially if the serial monitor is being used.
If you are using macOS and receive the error
“avrdude: ser_close(): can’t reset attributes for device: Device not configured”, click the Apple logo in the top left of your screen and click “About This Mac” to check which version of macOS your are running.

macOS Catalina version 10.15 and 10.15.1 contain a bug that prevents them from being able to communicate with the ATmega32u4. Update your macOS to the latest version to fix this issue.
Other Problems
If you run into any issues not listed here, please contact us with a screenshot of your error and we will get back to you as soon as possible.
All 3DoT Documentation is released under CC BY License. You may distribute, remix, adapt, and build upon our work, even commercially, as long as you credit you for the original creation.