Debugging Wire Library

By: Electronics and Control Engineer – Kevin Armentrout

Table of Contents

Debugging the Wire Library

Problems with the Wire Library and the 3DoT library

The wire library uses an inefficient system of transferring data via I2c which can be interrupted during serial communications. When this happens your 3DoT program, and any other Arduino program that is using both of these communication methods will freeze. This is a very difficult problem to experience and diagnose as it may be the most frustrating thing you can experience, an intermittent bug.

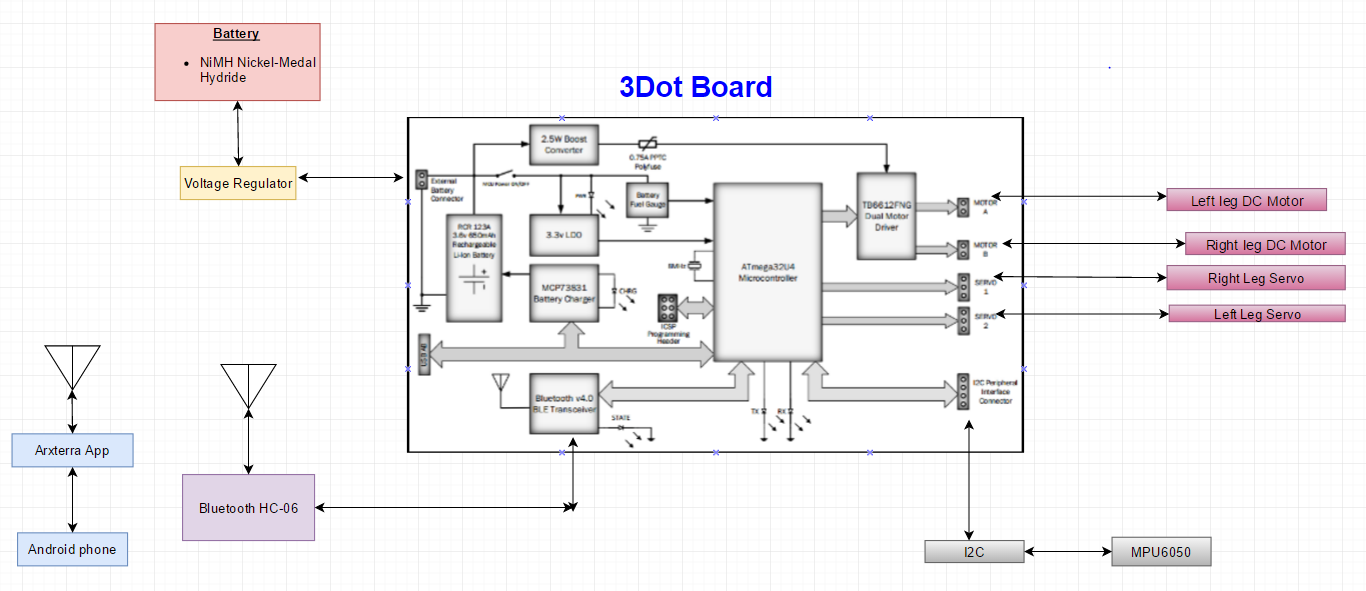
Fortunately, the solution is available, but it requires modifying the header files of any I2c implemented device to ensure that the libraries are compatible. I modified the MPU-6050 library to prevent this run-over and implemented the time-out that is available in the I2C Master library. This eliminated all bugs associated with I2C and serial communications that I had experienced. The I2C Master library is found here. Completion of this interface between the 3DoT library and the I2C library accomplishes the IMU action item.

Project Source Code Gyro Debugging:

/* Author = helscream (Omer Ikram ul Haq)
Last edit date = 2014-10-08
Website: http://hobbylogs.me.pn/?p=47
Location: Pakistan
Ver: 0.1 beta — Start
Ver: 0.2 beta — Bug fixed for calculating “angle_y_accel” and “angle_x_accel” in “Gyro_header.ino” file
*/

#ifndef gyro_accel.h
#define gyro_accel.h

extern int accel_x_OC, accel_y_OC, accel_z_OC, gyro_x_OC ,gyro_y_OC, gyro_z_OC; // offset variables
extern float temp_scalled,accel_x_scalled,accel_y_scalled,accel_z_scalled,gyro_x_scalled,gyro_y_scalled,gyro_z_scalled; //Scaled Data variables

void MPU6050_ReadData();
void MPU6050_ResetWake();
void MPU6050_SetDLPF(int BW);
void MPU6050_SetGains(int gyro,int accel);
void MPU6050_OffsetCal();

#endif


/* Author = helscream (Omer Ikram ul Haq)
Last edit date = 2014-10-08
Website: http://hobbylogs.me.pn/?p=47
Location: Pakistan
Ver: 0.1 beta — Start
Ver: 0.2 beta — Bug fixed for calculating “angle_y_accel” and “angle_x_accel” in “Gyro_header.ino” file
*/

#include <Arduino.h>
#include <Wire.h>
#include “gyro_accel.h”
#include “I2C.h”

// Defining the important registers

#define MPU6050_address 0x68

// —— SELF Test Trim Factors ———————-
#define MPU6050_self_test_x 13       // R/W
#define MPU6050_self_test_y 14       // R/W
#define MPU6050_self_test_z 15       // R/W
#define MPU6050_self_test_A 16       // R/W

// —– Sample Divider ——————————-
#define MPU6050_sample_div 25        // R/W
/*       Sample Divider Discription
Sample rate = 8/(1 + Sample rate divider) [kHz]  if DLPF is disabled
Sample rate = 1/(1 + Sample rate divider) [kHz]  if DLPF is enabled
*/

// —– Configration ———————————
#define MPU6050_config 26            // R/W
#define MPU6050_gyro_config 27       // R/W
#define MPU6050_accel_config 28      // R/W

// —– Data ———————————————
#define MPU6050_data_start 59
#define read_bytes 14

// —– Power Management ———————————
#define MPU6050_PWR1 107
#define MPU6050_PWR2 108

// —– Defining Constant ——————————–
#define g 9.81                       // Gravitational accelration

// Variables
int temp=0, accel_x=0, accel_y=0, accel_z=0, gyro_x=0, gyro_y=0, gyro_z=0; // Raw values varaibles
int accel_x_OC=0, accel_y_OC=0, accel_z_OC=0, gyro_x_OC=0 ,gyro_y_OC=0, gyro_z_OC=0; // offset variables
float temp_scalled,accel_x_scalled,accel_y_scalled,accel_z_scalled,gyro_x_scalled,gyro_y_scalled,gyro_z_scalled; //Scalled Data varaibles
float accel_scale_fact = 1, gyro_scale_fact = 1; // Scale factor variables

// **************************************************************************
//          Functions for MPU6050
// **************************************************************************

void MPU6050_ReadData(){

//Wire.beginTransmission(MPU6050_address);
//Wire.write(MPU6050_data_start);
//Wire.endTransmission();

I2c.write(MPU6050_address, MPU6050_data_start);

//int read_bytes = 14;

//Wire.requestFrom(MPU6050_address,read_bytes);
I2c.read(MPU6050_address,read_bytes);

if(I2c.available() == read_bytes){

accel_x = I2c.receive()<<8 | I2c.receive();
accel_y = I2c.receive()<<8 | I2c.receive();
accel_z = I2c.receive()<<8 | I2c.receive();

temp = I2c.receive()<<8 | I2c.receive();

gyro_x = I2c.receive()<<8 | I2c.receive();
gyro_y = I2c.receive()<<8 | I2c.receive();
gyro_z = I2c.receive()<<8 | I2c.receive();

}

/*   if(Wire.available() == read_bytes){

accel_x = Wire.read()<<8 | Wire.read();
accel_y = Wire.read()<<8 | Wire.read();
accel_z = Wire.read()<<8 | Wire.read();

temp = Wire.read()<<8 | Wire.read();

gyro_x = Wire.read()<<8 | Wire.read();
gyro_y = Wire.read()<<8 | Wire.read();
gyro_z = Wire.read()<<8 | Wire.read();

} */

accel_x_scalled = (float)(accel_x-accel_x_OC)*accel_scale_fact/1000; // divided by 1000 as the Scale factor is in milli units
accel_y_scalled = (float)(accel_y-accel_y_OC)*accel_scale_fact/1000;
accel_z_scalled = (float)(accel_z-accel_z_OC)*accel_scale_fact/1000;

gyro_x_scalled = (float)(gyro_x-gyro_x_OC)*gyro_scale_fact/1000;
gyro_y_scalled = (float)(gyro_y-gyro_y_OC)*gyro_scale_fact/1000;
gyro_z_scalled = ((float)(gyro_z-gyro_z_OC)*gyro_scale_fact/1000);

temp_scalled = (float)temp/340+36.53;
}

// ————————————————
//       Reset and wake up the MPU6050
// ————————————————
void MPU6050_ResetWake(){

Serial.println(“Resetting MPU6050 and waking it up…..”);
Wire.beginTransmission(MPU6050_address);
Wire.write(MPU6050_PWR1);
Wire.write(0b10000000);
Wire.endTransmission();

delay(100); // Waiting for the reset to complete

Wire.beginTransmission(MPU6050_address);
Wire.write(MPU6050_PWR1);

Wire.write(0b00000000);
Wire.endTransmission();

}

// ————————————————
//       Setting up the DLFP
// ————————————————

void MPU6050_SetDLPF(int BW)
{
if (BW < 0 || BW > 6){
BW = 0;
}
Wire.beginTransmission(MPU6050_address);
Wire.write(MPU6050_config); // Address to the configuration register
/*       config Discription —- x x 0 0 0 F2 F1 F0
I am only intrested in the Digital Low Pass Filter (DLPF)
F2 F1 F0    Bandwidth [Hz]
0  0  0
0  0  1      184
0  1  0      94
0  1  1      44
1  0  0      21
1  0  1      10
1  1  0      5
*/

Wire.write(BW);
Wire.endTransmission();
}

// ————————————————
//       Setting up the Accelrometer and Gyro Gains
// ————————————————

void MPU6050_SetGains(int gyro,int accel)
{
byte gyro_byte,accel_byte;

// Setting up Gyro
Wire.beginTransmission(MPU6050_address);
Wire.write(MPU6050_gyro_config); // Address to the configuration register
if (gyro==0)
{
gyro_scale_fact =(float)250*0.0305; // each data is of 16 bits that means, 250 is divided along 2^(15)-1 = 32767 so for milli degree/s 0.0305 = 1000/32767
gyro_byte = 0b00000000;
}else if (gyro == 1)
{
gyro_scale_fact = 500*0.0305; // each data is of 16 bits that means, 500 is divided along 2^(15)-1 = 32767 so for milli degree/s 0.0305 = 1000/32767
gyro_byte = 0b00001000;
}else if (gyro == 2)
{
gyro_scale_fact = 1000*0.0305;// each data is of 16 bits that means, 1000 is divided along 2^(15)-1 = 32767 so for milli degree/s 0.0305 = 1000/32767
gyro_byte = 0b00010000;
}else if (gyro == 3)
{
gyro_scale_fact = 2000*0.0305;  // each data is of 16 bits that means, 2000 is divided along 2^(15)-1 = 32767 so for milli degree/s 0.0305 = 1000/32767
gyro_byte = 0b00011000;
}else
{
gyro_scale_fact = 1;
}

Wire.write(gyro_byte);
Wire.endTransmission();
Serial.print(“The gyro scale is set to “);
Serial.print(gyro_scale_fact);
Serial.println(” milli Degree/s”);

// Setting up Accel
Wire.beginTransmission(MPU6050_address);
Wire.write(MPU6050_accel_config); // Address to the configuration register
if (accel==0)
{
accel_scale_fact =(float)2*g*0.0305; // each data is of 16 bits that means, 2g is divided along 2^(15)-1 = 32767 so for milli m/s^2 0.0305 = 1000/32767
accel_byte = 0b00000000;
}else if (accel == 1)
{
accel_scale_fact = 4*g*0.0305; // each data is of 16 bits that means, 4g is divided along 2^(15)-1 = 32767 so for milli m/s^2 0.0305 = 1000/32767
accel_byte = 0b00001000;
}else if (accel == 2)
{
accel_scale_fact = 8*g*0.0305;// each data is of 16 bits that means, 8g is divided along 2^(15)-1 = 32767 so for milli m/s^2 0.0305 = 1000/32767
accel_byte = 0b00010000;
}else if (accel == 3)
{
accel_scale_fact = 16*g*0.0305; // each data is of 16 bits that means, 16g is divided along 2^(15)-1 = 32767 so for milli m/s^2 0.0305 = 1000/32767
accel_byte = 0b00011000;
}else
{
accel_scale_fact = 1;
}

Wire.write(accel_byte);
Wire.endTransmission();
Serial.print(“The accel scale is set to “);
Serial.print(accel_scale_fact);
Serial.println(” milli m/s^2″);

}

// ————————————————
//       offset calibration
// ————————————————

void MPU6050_OffsetCal(){
Serial.println(“Calibrating gyroscope …. dont move the hardware ……….”);

int x=0,y=0,z=0,i;

MPU6050_ReadData();
MPU6050_ReadData();

// Gyro Offset Calculation
x=gyro_x;
y=gyro_y;
z=gyro_z;

for (i=1;i<=1000;i++){
MPU6050_ReadData();
x=(x+gyro_x)/2;
y=(y+gyro_y)/2;
z=(z+gyro_z)/2;
Serial.print(“.”);
}
Serial.println(“.”);
gyro_x_OC=x;
gyro_y_OC=y;
gyro_z_OC=z;

Serial.print(“gyro_x register offset = “);
Serial.println(x);

Serial.print(“gyro_y register offect = “);
Serial.println(y);

Serial.print(“gyro_z register offset = “);
Serial.println(z);

// Accel Offset Calculation
Serial.println(“Calibrating accelrometer …. dont move the hardware ……….”);
x=accel_x;
y=accel_y;
z=accel_z;

for (i=1;i<=1000;i++){
MPU6050_ReadData();
x=(x+accel_x)/2;
y=(y+accel_y)/2;
z=(z+accel_z)/2;
Serial.print(“.”);
}
Serial.println(“.”);
accel_x_OC=x;
accel_y_OC=y;
accel_z_OC=z-(float)g*1000/accel_scale_fact;

Serial.print(“Accel_x register offset = “);
Serial.println(x);

Serial.print(“Accel_y register offect = “);
Serial.println(y);

Serial.print(“Accel_z register offset = “);
Serial.println(z);

}

Telemetry Custom Commands

/*

* Telemetry and Custom Command Sample Arduino Code

*   Telemetry Example: Monitor an extended I/O register value and send to control panel display

*   Command Example:   Add Robot unique MOVE, BLINK, and SERVO commands

*/


#include <Robot3DoTBoard.h>     // instantiated as Robot3DoT at end of class header


#include <EEPROM.h>

//#include <Wire.h>               // I2C support

#include <Servo.h>

#include <I2C.h>


// IMU Variables


#include “gyro_accel.h”

// Defining constants

#define IMUdt 20                       // time difference in milli seconds

#define rad2degree 57.3              // Radian to degree conversion

#define Filter_gain 0.95             // e.g.  angle = angle_gyro*Filter_gain + angle_accel*(1-Filter_gain)


// *********************************************************************

//    Global IMU Variables

// *********************************************************************

unsigned long IMUt=0; // Time Variables

float angle_x_gyro=0,angle_y_gyro=0,angle_z_gyro=0,angle_x_accel=0,angle_y_accel=0,angle_z_accel=0,angle_x=0,angle_y=0,angle_z=0;

// *********************************************************************


// Motor Variables


int Motor1F = 5;

int Motor1R = 10;

int Motor1PWM = A9;

volatile int Motor1Speed = 0;


int Motor2F = 19;

int Motor2R = 20;

int Motor2PWM = 6;

volatile int Motor2Speed = 0;


volatile int Mot1State = 0;

volatile int Mot2State = 0;

long HoldTime = micros();


// Servo Variables


//


Robot3DoTBoard Robot3DoT;       // instantiated as Robot3DoT at end of class header


/*

* Command Example

* Step 1: Assign new command mnemonics ID numbers

*         In our example we will be adding 3 custom commands (2 new and one predefined).

*         The predefined MOVE command is intercepted and our robot unique code is to be

*         run instead. The MOVE command mnemonic ID 0x01 is already defined in Configure.h

*         The next two commands are new and assigned to the first two addresses in the

*         custom command address space 0x40 – 0x5F.

*/


#define DYNSTAT       0x41

const uint8_t CMD_LIST_SIZE = 2;   // we are adding 3 commands (MOVE, BLINK, SERVO)


/*

* Command Example

* Step 2: Register commands by linking IDs to their corresponding command handlers

*         In our example when the MOVE command is intercepted the moveHandler is to be run.

*         In a similar fashion the BLINK command calls the blinkHandler and SERVO the

*         servoHandler.

*/


void moveHandler (uint8_t cmd, uint8_t param[], uint8_t n);

void dynstatHandler (uint8_t cmd, uint8_t param[], uint8_t n);


Robot3DoTBoard::cmdFunc_t onCommand[CMD_LIST_SIZE] = {{MOVE,moveHandler}, {DYNSTAT,dynstatHandler}};


/*

* Telemetry Example

* Step 1: Instantiate packet

*         In our example we simulate a current sensor wired to MOTOR 2. MOTOR2_CURRENT_ID

*         is defined as 0x02 in Configure.h

*         To simulate the data stream coming from the sensor we will read ATmega32U4

*         Register OCR4D which controls the duty cycle of MOTOR 2.

*/

Packet motorPWM(MOTOR2_CURRENT_ID);  // initialize the packet properties to default values


void setup()

{

Serial.begin(38400);               // default = 115200


Robot3DoT.begin();


// Initialize Motor To Off


pinMode(Motor1F, OUTPUT);

pinMode(Motor1R, OUTPUT);

pinMode(Motor1PWM, OUTPUT);


pinMode(Motor2F, OUTPUT);

pinMode(Motor2R, OUTPUT);

pinMode(Motor2PWM, OUTPUT);


digitalWrite(Motor1F,LOW);

digitalWrite(Motor1R,LOW);


digitalWrite(Motor2F,LOW);

digitalWrite(Motor2R,LOW);


// Initialize IMU


Serial.begin(9600);

I2c.begin();

I2c.timeOut(100);

MPU6050_ResetWake();

MPU6050_SetGains(0,1);// Setting the lows scale

MPU6050_SetDLPF(0); // Setting the DLPF to inf Bandwidth for calibration

MPU6050_OffsetCal();

MPU6050_SetDLPF(6); // Setting the DLPF to lowest Bandwidth

IMUt=millis();


/*

* Command Example

* Step 3: Tell 3DoT Robot software about new commands

*

*

*/


Robot3DoT.setOnCommand(onCommand, CMD_LIST_SIZE);


/* Telemetry Example

* Step 2: Modify default values assigned to internal properties as needed.

*         Before a packet is created and sent, it is qualified. Specifically,

*         the data in a packet must change by some amount from the previous

*         packet and may not be sent with at a period less than some value.

*         In most cases you can leave these values at their default values.

*/

delay(1000);

}


void loop()

{

Robot3DoT.loop();

// Set Motor State to the Telemetry Read Value


if (Mot1State == 1){ digitalWrite(Motor1F,HIGH);

digitalWrite(Motor1R,LOW);

} else if (Mot1State == 2) { digitalWrite(Motor1F,LOW);

digitalWrite(Motor1R,HIGH);

}                                 else {digitalWrite(Motor1F,LOW);

digitalWrite(Motor1R,LOW);}


if (Mot2State == 1){  digitalWrite(Motor2F,HIGH);

digitalWrite(Motor2R,LOW);

} else if (Mot2State == 2) { digitalWrite(Motor2F,LOW);

digitalWrite(Motor2R,HIGH);

}                                 else {digitalWrite(Motor2F,LOW);

digitalWrite(Motor2R,LOW);}


analogWrite(Motor1PWM, Motor1Speed);

analogWrite(Motor2PWM, Motor2Speed);

if (micros() – HoldTime > 500000){

HoldTime = micros();

//  Serial.write(“”);

//  Serial.write(Mot1State);

//  Serial.write(Motor1Speed);

//  Serial.write(Mot2State);

//  Serial.write(Motor2Speed);

//  Serial.write(“”);


Serial.print(angle_x);

Serial.print(“\t”);

Serial.print(angle_y);

Serial.print(“\t”);

Serial.print(angle_z);

Serial.println();

}

// Read IMU Settings


//if (millis() – IMUt > IMUdt){

IMU();

//}


// Set Servos to IMU Setting


}


/*

* Command Example

* Step 4: Write command handlers

*/


/*

* User Defined Command BLINK (0x40) Example

* A5 01 40 E4

*/


/*

* Override MOVE (0x01) Command Example

* A5 05 01 01 80 01 80 A1

*/

void moveHandler (uint8_t cmd, uint8_t param[], uint8_t n)

{

Mot1State = param[0];

Mot2State = param[2];


// Configure Inputs and Output


Motor1Speed = param[1];

Motor2Speed = param[3];

Serial.write(cmd);             // move command = 0x01

Serial.write(n);               // number of param = 4

for (int i=0;i<n;i++)          // param = 01 80 01 80

{

Serial.write (param[i]);

}


}                                // moveHandler


/*

* User Defined Command SERVO (0x41) Example

* Rotate servo to 90 degrees

* A5 02 41 90 76

*/

void dynstatHandler (uint8_t cmd, uint8_t param[], uint8_t n)

{

Serial.write(cmd);             // servo command = 0x41

Serial.write(n);               // number of param = 1

for (int i=0;i<n;i++)          // param = 90 degrees

{

Serial.write (param[i]);

}


}  // servoHandler


void IMU(){

IMUt=millis();


MPU6050_ReadData();


angle_x_gyro = (gyro_x_scalled*((float)IMUdt/1000)+angle_x);

angle_y_gyro = (gyro_y_scalled*((float)IMUdt/1000)+angle_y);

angle_z_gyro = (gyro_z_scalled*((float)IMUdt/1000)+angle_z);


angle_z_accel = atan(accel_z_scalled/(sqrt(accel_y_scalled*accel_y_scalled+accel_x_scalled*accel_x_scalled)))*(float)rad2degree;

angle_y_accel = -atan(accel_y_scalled/(sqrt(accel_y_scalled*accel_y_scalled+accel_z_scalled*accel_z_scalled)))*(float)rad2degree;

angle_x_accel = atan(accel_x_scalled/(sqrt(accel_x_scalled*accel_x_scalled+accel_z_scalled*accel_z_scalled)))*(float)rad2degree;


angle_x = Filter_gain*angle_x_gyro+(1-Filter_gain)*angle_x_accel;

angle_y = Filter_gain*angle_y_gyro+(1-Filter_gain)*angle_y_accel;

angle_z = Filter_gain*angle_z_gyro+(1-Filter_gain)*angle_z_accel;


//  Serial.print(gyro_x_scalled);

//  Serial.print(“\t”);

//  Serial.print(gyro_y_scalled);

//  Serial.print(“\t”);

//  Serial.print(gyro_z_scalled);

//  Serial.print(“\t”);

//

//

//  Serial.print(accel_x_scalled);

//  Serial.print(“\t”);

//  Serial.print(accel_y_scalled);

//  Serial.print(“\t”);

//  Serial.print(accel_z_scalled);

//  Serial.print(“\t”);

//

//  Serial.print(angle_x_gyro);

//  Serial.print(“\t”);

//  Serial.print(angle_y_gyro);

//  Serial.print(“\t”);

//  Serial.print(angle_z_gyro);

//  Serial.print(“\t”);

//

//  Serial.print(angle_x_accel);

//  Serial.print(“\t”);

//  Serial.print(angle_y_accel);

//  Serial.print(“\t”);

//  Serial.print(angle_z_accel);

//  Serial.print(“\t”);


//  Serial.print(angle_x);

//  Serial.print(“\t”);

//  Serial.print(angle_y);

//  Serial.print(“\t”);

//  Serial.print(angle_z);

//  Serial.println();


//  Serial.println(((float)(millis()-IMUt)/(float)IMUdt)*100);

}


Modified gyro_accel.cpp:

/* Author = helscream (Omer Ikram ul Haq)

Last edit date = 2014-10-08

Website: http://hobbylogs.me.pn/?p=47

Location: Pakistan

Ver: 0.1 beta — Start

Ver: 0.2 beta — Bug fixed for calculating “angle_y_accel” and “angle_x_accel” in “Gyro_header.ino” file

*/


#include <Arduino.h>

#include <Wire.h>

#include “gyro_accel.h”

#include “I2C.h”


// Defining the important registers


#define MPU6050_address 0x68


// —— SELF Test Trim Factors ———————-

#define MPU6050_self_test_x 13       // R/W

#define MPU6050_self_test_y 14       // R/W

#define MPU6050_self_test_z 15       // R/W

#define MPU6050_self_test_A 16       // R/W


// —– Sample Divider ——————————-

#define MPU6050_sample_div 25        // R/W

/*       Sample Divider Discription

Sample rate = 8/(1 + Sample rate divider) [kHz]  if DLPF is disabled

Sample rate = 1/(1 + Sample rate divider) [kHz]  if DLPF is enabled

*/


// —– Configration ———————————

#define MPU6050_config 26            // R/W

#define MPU6050_gyro_config 27       // R/W

#define MPU6050_accel_config 28      // R/W


// —– Data ———————————————

#define MPU6050_data_start 59

#define read_bytes 14


// —– Power Management ———————————

#define MPU6050_PWR1 107

#define MPU6050_PWR2 108


// —– Defining Constant ——————————–

#define g 9.81                       // Gravitational accelration


// Variables

int temp=0, accel_x=0, accel_y=0, accel_z=0, gyro_x=0, gyro_y=0, gyro_z=0; // Raw values varaibles

int accel_x_OC=0, accel_y_OC=0, accel_z_OC=0, gyro_x_OC=0 ,gyro_y_OC=0, gyro_z_OC=0; // offset variables

float temp_scalled,accel_x_scalled,accel_y_scalled,accel_z_scalled,gyro_x_scalled,gyro_y_scalled,gyro_z_scalled; //Scalled Data varaibles

float accel_scale_fact = 1, gyro_scale_fact = 1; // Scale factor variables


// **************************************************************************

//          Functions for MPU6050

// **************************************************************************


void MPU6050_ReadData(){


//Wire.beginTransmission(MPU6050_address);

//Wire.write(MPU6050_data_start);

//Wire.endTransmission();


I2c.write(MPU6050_address, MPU6050_data_start);


//int read_bytes = 14;


//Wire.requestFrom(MPU6050_address,read_bytes);

I2c.read(MPU6050_address,read_bytes);


if(I2c.available() == read_bytes){


accel_x = I2c.receive()<<8 | I2c.receive();

accel_y = I2c.receive()<<8 | I2c.receive();

accel_z = I2c.receive()<<8 | I2c.receive();


temp = I2c.receive()<<8 | I2c.receive();


gyro_x = I2c.receive()<<8 | I2c.receive();

gyro_y = I2c.receive()<<8 | I2c.receive();

gyro_z = I2c.receive()<<8 | I2c.receive();


}


/*   if(Wire.available() == read_bytes){


accel_x = Wire.read()<<8 | Wire.read();

accel_y = Wire.read()<<8 | Wire.read();

accel_z = Wire.read()<<8 | Wire.read();


temp = Wire.read()<<8 | Wire.read();


gyro_x = Wire.read()<<8 | Wire.read();

gyro_y = Wire.read()<<8 | Wire.read();

gyro_z = Wire.read()<<8 | Wire.read();


} */


accel_x_scalled = (float)(accel_x-accel_x_OC)*accel_scale_fact/1000; // divided by 1000 as the Scale factor is in milli units

accel_y_scalled = (float)(accel_y-accel_y_OC)*accel_scale_fact/1000;

accel_z_scalled = (float)(accel_z-accel_z_OC)*accel_scale_fact/1000;


gyro_x_scalled = (float)(gyro_x-gyro_x_OC)*gyro_scale_fact/1000;

gyro_y_scalled = (float)(gyro_y-gyro_y_OC)*gyro_scale_fact/1000;

gyro_z_scalled = ((float)(gyro_z-gyro_z_OC)*gyro_scale_fact/1000);


temp_scalled = (float)temp/340+36.53;

}


// ————————————————

//       Reset and wake up the MPU6050

// ————————————————

void MPU6050_ResetWake(){


Serial.println(“Resetting MPU6050 and waking it up…..”);

Wire.beginTransmission(MPU6050_address);

Wire.write(MPU6050_PWR1);

Wire.write(0b10000000);

Wire.endTransmission();


delay(100); // Waiting for the reset to complete


Wire.beginTransmission(MPU6050_address);

Wire.write(MPU6050_PWR1);


Wire.write(0b00000000);

Wire.endTransmission();


}


// ————————————————

//       Setting up the DLFP

// ————————————————


void MPU6050_SetDLPF(int BW)

{

if (BW < 0 || BW > 6){

BW = 0;

}

Wire.beginTransmission(MPU6050_address);

Wire.write(MPU6050_config); // Address to the configuration register

/*       config Discription —- x x 0 0 0 F2 F1 F0

I am only intrested in the Digital Low Pass Filter (DLPF)

F2 F1 F0    Bandwidth [Hz]

0  0  0

0  0  1      184

0  1  0      94

0  1  1      44

1  0  0      21

1  0  1      10

1  1  0      5

*/


Wire.write(BW);

Wire.endTransmission();

}


// ————————————————

//       Setting up the Accelrometer and Gyro Gains

// ————————————————


void MPU6050_SetGains(int gyro,int accel)

{

byte gyro_byte,accel_byte;


// Setting up Gyro

Wire.beginTransmission(MPU6050_address);

Wire.write(MPU6050_gyro_config); // Address to the configuration register

if (gyro==0)

{

gyro_scale_fact =(float)250*0.0305; // each data is of 16 bits that means, 250 is divided along 2^(15)-1 = 32767 so for milli degree/s 0.0305 = 1000/32767

gyro_byte = 0b00000000;

}else if (gyro == 1)

{

gyro_scale_fact = 500*0.0305; // each data is of 16 bits that means, 500 is divided along 2^(15)-1 = 32767 so for milli degree/s 0.0305 = 1000/32767

gyro_byte = 0b00001000;

}else if (gyro == 2)

{

gyro_scale_fact = 1000*0.0305;// each data is of 16 bits that means, 1000 is divided along 2^(15)-1 = 32767 so for milli degree/s 0.0305 = 1000/32767

gyro_byte = 0b00010000;

}else if (gyro == 3)

{

gyro_scale_fact = 2000*0.0305;  // each data is of 16 bits that means, 2000 is divided along 2^(15)-1 = 32767 so for milli degree/s 0.0305 = 1000/32767

gyro_byte = 0b00011000;

}else

{

gyro_scale_fact = 1;

}


Wire.write(gyro_byte);

Wire.endTransmission();

Serial.print(“The gyro scale is set to “);

Serial.print(gyro_scale_fact);

Serial.println(” milli Degree/s”);


// Setting up Accel

Wire.beginTransmission(MPU6050_address);

Wire.write(MPU6050_accel_config); // Address to the configuration register

if (accel==0)

{

accel_scale_fact =(float)2*g*0.0305; // each data is of 16 bits that means, 2g is divided along 2^(15)-1 = 32767 so for milli m/s^2 0.0305 = 1000/32767

accel_byte = 0b00000000;

}else if (accel == 1)

{

accel_scale_fact = 4*g*0.0305; // each data is of 16 bits that means, 4g is divided along 2^(15)-1 = 32767 so for milli m/s^2 0.0305 = 1000/32767

accel_byte = 0b00001000;

}else if (accel == 2)

{

accel_scale_fact = 8*g*0.0305;// each data is of 16 bits that means, 8g is divided along 2^(15)-1 = 32767 so for milli m/s^2 0.0305 = 1000/32767

accel_byte = 0b00010000;

}else if (accel == 3)

{

accel_scale_fact = 16*g*0.0305; // each data is of 16 bits that means, 16g is divided along 2^(15)-1 = 32767 so for milli m/s^2 0.0305 = 1000/32767

accel_byte = 0b00011000;

}else

{

accel_scale_fact = 1;

}


Wire.write(accel_byte);

Wire.endTransmission();

Serial.print(“The accel scale is set to “);

Serial.print(accel_scale_fact);

Serial.println(” milli m/s^2″);


}


// ————————————————

//       offset calibration

// ————————————————


void MPU6050_OffsetCal(){

Serial.println(“Calibrating gyroscope …. dont move the hardware ……….”);


int x=0,y=0,z=0,i;


MPU6050_ReadData();

MPU6050_ReadData();


// Gyro Offset Calculation

x=gyro_x;

y=gyro_y;

z=gyro_z;


for (i=1;i<=1000;i++){

MPU6050_ReadData();

x=(x+gyro_x)/2;

y=(y+gyro_y)/2;

z=(z+gyro_z)/2;

Serial.print(“.”);

}

Serial.println(“.”);

gyro_x_OC=x;

gyro_y_OC=y;

gyro_z_OC=z;


Serial.print(“gyro_x register offset = “);

Serial.println(x);


Serial.print(“gyro_y register offect = “);

Serial.println(y);


Serial.print(“gyro_z register offset = “);

Serial.println(z);


// Accel Offset Calculation

Serial.println(“Calibrating accelrometer …. dont move the hardware ……….”);

x=accel_x;

y=accel_y;

z=accel_z;


for (i=1;i<=1000;i++){

MPU6050_ReadData();

x=(x+accel_x)/2;

y=(y+accel_y)/2;

z=(z+accel_z)/2;

Serial.print(“.”);

}

Serial.println(“.”);

accel_x_OC=x;

accel_y_OC=y;

accel_z_OC=z-(float)g*1000/accel_scale_fact;


Serial.print(“Accel_x register offset = “);

Serial.println(x);


Serial.print(“Accel_y register offect = “);

Serial.println(y);


Serial.print(“Accel_z register offset = “);

Serial.println(z);


}

3DoT and IMU

By: Electronics and Control Engineer – Kevin Armentrout

Table of Contents

Testing 3DoT Libraries and 3Dot Board

3DoT Board Bypass Testing

The purpose behind 3DoT board bypass was to allow for the connection of 3.3v Motors to the motor header. The bypass route identified was on the 3DoT board’s jumper header located on the back of the board.

3dot-board-cut-min

The header was bypassed as shown in the picture above, and the output voltage with from the polyfuse on the 3DoT board to ground was 3.8-4.2V, consistent with the battery voltage.

The 3Dot libraries are very useful for telecommunications between serial (Bluetooth) and the interfacing Arduino. The 3DoT board I would have like to test the libraries on was not fully functional, so I opted to recreate the dual motor driver on the 3DoT board using a L293D and a Pro Micro. For my testing I used the command handler for the MOVE command, which was used to decode the move signals and output a result to the motors. The move handler decodes the MOVE command to the three following values:

  • 0x00 – Stop the Motor
  • 0x01 – Drive the Motor in the forward direction
  • 0x02 – Drive the Motor in the reverse direction

From there, the PWM component of the signal is used as a direct drive to the motor in the 0-255 analogWrite format. The test setup is shown below.

breadboard-min

Coolterm was utilized to simulate Bluetooth serial commands coming into the Arduino. The following Commands were tested satisfactory from the handler.

  • A5 05 01 01 ff 01 ff A1 – A full Forward Drive of both motors
  • A5 05 01 01 ff 02 ff A2 – A Forward and Reverse offset of both motors
  • A5 05 01 00 ff 00 ff A1 – A full stop of both motors
  • A5 05 01 01 80 00 80 A0 – A stop of one motor and a half drive of the other motor

Implementation of this scheme will satisfy the project requirements for biped motion and static movement.

IMU Testing

MPU – 9150 Testing

Following the 3DoT library testing, IMU testing was performed using code that was utilizing the HPU-6050 IMU and the wire interface. The IMU produces good results when the IMU is not stationary too long to cause drift due to sensor integration. This process is explained here. The IMU tested used 40% of the 32% of the Arduino’s program memory, so the portability between platforms should be easily established.

This testing accomplishes the requirements of the project for X,Y, and Z angles to the hundredth of a degree.

IMU and 3DoT Combined Testing

The combination testing of the 3DoT library and the IMU was not as successful as it would be desired. There appears to be a conflict between these two sets of code that do not allow them to be used together. Further testing needs to be done to see how to accomplish a fusion of these two sensors.

Source Code

3DoT Code

#include <Robot3DoTBoard.h>     // instantiated as Robot3DoT at end of class header


#include <EEPROM.h>

#include <Wire.h>               // I2C support

#include <Servo.h>


// Motor Variables


int Motor1F = 5;

int Motor1R = 10;

int Motor1PWM = A9;


int Motor2F = 19;

int Motor2R = 20;

int Motor2PWM = 6;


int Mot1State = 0;

int Mot2State = 0;


// Servo Variables


//


Robot3DoTBoard Robot3DoT;       // instantiated as Robot3DoT at end of class header


/*

* Command Example

* Step 1: Assign new command mnemonics ID numbers

*         In our example we will be adding 3 custom commands (2 new and one predefined).

*         The predefined MOVE command is intercepted and our robot unique code is to be

*         run instead. The MOVE command mnemonic ID 0x01 is already defined in Configure.h

*         The next two commands are new and assigned to the first two addresses in the

*         custom command address space 0x40 – 0x5F.

*/


#define DYNSTAT       0x41

const uint8_t CMD_LIST_SIZE = 2;   // we are adding 3 commands (MOVE, BLINK, SERVO)


/*

* Command Example

* Step 2: Register commands by linking IDs to their corresponding command handlers

*         In our example when the MOVE command is intercepted the moveHandler is to be run.

*         In a similar fashion the BLINK command calls the blinkHandler and SERVO the

*         servoHandler.

*/


void moveHandler (uint8_t cmd, uint8_t param[], uint8_t n);

void dynstatHandler (uint8_t cmd, uint8_t param[], uint8_t n);


Robot3DoTBoard::cmdFunc_t onCommand[CMD_LIST_SIZE] = {{MOVE,moveHandler}, {DYNSTAT,dynstatHandler}};


/*

* Telemetry Example

* Step 1: Instantiate packet

*         In our example we simulate a current sensor wired to MOTOR 2. MOTOR2_CURRENT_ID

*         is defined as 0x02 in Configure.h

*         To simulate the data stream coming from the sensor we will read ATmega32U4

*         Register OCR4D which controls the duty cycle of MOTOR 2.

*/

Packet motorPWM(MOTOR2_CURRENT_ID);  // initialize the packet properties to default values


void setup()

{

Serial.begin(19200);               // default = 115200

Robot3DoT.begin();


// Initialize Motor To Off


pinMode(Motor1F, OUTPUT);

pinMode(Motor1R, OUTPUT);

pinMode(Motor1PWM, OUTPUT);


pinMode(Motor2F, OUTPUT);

pinMode(Motor2R, OUTPUT);

pinMode(Motor2PWM, OUTPUT);


digitalWrite(Motor1F,LOW);

digitalWrite(Motor1R,LOW);


digitalWrite(Motor2F,LOW);

digitalWrite(Motor2R,LOW);

Robot3DoT.setOnCommand(onCommand, CMD_LIST_SIZE);


/* Telemetry Example

* Step 2: Modify default values assigned to internal properties as needed.

*         Before a packet is created and sent, it is qualified. Specifically,

*         the data in a packet must change by some amount from the previous

*         packet and may not be sent with at a period less than some value.

*         In most cases you can leave these values at their default values.

*/


}

void loop()

{

Robot3DoT.loop();


// Set Motor State to the Telemetry Read Value


if (Mot1State == 1){ digitalWrite(Motor1F,HIGH);

digitalWrite(Motor1R,LOW);

} else if (Mot1State == 2) { digitalWrite(Motor1F,LOW);

digitalWrite(Motor1R,HIGH);

}                                 else {digitalWrite(Motor1F,LOW);

digitalWrite(Motor1R,LOW);}


if (Mot2State == 1){  digitalWrite(Motor2F,HIGH);

digitalWrite(Motor2R,LOW);

} else if (Mot2State == 2) { digitalWrite(Motor2F,LOW);

digitalWrite(Motor2R,HIGH);

}                                 else {digitalWrite(Motor2F,LOW);

digitalWrite(Motor2R,LOW);}


// Read IMU Settings


// Set Servos to IMU Setting


}


/*

* Command Example

* Step 4: Write command handlers

*/


/*

* User Defined Command BLINK (0x40) Example

* A5 01 40 E4

*/


/*

* Override MOVE (0x01) Command Example

* A5 05 01 01 80 01 80 A1

*/

void moveHandler (uint8_t cmd, uint8_t param[], uint8_t n)

{

Serial.write(cmd);             // move command = 0x01

Serial.write(n);               // number of param = 4

for (int i=0;i<n;i++)          // param = 01 80 01 80

{

Serial.write (param[i]);

}


Mot1State = param[0];

Mot2State = param[2];


// Configure Inputs and Outputs


if (param[0] == 1){ digitalWrite(Motor1F,HIGH);

digitalWrite(Motor1R,LOW);

Serial.println(“Left Leg Forward”);

} else if (param[0] == 2) { digitalWrite(Motor1F,LOW);

digitalWrite(Motor1R,HIGH);

Serial.println(“Left Leg Backwards”);

}                                 else {digitalWrite(Motor1F,LOW);

digitalWrite(Motor1R,LOW);

Serial.println(“Left Leg Stop”);}


if (param[2] == 1){  digitalWrite(Motor2F,HIGH);

digitalWrite(Motor2R,LOW);

Serial.println(“Right Leg Forward”);

} else if (param[2] == 2) { digitalWrite(Motor2F,LOW);

digitalWrite(Motor2R,HIGH);

Serial.println(“Right Leg Backwards”);

}                                 else {digitalWrite(Motor2F,LOW);

digitalWrite(Motor2R,LOW);

Serial.println(“Right Leg Stop”);}


analogWrite(Motor1PWM,param[1]);

analogWrite(Motor2PWM,param[3]);


}                                // moveHandler


/*

* User Defined Command SERVO (0x41) Example

* Rotate servo to 90 degrees

* A5 02 41 90 76

*/

void dynstatHandler (uint8_t cmd, uint8_t param[], uint8_t n)

{

Serial.write(cmd);             // servo command = 0x41

Serial.write(n);               // number of param = 1

for (int i=0;i<n;i++)          // param = 90 degrees

{

Serial.write (param[i]);

}


}  // servoHandler

Telemetry and Custom Command Source Code

/*

* Telemetry and Custom Command Sample Arduino Code

*   Telemetry Example: Monitor an extended I/O register value and send to control panel display

*   Command Example:   Add Robot unique MOVE, BLINK, and SERVO commands

*/


#include <Robot3DoTBoard.h>     // instantiated as Robot3DoT at end of class header


#include <EEPROM.h>

#include <Wire.h>               // I2C support

#include <Servo.h>


// IMU Variables


long HoldTime = micros();


#define MPU6050_AUX_VDDIO          0x01   // R/W

#define MPU6050_SMPLRT_DIV         0x19   // R/W

#define MPU6050_CONFIG             0x1A   // R/W

#define MPU6050_GYRO_CONFIG        0x1B   // R/W

#define MPU6050_ACCEL_CONFIG       0x1C   // R/W

#define MPU6050_FF_THR             0x1D   // R/W

#define MPU6050_FF_DUR             0x1E   // R/W

#define MPU6050_MOT_THR            0x1F   // R/W

#define MPU6050_MOT_DUR            0x20   // R/W

#define MPU6050_ZRMOT_THR          0x21   // R/W

#define MPU6050_ZRMOT_DUR          0x22   // R/W

#define MPU6050_FIFO_EN            0x23   // R/W

#define MPU6050_I2C_MST_CTRL       0x24   // R/W

#define MPU6050_I2C_SLV0_ADDR      0x25   // R/W

#define MPU6050_I2C_SLV0_REG       0x26   // R/W

#define MPU6050_I2C_SLV0_CTRL      0x27   // R/W

#define MPU6050_I2C_SLV1_ADDR      0x28   // R/W

#define MPU6050_I2C_SLV1_REG       0x29   // R/W

#define MPU6050_I2C_SLV1_CTRL      0x2A   // R/W

#define MPU6050_I2C_SLV2_ADDR      0x2B   // R/W

#define MPU6050_I2C_SLV2_REG       0x2C   // R/W

#define MPU6050_I2C_SLV2_CTRL      0x2D   // R/W

#define MPU6050_I2C_SLV3_ADDR      0x2E   // R/W

#define MPU6050_I2C_SLV3_REG       0x2F   // R/W

#define MPU6050_I2C_SLV3_CTRL      0x30   // R/W

#define MPU6050_I2C_SLV4_ADDR      0x31   // R/W

#define MPU6050_I2C_SLV4_REG       0x32   // R/W

#define MPU6050_I2C_SLV4_DO        0x33   // R/W

#define MPU6050_I2C_SLV4_CTRL      0x34   // R/W

#define MPU6050_I2C_SLV4_DI        0x35   // R

#define MPU6050_I2C_MST_STATUS     0x36   // R

#define MPU6050_INT_PIN_CFG        0x37   // R/W

#define MPU6050_INT_ENABLE         0x38   // R/W

#define MPU6050_INT_STATUS         0x3A   // R

#define MPU6050_ACCEL_XOUT_H       0x3B   // R

#define MPU6050_ACCEL_XOUT_L       0x3C   // R

#define MPU6050_ACCEL_YOUT_H       0x3D   // R

#define MPU6050_ACCEL_YOUT_L       0x3E   // R

#define MPU6050_ACCEL_ZOUT_H       0x3F   // R

#define MPU6050_ACCEL_ZOUT_L       0x40   // R

#define MPU6050_TEMP_OUT_H         0x41   // R

#define MPU6050_TEMP_OUT_L         0x42   // R

#define MPU6050_GYRO_XOUT_H        0x43   // R

#define MPU6050_GYRO_XOUT_L        0x44   // R

#define MPU6050_GYRO_YOUT_H        0x45   // R

#define MPU6050_GYRO_YOUT_L        0x46   // R

#define MPU6050_GYRO_ZOUT_H        0x47   // R

#define MPU6050_GYRO_ZOUT_L        0x48   // R

#define MPU6050_EXT_SENS_DATA_00   0x49   // R

#define MPU6050_EXT_SENS_DATA_01   0x4A   // R

#define MPU6050_EXT_SENS_DATA_02   0x4B   // R

#define MPU6050_EXT_SENS_DATA_03   0x4C   // R

#define MPU6050_EXT_SENS_DATA_04   0x4D   // R

#define MPU6050_EXT_SENS_DATA_05   0x4E   // R

#define MPU6050_EXT_SENS_DATA_06   0x4F   // R

#define MPU6050_EXT_SENS_DATA_07   0x50   // R

#define MPU6050_EXT_SENS_DATA_08   0x51   // R

#define MPU6050_EXT_SENS_DATA_09   0x52   // R

#define MPU6050_EXT_SENS_DATA_10   0x53   // R

#define MPU6050_EXT_SENS_DATA_11   0x54   // R

#define MPU6050_EXT_SENS_DATA_12   0x55   // R

#define MPU6050_EXT_SENS_DATA_13   0x56   // R

#define MPU6050_EXT_SENS_DATA_14   0x57   // R

#define MPU6050_EXT_SENS_DATA_15   0x58   // R

#define MPU6050_EXT_SENS_DATA_16   0x59   // R

#define MPU6050_EXT_SENS_DATA_17   0x5A   // R

#define MPU6050_EXT_SENS_DATA_18   0x5B   // R

#define MPU6050_EXT_SENS_DATA_19   0x5C   // R

#define MPU6050_EXT_SENS_DATA_20   0x5D   // R

#define MPU6050_EXT_SENS_DATA_21   0x5E   // R

#define MPU6050_EXT_SENS_DATA_22   0x5F   // R

#define MPU6050_EXT_SENS_DATA_23   0x60   // R

#define MPU6050_MOT_DETECT_STATUS  0x61   // R

#define MPU6050_I2C_SLV0_DO        0x63   // R/W

#define MPU6050_I2C_SLV1_DO        0x64   // R/W

#define MPU6050_I2C_SLV2_DO        0x65   // R/W

#define MPU6050_I2C_SLV3_DO        0x66   // R/W

#define MPU6050_I2C_MST_DELAY_CTRL 0x67   // R/W

#define MPU6050_SIGNAL_PATH_RESET  0x68   // R/W

#define MPU6050_MOT_DETECT_CTRL    0x69   // R/W

#define MPU6050_USER_CTRL          0x6A   // R/W

#define MPU6050_PWR_MGMT_1         0x6B   // R/W

#define MPU6050_PWR_MGMT_2         0x6C   // R/W

#define MPU6050_FIFO_COUNTH        0x72   // R/W

#define MPU6050_FIFO_COUNTL        0x73   // R/W

#define MPU6050_FIFO_R_W           0x74   // R/W

#define MPU6050_WHO_AM_I           0x75   // R


// Defines for the bits, to be able to change

// between bit number and binary definition.

// By using the bit number, programming the sensor

// is like programming the AVR microcontroller.

// But instead of using “(1<<X)”, or “_BV(X)”,

// the Arduino “bit(X)” is used.

#define MPU6050_D0 0

#define MPU6050_D1 1

#define MPU6050_D2 2

#define MPU6050_D3 3

#define MPU6050_D4 4

#define MPU6050_D5 5

#define MPU6050_D6 6

#define MPU6050_D7 7


// AUX_VDDIO Register

#define MPU6050_AUX_VDDIO MPU6050_D7  // I2C high: 1=VDD, 0=VLOGIC


// CONFIG Register

// DLPF is Digital Low Pass Filter for both gyro and accelerometers.

// These are the names for the bits.

// Use these only with the bit() macro.

#define MPU6050_DLPF_CFG0     MPU6050_D0

#define MPU6050_DLPF_CFG1     MPU6050_D1

#define MPU6050_DLPF_CFG2     MPU6050_D2

#define MPU6050_EXT_SYNC_SET0 MPU6050_D3

#define MPU6050_EXT_SYNC_SET1 MPU6050_D4

#define MPU6050_EXT_SYNC_SET2 MPU6050_D5


// Combined definitions for the EXT_SYNC_SET values

#define MPU6050_EXT_SYNC_SET_0 (0)

#define MPU6050_EXT_SYNC_SET_1 (bit(MPU6050_EXT_SYNC_SET0))

#define MPU6050_EXT_SYNC_SET_2 (bit(MPU6050_EXT_SYNC_SET1))

#define MPU6050_EXT_SYNC_SET_3 (bit(MPU6050_EXT_SYNC_SET1)|bit(MPU6050_EXT_SYNC_SET0))

#define MPU6050_EXT_SYNC_SET_4 (bit(MPU6050_EXT_SYNC_SET2))

#define MPU6050_EXT_SYNC_SET_5 (bit(MPU6050_EXT_SYNC_SET2)|bit(MPU6050_EXT_SYNC_SET0))

#define MPU6050_EXT_SYNC_SET_6 (bit(MPU6050_EXT_SYNC_SET2)|bit(MPU6050_EXT_SYNC_SET1))

#define MPU6050_EXT_SYNC_SET_7 (bit(MPU6050_EXT_SYNC_SET2)|bit(MPU6050_EXT_SYNC_SET1)|bit(MPU6050_EXT_SYNC_SET0))


// Alternative names for the combined definitions.

#define MPU6050_EXT_SYNC_DISABLED     MPU6050_EXT_SYNC_SET_0

#define MPU6050_EXT_SYNC_TEMP_OUT_L   MPU6050_EXT_SYNC_SET_1

#define MPU6050_EXT_SYNC_GYRO_XOUT_L  MPU6050_EXT_SYNC_SET_2

#define MPU6050_EXT_SYNC_GYRO_YOUT_L  MPU6050_EXT_SYNC_SET_3

#define MPU6050_EXT_SYNC_GYRO_ZOUT_L  MPU6050_EXT_SYNC_SET_4

#define MPU6050_EXT_SYNC_ACCEL_XOUT_L MPU6050_EXT_SYNC_SET_5

#define MPU6050_EXT_SYNC_ACCEL_YOUT_L MPU6050_EXT_SYNC_SET_6

#define MPU6050_EXT_SYNC_ACCEL_ZOUT_L MPU6050_EXT_SYNC_SET_7


// Combined definitions for the DLPF_CFG values

#define MPU6050_DLPF_CFG_0 (0)

#define MPU6050_DLPF_CFG_1 (bit(MPU6050_DLPF_CFG0))

#define MPU6050_DLPF_CFG_2 (bit(MPU6050_DLPF_CFG1))

#define MPU6050_DLPF_CFG_3 (bit(MPU6050_DLPF_CFG1)|bit(MPU6050_DLPF_CFG0))

#define MPU6050_DLPF_CFG_4 (bit(MPU6050_DLPF_CFG2))

#define MPU6050_DLPF_CFG_5 (bit(MPU6050_DLPF_CFG2)|bit(MPU6050_DLPF_CFG0))

#define MPU6050_DLPF_CFG_6 (bit(MPU6050_DLPF_CFG2)|bit(MPU6050_DLPF_CFG1))

#define MPU6050_DLPF_CFG_7 (bit(MPU6050_DLPF_CFG2)|bit(MPU6050_DLPF_CFG1)|bit(MPU6050_DLPF_CFG0))


// Alternative names for the combined definitions

// This name uses the bandwidth (Hz) for the accelometer,

// for the gyro the bandwidth is almost the same.

#define MPU6050_DLPF_260HZ    MPU6050_DLPF_CFG_0

#define MPU6050_DLPF_184HZ    MPU6050_DLPF_CFG_1

#define MPU6050_DLPF_94HZ     MPU6050_DLPF_CFG_2

#define MPU6050_DLPF_44HZ     MPU6050_DLPF_CFG_3

#define MPU6050_DLPF_21HZ     MPU6050_DLPF_CFG_4

#define MPU6050_DLPF_10HZ     MPU6050_DLPF_CFG_5

#define MPU6050_DLPF_5HZ      MPU6050_DLPF_CFG_6

#define MPU6050_DLPF_RESERVED MPU6050_DLPF_CFG_7


// GYRO_CONFIG Register

// The XG_ST, YG_ST, ZG_ST are bits for selftest.

// The FS_SEL sets the range for the gyro.

// These are the names for the bits.

// Use these only with the bit() macro.

#define MPU6050_FS_SEL0 MPU6050_D3

#define MPU6050_FS_SEL1 MPU6050_D4

#define MPU6050_ZG_ST   MPU6050_D5

#define MPU6050_YG_ST   MPU6050_D6

#define MPU6050_XG_ST   MPU6050_D7


// Combined definitions for the FS_SEL values

#define MPU6050_FS_SEL_0 (0)

#define MPU6050_FS_SEL_1 (bit(MPU6050_FS_SEL0))

#define MPU6050_FS_SEL_2 (bit(MPU6050_FS_SEL1))

#define MPU6050_FS_SEL_3 (bit(MPU6050_FS_SEL1)|bit(MPU6050_FS_SEL0))


// Alternative names for the combined definitions

// The name uses the range in degrees per second.

#define MPU6050_FS_SEL_250  MPU6050_FS_SEL_0

#define MPU6050_FS_SEL_500  MPU6050_FS_SEL_1

#define MPU6050_FS_SEL_1000 MPU6050_FS_SEL_2

#define MPU6050_FS_SEL_2000 MPU6050_FS_SEL_3


// ACCEL_CONFIG Register

// The XA_ST, YA_ST, ZA_ST are bits for selftest.

// The AFS_SEL sets the range for the accelerometer.

// These are the names for the bits.

// Use these only with the bit() macro.

#define MPU6050_ACCEL_HPF0 MPU6050_D0

#define MPU6050_ACCEL_HPF1 MPU6050_D1

#define MPU6050_ACCEL_HPF2 MPU6050_D2

#define MPU6050_AFS_SEL0   MPU6050_D3

#define MPU6050_AFS_SEL1   MPU6050_D4

#define MPU6050_ZA_ST      MPU6050_D5

#define MPU6050_YA_ST      MPU6050_D6

#define MPU6050_XA_ST      MPU6050_D7


// Combined definitions for the ACCEL_HPF values

#define MPU6050_ACCEL_HPF_0 (0)

#define MPU6050_ACCEL_HPF_1 (bit(MPU6050_ACCEL_HPF0))

#define MPU6050_ACCEL_HPF_2 (bit(MPU6050_ACCEL_HPF1))

#define MPU6050_ACCEL_HPF_3 (bit(MPU6050_ACCEL_HPF1)|bit(MPU6050_ACCEL_HPF0))

#define MPU6050_ACCEL_HPF_4 (bit(MPU6050_ACCEL_HPF2))

#define MPU6050_ACCEL_HPF_7 (bit(MPU6050_ACCEL_HPF2)|bit(MPU6050_ACCEL_HPF1)|bit(MPU6050_ACCEL_HPF0))


// Alternative names for the combined definitions

// The name uses the Cut-off frequency.

#define MPU6050_ACCEL_HPF_RESET  MPU6050_ACCEL_HPF_0

#define MPU6050_ACCEL_HPF_5HZ    MPU6050_ACCEL_HPF_1

#define MPU6050_ACCEL_HPF_2_5HZ  MPU6050_ACCEL_HPF_2

#define MPU6050_ACCEL_HPF_1_25HZ MPU6050_ACCEL_HPF_3

#define MPU6050_ACCEL_HPF_0_63HZ MPU6050_ACCEL_HPF_4

#define MPU6050_ACCEL_HPF_HOLD   MPU6050_ACCEL_HPF_7


// Combined definitions for the AFS_SEL values

#define MPU6050_AFS_SEL_0 (0)

#define MPU6050_AFS_SEL_1 (bit(MPU6050_AFS_SEL0))

#define MPU6050_AFS_SEL_2 (bit(MPU6050_AFS_SEL1))

#define MPU6050_AFS_SEL_3 (bit(MPU6050_AFS_SEL1)|bit(MPU6050_AFS_SEL0))


// Alternative names for the combined definitions

// The name uses the full scale range for the accelerometer.

#define MPU6050_AFS_SEL_2G  MPU6050_AFS_SEL_0

#define MPU6050_AFS_SEL_4G  MPU6050_AFS_SEL_1

#define MPU6050_AFS_SEL_8G  MPU6050_AFS_SEL_2

#define MPU6050_AFS_SEL_16G MPU6050_AFS_SEL_3


// FIFO_EN Register

// These are the names for the bits.

// Use these only with the bit() macro.

#define MPU6050_SLV0_FIFO_EN  MPU6050_D0

#define MPU6050_SLV1_FIFO_EN  MPU6050_D1

#define MPU6050_SLV2_FIFO_EN  MPU6050_D2

#define MPU6050_ACCEL_FIFO_EN MPU6050_D3

#define MPU6050_ZG_FIFO_EN    MPU6050_D4

#define MPU6050_YG_FIFO_EN    MPU6050_D5

#define MPU6050_XG_FIFO_EN    MPU6050_D6

#define MPU6050_TEMP_FIFO_EN  MPU6050_D7


// I2C_MST_CTRL Register

// These are the names for the bits.

// Use these only with the bit() macro.

#define MPU6050_I2C_MST_CLK0  MPU6050_D0

#define MPU6050_I2C_MST_CLK1  MPU6050_D1

#define MPU6050_I2C_MST_CLK2  MPU6050_D2

#define MPU6050_I2C_MST_CLK3  MPU6050_D3

#define MPU6050_I2C_MST_P_NSR MPU6050_D4

#define MPU6050_SLV_3_FIFO_EN MPU6050_D5

#define MPU6050_WAIT_FOR_ES   MPU6050_D6

#define MPU6050_MULT_MST_EN   MPU6050_D7


// Combined definitions for the I2C_MST_CLK

#define MPU6050_I2C_MST_CLK_0 (0)

#define MPU6050_I2C_MST_CLK_1  (bit(MPU6050_I2C_MST_CLK0))

#define MPU6050_I2C_MST_CLK_2  (bit(MPU6050_I2C_MST_CLK1))

#define MPU6050_I2C_MST_CLK_3  (bit(MPU6050_I2C_MST_CLK1)|bit(MPU6050_I2C_MST_CLK0))

#define MPU6050_I2C_MST_CLK_4  (bit(MPU6050_I2C_MST_CLK2))

#define MPU6050_I2C_MST_CLK_5  (bit(MPU6050_I2C_MST_CLK2)|bit(MPU6050_I2C_MST_CLK0))

#define MPU6050_I2C_MST_CLK_6  (bit(MPU6050_I2C_MST_CLK2)|bit(MPU6050_I2C_MST_CLK1))

#define MPU6050_I2C_MST_CLK_7  (bit(MPU6050_I2C_MST_CLK2)|bit(MPU6050_I2C_MST_CLK1)|bit(MPU6050_I2C_MST_CLK0))

#define MPU6050_I2C_MST_CLK_8  (bit(MPU6050_I2C_MST_CLK3))

#define MPU6050_I2C_MST_CLK_9  (bit(MPU6050_I2C_MST_CLK3)|bit(MPU6050_I2C_MST_CLK0))

#define MPU6050_I2C_MST_CLK_10 (bit(MPU6050_I2C_MST_CLK3)|bit(MPU6050_I2C_MST_CLK1))

#define MPU6050_I2C_MST_CLK_11 (bit(MPU6050_I2C_MST_CLK3)|bit(MPU6050_I2C_MST_CLK1)|bit(MPU6050_I2C_MST_CLK0))

#define MPU6050_I2C_MST_CLK_12 (bit(MPU6050_I2C_MST_CLK3)|bit(MPU6050_I2C_MST_CLK2))

#define MPU6050_I2C_MST_CLK_13 (bit(MPU6050_I2C_MST_CLK3)|bit(MPU6050_I2C_MST_CLK2)|bit(MPU6050_I2C_MST_CLK0))

#define MPU6050_I2C_MST_CLK_14 (bit(MPU6050_I2C_MST_CLK3)|bit(MPU6050_I2C_MST_CLK2)|bit(MPU6050_I2C_MST_CLK1))

#define MPU6050_I2C_MST_CLK_15 (bit(MPU6050_I2C_MST_CLK3)|bit(MPU6050_I2C_MST_CLK2)|bit(MPU6050_I2C_MST_CLK1)|bit(MPU6050_I2C_MST_CLK0))


// Alternative names for the combined definitions

// The names uses I2C Master Clock Speed in kHz.

#define MPU6050_I2C_MST_CLK_348KHZ MPU6050_I2C_MST_CLK_0

#define MPU6050_I2C_MST_CLK_333KHZ MPU6050_I2C_MST_CLK_1

#define MPU6050_I2C_MST_CLK_320KHZ MPU6050_I2C_MST_CLK_2

#define MPU6050_I2C_MST_CLK_308KHZ MPU6050_I2C_MST_CLK_3

#define MPU6050_I2C_MST_CLK_296KHZ MPU6050_I2C_MST_CLK_4

#define MPU6050_I2C_MST_CLK_286KHZ MPU6050_I2C_MST_CLK_5

#define MPU6050_I2C_MST_CLK_276KHZ MPU6050_I2C_MST_CLK_6

#define MPU6050_I2C_MST_CLK_267KHZ MPU6050_I2C_MST_CLK_7

#define MPU6050_I2C_MST_CLK_258KHZ MPU6050_I2C_MST_CLK_8

#define MPU6050_I2C_MST_CLK_500KHZ MPU6050_I2C_MST_CLK_9

#define MPU6050_I2C_MST_CLK_471KHZ MPU6050_I2C_MST_CLK_10

#define MPU6050_I2C_MST_CLK_444KHZ MPU6050_I2C_MST_CLK_11

#define MPU6050_I2C_MST_CLK_421KHZ MPU6050_I2C_MST_CLK_12

#define MPU6050_I2C_MST_CLK_400KHZ MPU6050_I2C_MST_CLK_13

#define MPU6050_I2C_MST_CLK_381KHZ MPU6050_I2C_MST_CLK_14

#define MPU6050_I2C_MST_CLK_364KHZ MPU6050_I2C_MST_CLK_15


// I2C_SLV0_ADDR Register

// These are the names for the bits.

// Use these only with the bit() macro.

#define MPU6050_I2C_SLV0_RW MPU6050_D7


// I2C_SLV0_CTRL Register

// These are the names for the bits.

// Use these only with the bit() macro.

#define MPU6050_I2C_SLV0_LEN0    MPU6050_D0

#define MPU6050_I2C_SLV0_LEN1    MPU6050_D1

#define MPU6050_I2C_SLV0_LEN2    MPU6050_D2

#define MPU6050_I2C_SLV0_LEN3    MPU6050_D3

#define MPU6050_I2C_SLV0_GRP     MPU6050_D4

#define MPU6050_I2C_SLV0_REG_DIS MPU6050_D5

#define MPU6050_I2C_SLV0_BYTE_SW MPU6050_D6

#define MPU6050_I2C_SLV0_EN      MPU6050_D7


// A mask for the length

#define MPU6050_I2C_SLV0_LEN_MASK 0x0F


// I2C_SLV1_ADDR Register

// These are the names for the bits.

// Use these only with the bit() macro.

#define MPU6050_I2C_SLV1_RW MPU6050_D7


// I2C_SLV1_CTRL Register

// These are the names for the bits.

// Use these only with the bit() macro.

#define MPU6050_I2C_SLV1_LEN0    MPU6050_D0

#define MPU6050_I2C_SLV1_LEN1    MPU6050_D1

#define MPU6050_I2C_SLV1_LEN2    MPU6050_D2

#define MPU6050_I2C_SLV1_LEN3    MPU6050_D3

#define MPU6050_I2C_SLV1_GRP     MPU6050_D4

#define MPU6050_I2C_SLV1_REG_DIS MPU6050_D5

#define MPU6050_I2C_SLV1_BYTE_SW MPU6050_D6

#define MPU6050_I2C_SLV1_EN      MPU6050_D7


// A mask for the length

#define MPU6050_I2C_SLV1_LEN_MASK 0x0F


// I2C_SLV2_ADDR Register

// These are the names for the bits.

// Use these only with the bit() macro.

#define MPU6050_I2C_SLV2_RW MPU6050_D7


// I2C_SLV2_CTRL Register

// These are the names for the bits.

// Use these only with the bit() macro.

#define MPU6050_I2C_SLV2_LEN0    MPU6050_D0

#define MPU6050_I2C_SLV2_LEN1    MPU6050_D1

#define MPU6050_I2C_SLV2_LEN2    MPU6050_D2

#define MPU6050_I2C_SLV2_LEN3    MPU6050_D3

#define MPU6050_I2C_SLV2_GRP     MPU6050_D4

#define MPU6050_I2C_SLV2_REG_DIS MPU6050_D5

#define MPU6050_I2C_SLV2_BYTE_SW MPU6050_D6

#define MPU6050_I2C_SLV2_EN      MPU6050_D7


// A mask for the length

#define MPU6050_I2C_SLV2_LEN_MASK 0x0F


// I2C_SLV3_ADDR Register

// These are the names for the bits.

// Use these only with the bit() macro.

#define MPU6050_I2C_SLV3_RW MPU6050_D7


// I2C_SLV3_CTRL Register

// These are the names for the bits.

// Use these only with the bit() macro.

#define MPU6050_I2C_SLV3_LEN0    MPU6050_D0

#define MPU6050_I2C_SLV3_LEN1    MPU6050_D1

#define MPU6050_I2C_SLV3_LEN2    MPU6050_D2

#define MPU6050_I2C_SLV3_LEN3    MPU6050_D3

#define MPU6050_I2C_SLV3_GRP     MPU6050_D4

#define MPU6050_I2C_SLV3_REG_DIS MPU6050_D5

#define MPU6050_I2C_SLV3_BYTE_SW MPU6050_D6

#define MPU6050_I2C_SLV3_EN      MPU6050_D7


// A mask for the length

#define MPU6050_I2C_SLV3_LEN_MASK 0x0F


// I2C_SLV4_ADDR Register

// These are the names for the bits.

// Use these only with the bit() macro.

#define MPU6050_I2C_SLV4_RW MPU6050_D7


// I2C_SLV4_CTRL Register

// These are the names for the bits.

// Use these only with the bit() macro.

#define MPU6050_I2C_MST_DLY0     MPU6050_D0

#define MPU6050_I2C_MST_DLY1     MPU6050_D1

#define MPU6050_I2C_MST_DLY2     MPU6050_D2

#define MPU6050_I2C_MST_DLY3     MPU6050_D3

#define MPU6050_I2C_MST_DLY4     MPU6050_D4

#define MPU6050_I2C_SLV4_REG_DIS MPU6050_D5

#define MPU6050_I2C_SLV4_INT_EN  MPU6050_D6

#define MPU6050_I2C_SLV4_EN      MPU6050_D7


// A mask for the delay

#define MPU6050_I2C_MST_DLY_MASK 0x1F


// I2C_MST_STATUS Register

// These are the names for the bits.

// Use these only with the bit() macro.

#define MPU6050_I2C_SLV0_NACK MPU6050_D0

#define MPU6050_I2C_SLV1_NACK MPU6050_D1

#define MPU6050_I2C_SLV2_NACK MPU6050_D2

#define MPU6050_I2C_SLV3_NACK MPU6050_D3

#define MPU6050_I2C_SLV4_NACK MPU6050_D4

#define MPU6050_I2C_LOST_ARB  MPU6050_D5

#define MPU6050_I2C_SLV4_DONE MPU6050_D6

#define MPU6050_PASS_THROUGH  MPU6050_D7


// I2C_PIN_CFG Register

// These are the names for the bits.

// Use these only with the bit() macro.

#define MPU6050_CLKOUT_EN       MPU6050_D0

#define MPU6050_I2C_BYPASS_EN   MPU6050_D1

#define MPU6050_FSYNC_INT_EN    MPU6050_D2

#define MPU6050_FSYNC_INT_LEVEL MPU6050_D3

#define MPU6050_INT_RD_CLEAR    MPU6050_D4

#define MPU6050_LATCH_INT_EN    MPU6050_D5

#define MPU6050_INT_OPEN        MPU6050_D6

#define MPU6050_INT_LEVEL       MPU6050_D7


// INT_ENABLE Register

// These are the names for the bits.

// Use these only with the bit() macro.

#define MPU6050_DATA_RDY_EN    MPU6050_D0

#define MPU6050_I2C_MST_INT_EN MPU6050_D3

#define MPU6050_FIFO_OFLOW_EN  MPU6050_D4

#define MPU6050_ZMOT_EN        MPU6050_D5

#define MPU6050_MOT_EN         MPU6050_D6

#define MPU6050_FF_EN          MPU6050_D7


// INT_STATUS Register

// These are the names for the bits.

// Use these only with the bit() macro.

#define MPU6050_DATA_RDY_INT   MPU6050_D0

#define MPU6050_I2C_MST_INT    MPU6050_D3

#define MPU6050_FIFO_OFLOW_INT MPU6050_D4

#define MPU6050_ZMOT_INT       MPU6050_D5

#define MPU6050_MOT_INT        MPU6050_D6

#define MPU6050_FF_INT         MPU6050_D7


// MOT_DETECT_STATUS Register

// These are the names for the bits.

// Use these only with the bit() macro.

#define MPU6050_MOT_ZRMOT MPU6050_D0

#define MPU6050_MOT_ZPOS  MPU6050_D2

#define MPU6050_MOT_ZNEG  MPU6050_D3

#define MPU6050_MOT_YPOS  MPU6050_D4

#define MPU6050_MOT_YNEG  MPU6050_D5

#define MPU6050_MOT_XPOS  MPU6050_D6

#define MPU6050_MOT_XNEG  MPU6050_D7


// IC2_MST_DELAY_CTRL Register

// These are the names for the bits.

// Use these only with the bit() macro.

#define MPU6050_I2C_SLV0_DLY_EN MPU6050_D0

#define MPU6050_I2C_SLV1_DLY_EN MPU6050_D1

#define MPU6050_I2C_SLV2_DLY_EN MPU6050_D2

#define MPU6050_I2C_SLV3_DLY_EN MPU6050_D3

#define MPU6050_I2C_SLV4_DLY_EN MPU6050_D4

#define MPU6050_DELAY_ES_SHADOW MPU6050_D7


// SIGNAL_PATH_RESET Register

// These are the names for the bits.

// Use these only with the bit() macro.

#define MPU6050_TEMP_RESET  MPU6050_D0

#define MPU6050_ACCEL_RESET MPU6050_D1

#define MPU6050_GYRO_RESET  MPU6050_D2


// MOT_DETECT_CTRL Register

// These are the names for the bits.

// Use these only with the bit() macro.

#define MPU6050_MOT_COUNT0      MPU6050_D0

#define MPU6050_MOT_COUNT1      MPU6050_D1

#define MPU6050_FF_COUNT0       MPU6050_D2

#define MPU6050_FF_COUNT1       MPU6050_D3

#define MPU6050_ACCEL_ON_DELAY0 MPU6050_D4

#define MPU6050_ACCEL_ON_DELAY1 MPU6050_D5


// Combined definitions for the MOT_COUNT

#define MPU6050_MOT_COUNT_0 (0)

#define MPU6050_MOT_COUNT_1 (bit(MPU6050_MOT_COUNT0))

#define MPU6050_MOT_COUNT_2 (bit(MPU6050_MOT_COUNT1))

#define MPU6050_MOT_COUNT_3 (bit(MPU6050_MOT_COUNT1)|bit(MPU6050_MOT_COUNT0))


// Alternative names for the combined definitions

#define MPU6050_MOT_COUNT_RESET MPU6050_MOT_COUNT_0


// Combined definitions for the FF_COUNT

#define MPU6050_FF_COUNT_0 (0)

#define MPU6050_FF_COUNT_1 (bit(MPU6050_FF_COUNT0))

#define MPU6050_FF_COUNT_2 (bit(MPU6050_FF_COUNT1))

#define MPU6050_FF_COUNT_3 (bit(MPU6050_FF_COUNT1)|bit(MPU6050_FF_COUNT0))


// Alternative names for the combined definitions

#define MPU6050_FF_COUNT_RESET MPU6050_FF_COUNT_0


// Combined definitions for the ACCEL_ON_DELAY

#define MPU6050_ACCEL_ON_DELAY_0 (0)

#define MPU6050_ACCEL_ON_DELAY_1 (bit(MPU6050_ACCEL_ON_DELAY0))

#define MPU6050_ACCEL_ON_DELAY_2 (bit(MPU6050_ACCEL_ON_DELAY1))

#define MPU6050_ACCEL_ON_DELAY_3 (bit(MPU6050_ACCEL_ON_DELAY1)|bit(MPU6050_ACCEL_ON_DELAY0))


// Alternative names for the ACCEL_ON_DELAY

#define MPU6050_ACCEL_ON_DELAY_0MS MPU6050_ACCEL_ON_DELAY_0

#define MPU6050_ACCEL_ON_DELAY_1MS MPU6050_ACCEL_ON_DELAY_1

#define MPU6050_ACCEL_ON_DELAY_2MS MPU6050_ACCEL_ON_DELAY_2

#define MPU6050_ACCEL_ON_DELAY_3MS MPU6050_ACCEL_ON_DELAY_3


// USER_CTRL Register

// These are the names for the bits.

// Use these only with the bit() macro.

#define MPU6050_SIG_COND_RESET MPU6050_D0

#define MPU6050_I2C_MST_RESET  MPU6050_D1

#define MPU6050_FIFO_RESET     MPU6050_D2

#define MPU6050_I2C_IF_DIS     MPU6050_D4   // must be 0 for MPU-6050

#define MPU6050_I2C_MST_EN     MPU6050_D5

#define MPU6050_FIFO_EN        MPU6050_D6


// PWR_MGMT_1 Register

// These are the names for the bits.

// Use these only with the bit() macro.

#define MPU6050_CLKSEL0      MPU6050_D0

#define MPU6050_CLKSEL1      MPU6050_D1

#define MPU6050_CLKSEL2      MPU6050_D2

#define MPU6050_TEMP_DIS     MPU6050_D3    // 1: disable temperature sensor

#define MPU6050_CYCLE        MPU6050_D5    // 1: sample and sleep

#define MPU6050_SLEEP        MPU6050_D6    // 1: sleep mode

#define MPU6050_DEVICE_RESET MPU6050_D7    // 1: reset to default values


// Combined definitions for the CLKSEL

#define MPU6050_CLKSEL_0 (0)

#define MPU6050_CLKSEL_1 (bit(MPU6050_CLKSEL0))

#define MPU6050_CLKSEL_2 (bit(MPU6050_CLKSEL1))

#define MPU6050_CLKSEL_3 (bit(MPU6050_CLKSEL1)|bit(MPU6050_CLKSEL0))

#define MPU6050_CLKSEL_4 (bit(MPU6050_CLKSEL2))

#define MPU6050_CLKSEL_5 (bit(MPU6050_CLKSEL2)|bit(MPU6050_CLKSEL0))

#define MPU6050_CLKSEL_6 (bit(MPU6050_CLKSEL2)|bit(MPU6050_CLKSEL1))

#define MPU6050_CLKSEL_7 (bit(MPU6050_CLKSEL2)|bit(MPU6050_CLKSEL1)|bit(MPU6050_CLKSEL0))


// Alternative names for the combined definitions

#define MPU6050_CLKSEL_INTERNAL    MPU6050_CLKSEL_0

#define MPU6050_CLKSEL_X           MPU6050_CLKSEL_1

#define MPU6050_CLKSEL_Y           MPU6050_CLKSEL_2

#define MPU6050_CLKSEL_Z           MPU6050_CLKSEL_3

#define MPU6050_CLKSEL_EXT_32KHZ   MPU6050_CLKSEL_4

#define MPU6050_CLKSEL_EXT_19_2MHZ MPU6050_CLKSEL_5

#define MPU6050_CLKSEL_RESERVED    MPU6050_CLKSEL_6

#define MPU6050_CLKSEL_STOP        MPU6050_CLKSEL_7


// PWR_MGMT_2 Register

// These are the names for the bits.

// Use these only with the bit() macro.

#define MPU6050_STBY_ZG       MPU6050_D0

#define MPU6050_STBY_YG       MPU6050_D1

#define MPU6050_STBY_XG       MPU6050_D2

#define MPU6050_STBY_ZA       MPU6050_D3

#define MPU6050_STBY_YA       MPU6050_D4

#define MPU6050_STBY_XA       MPU6050_D5

#define MPU6050_LP_WAKE_CTRL0 MPU6050_D6

#define MPU6050_LP_WAKE_CTRL1 MPU6050_D7


// Combined definitions for the LP_WAKE_CTRL

#define MPU6050_LP_WAKE_CTRL_0 (0)

#define MPU6050_LP_WAKE_CTRL_1 (bit(MPU6050_LP_WAKE_CTRL0))

#define MPU6050_LP_WAKE_CTRL_2 (bit(MPU6050_LP_WAKE_CTRL1))

#define MPU6050_LP_WAKE_CTRL_3 (bit(MPU6050_LP_WAKE_CTRL1)|bit(MPU6050_LP_WAKE_CTRL0))


// Alternative names for the combined definitions

// The names uses the Wake-up Frequency.

#define MPU6050_LP_WAKE_1_25HZ MPU6050_LP_WAKE_CTRL_0

#define MPU6050_LP_WAKE_2_5HZ  MPU6050_LP_WAKE_CTRL_1

#define MPU6050_LP_WAKE_5HZ    MPU6050_LP_WAKE_CTRL_2

#define MPU6050_LP_WAKE_10HZ   MPU6050_LP_WAKE_CTRL_3


// Default I2C address for the MPU-6050 is 0x68.

// But only if the AD0 pin is low.

// Some sensor boards have AD0 high, and the

// I2C address thus becomes 0x69.

#define MPU6050_I2C_ADDRESS 0x68


// Declaring an union for the registers and the axis values.

// The byte order does not match the byte order of

// the compiler and AVR chip.

// The AVR chip (on the Arduino board) has the Low Byte

// at the lower address.

// But the MPU-6050 has a different order: High Byte at

// lower address, so that has to be corrected.

// The register part “reg” is only used internally,

// and are swapped in code.

typedef union accel_t_gyro_union

{

struct

{

uint8_t x_accel_h;

uint8_t x_accel_l;

uint8_t y_accel_h;

uint8_t y_accel_l;

uint8_t z_accel_h;

uint8_t z_accel_l;

uint8_t t_h;

uint8_t t_l;

uint8_t x_gyro_h;

uint8_t x_gyro_l;

uint8_t y_gyro_h;

uint8_t y_gyro_l;

uint8_t z_gyro_h;

uint8_t z_gyro_l;

} reg;

struct

{

int x_accel;

int y_accel;

int z_accel;

int temperature;

int x_gyro;

int y_gyro;

int z_gyro;

} value;

};


// Use the following global variables and access functions to help store the overall

// rotation angle of the sensor

unsigned long last_read_time;

float         last_x_angle;  // These are the filtered angles

float         last_y_angle;

float         last_z_angle;

float         last_gyro_x_angle;  // Store the gyro angles to compare drift

float         last_gyro_y_angle;

float         last_gyro_z_angle;


void set_last_read_angle_data(unsigned long time, float x, float y, float z, float x_gyro, float y_gyro, float z_gyro) {

last_read_time = time;

last_x_angle = x;

last_y_angle = y;

last_z_angle = z;

last_gyro_x_angle = x_gyro;

last_gyro_y_angle = y_gyro;

last_gyro_z_angle = z_gyro;

}


inline unsigned long get_last_time() {return last_read_time;}

inline float get_last_x_angle() {return last_x_angle;}

inline float get_last_y_angle() {return last_y_angle;}

inline float get_last_z_angle() {return last_z_angle;}

inline float get_last_gyro_x_angle() {return last_gyro_x_angle;}

inline float get_last_gyro_y_angle() {return last_gyro_y_angle;}

inline float get_last_gyro_z_angle() {return last_gyro_z_angle;}


//  Use the following global variables and access functions

//  to calibrate the acceleration sensor

float    base_x_accel;

float    base_y_accel;

float    base_z_accel;


float    base_x_gyro;

float    base_y_gyro;

float    base_z_gyro;


int read_gyro_accel_vals(uint8_t* accel_t_gyro_ptr) {

// Read the raw values.

// Read 14 bytes at once,

// containing acceleration, temperature and gyro.

// With the default settings of the MPU-6050,

// there is no filter enabled, and the values

// are not very stable.  Returns the error value


accel_t_gyro_union* accel_t_gyro = (accel_t_gyro_union *) accel_t_gyro_ptr;


int error = MPU6050_read (MPU6050_ACCEL_XOUT_H, (uint8_t *) accel_t_gyro, sizeof(*accel_t_gyro));


// Swap all high and low bytes.

// After this, the registers values are swapped,

// so the structure name like x_accel_l does no

// longer contain the lower byte.

uint8_t swap;

#define SWAP(x,y) swap = x; x = y; y = swap


SWAP ((*accel_t_gyro).reg.x_accel_h, (*accel_t_gyro).reg.x_accel_l);

SWAP ((*accel_t_gyro).reg.y_accel_h, (*accel_t_gyro).reg.y_accel_l);

SWAP ((*accel_t_gyro).reg.z_accel_h, (*accel_t_gyro).reg.z_accel_l);

SWAP ((*accel_t_gyro).reg.t_h, (*accel_t_gyro).reg.t_l);

SWAP ((*accel_t_gyro).reg.x_gyro_h, (*accel_t_gyro).reg.x_gyro_l);

SWAP ((*accel_t_gyro).reg.y_gyro_h, (*accel_t_gyro).reg.y_gyro_l);

SWAP ((*accel_t_gyro).reg.z_gyro_h, (*accel_t_gyro).reg.z_gyro_l);


return error;

}


void calibrate_sensors() {

int                   num_readings = 10;

float                 x_accel = 0;

float                 y_accel = 0;

float                 z_accel = 0;

float                 x_gyro = 0;

float                 y_gyro = 0;

float                 z_gyro = 0;

accel_t_gyro_union    accel_t_gyro;


//Serial.println(“Starting Calibration”);


// Discard the first set of values read from the IMU

read_gyro_accel_vals((uint8_t *) &accel_t_gyro);


// Read and average the raw values from the IMU

for (int i = 0; i < num_readings; i++) {

read_gyro_accel_vals((uint8_t *) &accel_t_gyro);

x_accel += accel_t_gyro.value.x_accel;

y_accel += accel_t_gyro.value.y_accel;

z_accel += accel_t_gyro.value.z_accel;

x_gyro += accel_t_gyro.value.x_gyro;

y_gyro += accel_t_gyro.value.y_gyro;

z_gyro += accel_t_gyro.value.z_gyro;

delay(100);

}

x_accel /= num_readings;

y_accel /= num_readings;

z_accel /= num_readings;

x_gyro /= num_readings;

y_gyro /= num_readings;

z_gyro /= num_readings;


// Store the raw calibration values globally

base_x_accel = x_accel;

base_y_accel = y_accel;

base_z_accel = z_accel;

base_x_gyro = x_gyro;

base_y_gyro = y_gyro;

base_z_gyro = z_gyro;


//Serial.println(“Finishing Calibration”);

}


// Motor Variables


int Motor1F = 5;

int Motor1R = 10;

int Motor1PWM = A9;

volatile int Motor1Speed = 0;


int Motor2F = 19;

int Motor2R = 20;

int Motor2PWM = 6;

volatile int Motor2Speed = 0;


volatile int Mot1State = 0;

volatile int Mot2State = 0;


// Servo Variables


//


Robot3DoTBoard Robot3DoT;       // instantiated as Robot3DoT at end of class header


/*

* Command Example

* Step 1: Assign new command mnemonics ID numbers

*         In our example we will be adding 3 custom commands (2 new and one predefined).

*         The predefined MOVE command is intercepted and our robot unique code is to be

*         run instead. The MOVE command mnemonic ID 0x01 is already defined in Configure.h

*         The next two commands are new and assigned to the first two addresses in the

*         custom command address space 0x40 – 0x5F.

*/


#define DYNSTAT       0x41

const uint8_t CMD_LIST_SIZE = 2;   // we are adding 3 commands (MOVE, BLINK, SERVO)


/*

* Command Example

* Step 2: Register commands by linking IDs to their corresponding command handlers

*         In our example when the MOVE command is intercepted the moveHandler is to be run.

*         In a similar fashion the BLINK command calls the blinkHandler and SERVO the

*         servoHandler.

*/


void moveHandler (uint8_t cmd, uint8_t param[], uint8_t n);

void dynstatHandler (uint8_t cmd, uint8_t param[], uint8_t n);


Robot3DoTBoard::cmdFunc_t onCommand[CMD_LIST_SIZE] = {{MOVE,moveHandler}, {DYNSTAT,dynstatHandler}};


/*

* Telemetry Example

* Step 1: Instantiate packet

*         In our example we simulate a current sensor wired to MOTOR 2. MOTOR2_CURRENT_ID

*         is defined as 0x02 in Configure.h

*         To simulate the data stream coming from the sensor we will read ATmega32U4

*         Register OCR4D which controls the duty cycle of MOTOR 2.

*/

Packet motorPWM(MOTOR2_CURRENT_ID);  // initialize the packet properties to default values


void setup()

{

Serial.begin(9600);               // default = 115200


Robot3DoT.begin();


// Initialize Motor To Off


pinMode(Motor1F, OUTPUT);

pinMode(Motor1R, OUTPUT);

pinMode(Motor1PWM, OUTPUT);


pinMode(Motor2F, OUTPUT);

pinMode(Motor2R, OUTPUT);

pinMode(Motor2PWM, OUTPUT);


digitalWrite(Motor1F,LOW);

digitalWrite(Motor1R,LOW);


digitalWrite(Motor2F,LOW);

digitalWrite(Motor2R,LOW);


// Initialize IMU


int error;

uint8_t c;


/*

Serial.println(F(“InvenSense MPU-6050”));

Serial.println(F(“June 2012”));

*/

// Initialize the ‘Wire’ class for the I2C-bus.

Wire.begin();


// default at power-up:

//    Gyro at 250 degrees second

//    Acceleration at 2g

//    Clock source at internal 8MHz

//    The device is in sleep mode.

//


error = MPU6050_read (MPU6050_WHO_AM_I, &c, 1);


/*

Serial.print(F(“WHO_AM_I : “));

Serial.print(c,HEX);

Serial.print(F(“, error = “));

Serial.println(error,DEC);

*/


// According to the datasheet, the ‘sleep’ bit

// should read a ‘1’. But I read a ‘0’.

// That bit has to be cleared, since the sensor

// is in sleep mode at power-up. Even if the

// bit reads ‘0’.

error = MPU6050_read (MPU6050_PWR_MGMT_2, &c, 1);


/*

Serial.print(F(“PWR_MGMT_2 : “));

Serial.print(c,HEX);

Serial.print(F(“, error = “));

Serial.println(error,DEC);

*/


// Clear the ‘sleep’ bit to start the sensor.

MPU6050_write_reg (MPU6050_PWR_MGMT_1, 0);


//Initialize the angles

calibrate_sensors();


set_last_read_angle_data(millis(), 0, 0, 0, 0, 0, 0);


/*

* Command Example

* Step 3: Tell 3DoT Robot software about new commands

*

*

*/


Robot3DoT.setOnCommand(onCommand, CMD_LIST_SIZE);


/* Telemetry Example

* Step 2: Modify default values assigned to internal properties as needed.

*         Before a packet is created and sent, it is qualified. Specifically,

*         the data in a packet must change by some amount from the previous

*         packet and may not be sent with at a period less than some value.

*         In most cases you can leave these values at their default values.

*/

delay(1000);

}


void loop()

{

Robot3DoT.loop();

// Set Motor State to the Telemetry Read Value


if (Mot1State == 1){ digitalWrite(Motor1F,HIGH);

digitalWrite(Motor1R,LOW);

} else if (Mot1State == 2) { digitalWrite(Motor1F,LOW);

digitalWrite(Motor1R,HIGH);

}                                 else {digitalWrite(Motor1F,LOW);

digitalWrite(Motor1R,LOW);}


if (Mot2State == 1){  digitalWrite(Motor2F,HIGH);

digitalWrite(Motor2R,LOW);

} else if (Mot2State == 2) { digitalWrite(Motor2F,LOW);

digitalWrite(Motor2R,HIGH);

}                                 else {digitalWrite(Motor2F,LOW);

digitalWrite(Motor2R,LOW);}


analogWrite(Motor1PWM, Motor1Speed);

analogWrite(Motor2PWM, Motor2Speed);

if (micros() – HoldTime > 500000){

HoldTime = micros();

Serial.write(“”);

Serial.write(Mot1State);

Serial.write(Motor1Speed);

Serial.write(Mot2State);

Serial.write(Motor2Speed);

Serial.write(“”);

}

// Read IMU Settings


//IMU();


// Set Servos to IMU Setting


}


/*

* Command Example

* Step 4: Write command handlers

*/


/*

* User Defined Command BLINK (0x40) Example

* A5 01 40 E4

*/


/*

* Override MOVE (0x01) Command Example

* A5 05 01 01 80 01 80 A1

*/

void moveHandler (uint8_t cmd, uint8_t param[], uint8_t n)

{

Mot1State = param[0];

Mot2State = param[2];


// Configure Inputs and Output


Motor1Speed = param[1];

Motor2Speed = param[3];

Serial.write(cmd);             // move command = 0x01

Serial.write(n);               // number of param = 4

for (int i=0;i<n;i++)          // param = 01 80 01 80

{

Serial.write (param[i]);

}


}                                // moveHandler


/*

* User Defined Command SERVO (0x41) Example

* Rotate servo to 90 degrees

* A5 02 41 90 76

*/

void dynstatHandler (uint8_t cmd, uint8_t param[], uint8_t n)

{

Serial.write(cmd);             // servo command = 0x41

Serial.write(n);               // number of param = 1

for (int i=0;i<n;i++)          // param = 90 degrees

{

Serial.write (param[i]);

}


}  // servoHandler


// IMU LOOPS


void IMU()

{

int error;

double dT;

accel_t_gyro_union accel_t_gyro;


Serial.println(F(“”));

Serial.println(F(“MPU-6050”));


// Read the raw values.

cli();

error = read_gyro_accel_vals((uint8_t*) &accel_t_gyro);

sei();

// Get the time of reading for rotation computations

unsigned long t_now = millis();


Serial.print(F(“Read accel, temp and gyro, error = “));

Serial.println(error,DEC);


// Print the raw acceleration values

Serial.print(F(“accel x,y,z: “));

Serial.print(accel_t_gyro.value.x_accel, DEC);

Serial.print(F(“, “));

Serial.print(accel_t_gyro.value.y_accel, DEC);

Serial.print(F(“, “));

Serial.print(accel_t_gyro.value.z_accel, DEC);

Serial.println(F(“”));


// The temperature sensor is -40 to +85 degrees Celsius.

// It is a signed integer.

// According to the datasheet:

//   340 per degrees Celsius, -512 at 35 degrees.

// At 0 degrees: -512 – (340 * 35) = -12412

/*

Serial.print(F(“temperature: “));

dT = ( (double) accel_t_gyro.value.temperature + 12412.0) / 340.0;

Serial.print(dT, 3);

Serial.print(F(” degrees Celsius”));

Serial.println(F(“”));


// Print the raw gyro values.

Serial.print(F(“raw gyro x,y,z : “));

Serial.print(accel_t_gyro.value.x_gyro, DEC);

Serial.print(F(“, “));

Serial.print(accel_t_gyro.value.y_gyro, DEC);

Serial.print(F(“, “));

Serial.print(accel_t_gyro.value.z_gyro, DEC);

Serial.print(F(“, “));

Serial.println(F(“”));

*/


// Convert gyro values to degrees/sec

float FS_SEL = 131;

/*

float gyro_x = (accel_t_gyro.value.x_gyro – base_x_gyro)/FS_SEL;

float gyro_y = (accel_t_gyro.value.y_gyro – base_y_gyro)/FS_SEL;

float gyro_z = (accel_t_gyro.value.z_gyro – base_z_gyro)/FS_SEL;

*/

float gyro_x = (accel_t_gyro.value.x_gyro – base_x_gyro)/FS_SEL;

float gyro_y = (accel_t_gyro.value.y_gyro – base_y_gyro)/FS_SEL;

float gyro_z = (accel_t_gyro.value.z_gyro – base_z_gyro)/FS_SEL;


// Get raw acceleration values

//float G_CONVERT = 16384;

float accel_x = accel_t_gyro.value.x_accel;

float accel_y = accel_t_gyro.value.y_accel;

float accel_z = accel_t_gyro.value.z_accel;


// Get angle values from accelerometer

float RADIANS_TO_DEGREES = 180/3.14159;

//  float accel_vector_length = sqrt(pow(accel_x,2) + pow(accel_y,2) + pow(accel_z,2));

float accel_angle_y = atan(-1*accel_x/sqrt(pow(accel_y,2) + pow(accel_z,2)))*RADIANS_TO_DEGREES;

float accel_angle_x = atan(accel_y/sqrt(pow(accel_x,2) + pow(accel_z,2)))*RADIANS_TO_DEGREES;


float accel_angle_z = 0;


// Compute the (filtered) gyro angles

float dt =(t_now – get_last_time())/1000.0;

float gyro_angle_x = gyro_x*dt + get_last_x_angle();

float gyro_angle_y = gyro_y*dt + get_last_y_angle();

float gyro_angle_z = gyro_z*dt + get_last_z_angle();


// Compute the drifting gyro angles

float unfiltered_gyro_angle_x = gyro_x*dt + get_last_gyro_x_angle();

float unfiltered_gyro_angle_y = gyro_y*dt + get_last_gyro_y_angle();

float unfiltered_gyro_angle_z = gyro_z*dt + get_last_gyro_z_angle();


// Apply the complementary filter to figure out the change in angle – choice of alpha is

// estimated now.  Alpha depends on the sampling rate…

float alpha = 0.96;

float angle_x = alpha*gyro_angle_x + (1.0 – alpha)*accel_angle_x;

float angle_y = alpha*gyro_angle_y + (1.0 – alpha)*accel_angle_y;

float angle_z = gyro_angle_z;  //Accelerometer doesn’t give z-angle


// Update the saved data with the latest values

cli();

set_last_read_angle_data(t_now, angle_x, angle_y, angle_z, unfiltered_gyro_angle_x, unfiltered_gyro_angle_y, unfiltered_gyro_angle_z);

sei();

//  Send the data to the serial port

//  Serial.print(F(“DEL:”));              //Delta T

//  Serial.print(dt, DEC);

//  Serial.print(F(“#ACC:”));              //Accelerometer angle

//  Serial.print(accel_angle_x, 2);

//  Serial.print(F(“,”));

//  Serial.print(accel_angle_y, 2);

//  Serial.print(F(“,”));

//  Serial.print(accel_angle_z, 2);

//  Serial.print(F(“#GYR:”));

//  Serial.print(unfiltered_gyro_angle_x, 2);        //Gyroscope angle

//  Serial.print(F(“,”));

//  Serial.print(unfiltered_gyro_angle_y, 2);

//  Serial.print(F(“,”));

//  Serial.print(unfiltered_gyro_angle_z, 2);


//  Serial.print(F(“#FIL:”));             //Filtered angle

//  Serial.print(angle_x, 2);

//  Serial.print(F(“,”));

//  Serial.print(angle_y, 2);

//  Serial.print(F(“,”));

//  Serial.print(angle_z, 2);

//  Serial.println(F(“”));


}


// ——————————————————–

// MPU6050_read

//

// This is a common function to read multiple bytes

// from an I2C device.

//

// It uses the boolean parameter for Wire.endTransMission()

// to be able to hold or release the I2C-bus.

// This is implemented in Arduino 1.0.1.

//

// Only this function is used to read.

// There is no function for a single byte.

//

int MPU6050_read(int start, uint8_t *buffer, int size)

{

int i, n, error;


Wire.beginTransmission(MPU6050_I2C_ADDRESS);

n = Wire.write(start);

if (n != 1)

return (-10);


n = Wire.endTransmission(false);    // hold the I2C-bus

if (n != 0)

return (n);


// Third parameter is true: relase I2C-bus after data is read.

Wire.requestFrom(MPU6050_I2C_ADDRESS, size, true);

i = 0;

while(Wire.available() && i<size)

{

buffer[i++]=Wire.read();

}

if ( i != size)

return (-11);


return (0);  // return : no error

}


// ——————————————————–

// MPU6050_write

//

// This is a common function to write multiple bytes to an I2C device.

//

// If only a single register is written,

// use the function MPU_6050_write_reg().

//

// Parameters:

//   start : Start address, use a define for the register

//   pData : A pointer to the data to write.

//   size  : The number of bytes to write.

//

// If only a single register is written, a pointer

// to the data has to be used, and the size is

// a single byte:

//   int data = 0;        // the data to write

//   MPU6050_write (MPU6050_PWR_MGMT_1, &c, 1);

//

int MPU6050_write(int start, const uint8_t *pData, int size)

{

int n, error;


Wire.beginTransmission(MPU6050_I2C_ADDRESS);

n = Wire.write(start);        // write the start address

if (n != 1)

return (-20);


n = Wire.write(pData, size);  // write data bytes

if (n != size)

return (-21);


error = Wire.endTransmission(true); // release the I2C-bus

if (error != 0)

return (error);


return (0);         // return : no error

}


// ——————————————————–

// MPU6050_write_reg

//

// An extra function to write a single register.

// It is just a wrapper around the MPU_6050_write()

// function, and it is only a convenient function

// to make it easier to write a single register.

//

int MPU6050_write_reg(int reg, uint8_t data)

{

int error;


error = MPU6050_write(reg, &data, 1);


return (error);

}

Fall 2016 Velociraptor (W) Preliminary Project Plan

By: Lam Nguyen (Project Manager)

        Hal Vongsahom (System Engineer)

Table of Contents

Work Breakdown Structure (WBS)

By: Lam Nguyen (Project Manager)

The Work Breakdown Structure in Figure 1 organize specific tasks to three section for the Velociraptor project. These three sections are assigned to division members in Mission, System, and Test, Electronics and Control, and Manufacturer. The overall diagrgam is overseen by the Velociraptor’s Project Manager to delegate these task to each division member. Each branch lists the responsiblity of the division member to meet the overall objective in completing the project.

work-breakdown-structure

Figure 1

Project Schedule

By: Lam Nguyen (Project Manager)

In order to meet deadlines for the Velociraptor Project, a project schedule was made to keep track of completed tasks. This schedule will not only benefit both the project manager and the division members but will also help move the project forward to build the robot.

Top Level Schedule

Top Level Schedule was created to keep track of tasks the project manager assigns each team member in Figure 2. Each task has a projected deadline assigned to each division member. Each deadline that is completed will help guide the team to focus on tasks unattended. The overview timeline of project in Figure 3 shows

 top-level-schedule

Figure 2

Top Level Overview

Figure 3

System/Subsystem Level Tasks

The System/Subsystem Level Tasks outlines the tasks for each division member and provides a projected time for each division members.

System and Subsystem level

Figure 3

system-and-subsystem-level-overview

Figure 4

Burn Down and Project Percent Completion

(TBA)

System Resource Reports

By: Hal Vongsahom (System Engineer)

Power Report

power

Figure 5

The power report is an overview of the initial power draw of the system. However, an important note is that the manufacture website or data sheet only listed power draw in current for all the components. Therefore, the power draw was calculated using Ohm’s law. The power report has a minimum and maximum power draw. A minimum power draw is when the velociraptor is not walking. A maximum power draw is when the velociraptor is walking. The measured power column is left blank at this moment. The group have not obtained any of the hardware to physical measure the current draw. However, the expected margin can give a rough estimate of the actually current.

The servos power draw was collected from the manufacture web site [1]. A total of three servos will be used. One servo to control the head, the second to control the tail, and the third is to control the threaded rod that will shift the center of mass accordingly. The total power draw for the three servos use the most power of the entire system.

The two DC motor comes second in drawing the most power for the system. The data was collected from the hardware website [2]. One DC motor will use for the right leg, and the other DC motor for the left leg.

The I2C and the MPU-6050 data was collected from the manufacture data sheet [3, 4]. The power draw for the I2C and MPU-6050 are not significant.

The 3Dot board data was collected from last semester Spider bot [5]. The Spider bot also use a 3Dot board last semester and measured actually values to verify that the ranges are correct. As a result, the velociraptor may use Spider bot data to factor into our initial power estimate.

Overall, the power is sufficient to operate the system. In addition, a 3,387 mW contingency is available for the system for other uncertainty.

Mass Report

mass

Figure 6

The goal of this semester velociraptor is to weigh less than 900 grams. The mass of the MPU-6050 was gathered from the manufactured data sheet [3]. The mass of the MPU-6050 is very small and does not factor heavily in the project. The mass of the I2C is collected from the website [4]. The mass of the I2C also plays a small part. The mass of the 3Dot board was collected from the Spider bot last semester. Again, they were able to accurately measure the mass of the 3Dot board which justify it in this report.

The mass of the servo is collected from the manufactured website [1]. Since the quantity is in three, and it is acting as the velociraptor muscle. This add a decent amount of weight to the project. The DC motor mass was also collected from the website [2]. The quantity of the DC motor is two and adds 36 grams to the project. The battery mass of the battery is found online data sheet [6]. There will be two battery use in this project which ass 63.5 grams which is the second highest mass in the project.

The largest mass comes from the frame of the velociraptor. The frame of the mass was calculated using the total mass of the previous semester project minus the components mass of this semester [7]. The justification for using last semester mass is because their project was successful, therefore, this semester can factor that into this mass report for a good estimation.

Project Cost Estimate

By: Hal Vongsahom (System Engineer)

cost

Figure 7

The total project budget for this velociraptor project is 400 dollars. The PCB, Frame, and prototype cost for this semester velociraptor cost report was borrowed from last semester velociraptor [7]. Last semester project actually spent the funds approved by the customer. Therefore, a good estimation can be calculated in this cost report. Also to note, these parts are the most expensive resources of the project.

The MPU-6050, I2C, Battery, servo, threaded rod, and DC motor cost was collected from the retailer’s website [3,4,6,2,3,1]. The DC motor and servo are the second most expensive component for this project. The data for the system resource reports link mass and cost together. The more mass the component has, the more cost that component shall have as well.

Last note, the 3Dot board is provided by the customer, therefore, it is not factor in the cost.

Overall the initial cost is well within the project budget with enough budget to cover addition cost for uncertainty.

Resources

[1] Addicore SG90 9g Mini Servo. (n.d.). Retrieved September 28, 2016, from http://www.addicore.com/Addicore-SG90-Mini-Servo-p/113.htm

[2] https://www.pololu.com/product/182/specs

[3] https://www.cdiweb.com/datasheets/invensense/PS-MPU-6000A.pdf

[4] https://cdn-shop.adafruit.com/datasheets/PCA9685.pdf

[5] https://www.arxterra.com/spring-2016-3dot-spider-bot-preliminary-design-document/

[6] https://www.bhphotovideo.com/bnh/controller/home?O=&sku=1018868&gclid=Cj0KEQjw1K2_BRC0s6jtgJzB-aMBEiQA-WzDMZ4G93fpLNmiUX-CGjONHm0czidWkbbSiUMk3B_luoAaAqM68P8HAQ&Q=&ap=y&m=Y&c3api=1876%2C92051678402%2C&is=REG&A=details

[7] https://www.arxterra.com/spring-2016-velociraptor-project-summary/#Size_Weight

[8] https://www.grainger.com/category/threaded-rods/bolts/fasteners/ecatalog/N-8k5

2016 Fall Velociraptor: Preliminary Project Plan

Paul Ahumada – Project Manager

Robert Licari – Systems Engineer

Kevin Armentrout – Electronics and Control Engineer

Victoria Osaji – Manufacturing Engineer

Table of Contents

Work Breakdown Structure

By Paul Ahumada

wbs-min

The WBS represents the job description tasks that members must fulfill. The three engineers are separated into their own divisions and handle their task for the Velociraptor. The tasks throughout the semester are specifically shown in the calendar view in the Top Level Schedule section.

Project Schedule

Top Level Schedule

By Paul Ahumada

project-top-schedule-min

The schedule is spread out for the semester with start and due dates for each task. These dates refer to a schedule provided by the customer. The Velociraptor project should follow the schedule to remain on track. Experiments and tests may be added as they are discovered and increase the task load.

The calendar provides a visual with names associated with each task. The person assigned to that task is responsible for its completion.

Calendar View Of Scheduleschedule-min

System/Subsystem Level Tasks

By Paul Ahumada

These tasks are shown in the Top Level Schedule. On the calendar layout, names are associated with each task. These tasks must be fulfilled by their associated team members. If there are no members listed, then the team as a whole must complete the task.

Burn Down and Project Percent Completion

By Paul Ahumada

burndown-schedule

The Project Burn Down shows how many tasks are left that the Velociraptor group must complete by the last day of the semester. The tasks we compare to are the remaining tasks in the Top Level Schedule. These tasks may increase as new experiments and tests are discovered. The Percent Completion is on a scale of 0-50 so it can be included on the same graph of tasks remaining.

System Resource Reports

By: Robert Licari

Mass Report

mass-report

The mass needs to be as close to 657g as possible to meet initial torque calculations (done by E&C). Currently the estimated mass is at 706g with a contingency of 21.6. Assets that were used in this calculation come from the previous semester as well as the initial torque calculations. From the previous semester, we have our mass allotment of 657g as well as an overall frame mass of 154g. For our purposes, the frame mass shall be the total mass of the mechanical structure of the velociraptor without anything listed under the “Systems” category. Systems includes anything that will contain our control modules, battery packs, and any cables outside of the 3DoT board and the PCB motor controller. The battery mass was taken from last semester as a placeholder. We should expect the battery to be of equivalent or less mass than last semester. An allotment of 60g divided between the cables and the Motor Controller PCB have also been given as placeholders and will most likely alter based upon final design choices. Due to the nature of the design changes, this is only a preliminary mass resource report and is subject to change.

Power Report

power-report

The power resource comes from four basic factors that draw current from our supply source. Supply source will be defined as the battery on the 3DoT board as well as an external battery source. The 3DoT board will consist of the Atmega32U4 microcontroller, the HC-10 Bluetooth module, as well as the boost converter and was estimated at 110mA average by spiderbot. The motors will be separated into the server motors and the DC motors. Current draw from the servos was taken from the “Actual Current” measurement from last semester, and the draw of the DC Motors was taken from the average current draw from the initial torque calculations. The PCB design has changed, so the current draw is minimal due to last-minute design changes. Due to the nature of the design changes, this is only a preliminary power resource report and is subject to change.

Project Cost Estimate

By Paul Ahumada

cost-report-min

The Cost Report provides an estimate to what the expected costs will be. The previous semester had there project cost $257.48. There project had $443.76 allocated for the frame and had an actual cost of $5.00. There reports show that the robot was not made 100% of aluminum and used a combination of aluminum and PLA to reduce costs described by their mass reports. The cost report shown for 3rd generation shows an expected cost of $273.55 and is increased because of the margin. Previous semesters requested $400.00 and our increased margin brings us to $387.05. Numerous components were looked at and are included in the citations.

Citations:

  1. http://web.csulb.edu/~hill/ee400d/Lectures/Week%2005%20Project%20Plans%20and%20Reports/c_Generic%20Schedule.pdf
  2. https://www.servocity.com/hs-5065mg
  3. https://www.servocity.com/hs-65hb-servo
  4. https://www.servocity.com/hs-65mg-servo
  5. http://www.ebay.com/itm/Torque-Digital-Metal-Gear-Servo-Motor-for-RC-Robot-Helicopter-Airplane-Car-Boat-/222246871400?var=&hash=item33bef22168:m:mq1v5yVeOUDRTVVJUVjh70A
  6. http://www.ebay.com/itm/AE-Team-Associated-1-10-ProSC-ProLite-4×4-XP-DIGITAL-DS1903MG-STEERING-SERVO-/400948939305?hash=item5d5a6b4a29:g:j1MAAOSw0UdXqeLU
  7. http://www.robotshop.com/en/hitec-hs422-servo-motor.html
  8. https://www.arxterra.com/fall-2016-velociraptor-th-preliminary-design-document/
  9. https://www.google.com/search?q=pla+material&ie=utf-8&oe=utf-8#q=pla+material&tbm=shop&spd=8876641036563277883
  10. https://www.google.com/search?q=pla+material&ie=utf-8&oe=utf-8#q=pla+material&tbm=shop&spd=8876641036563277883
  11. http://www.homedepot.com/p/MD-Building-Products-24-in-x-36-in-Plain-Aluminum-Sheet-in-Silver-57794/202091743
  12. https://www.servocity.com/81-rpm-mini-econ-gear-motor
  13. https://www.servocity.com/90-rpm-micro-gear-motor-w-encoder
  14. https://www.servocity.com/90-rpm-micro-gear-motor
  15. http://www.batteryspace.com/A123-System-Nanophosphate-LiFePO4-18650-Rechargeable-Cell-3.2V-1100mAh.aspx
  16. http://www.batteryspace.com/smart-charger-3-0a-for-3-2v-lifepo4-battery-pack.aspx
  17. http://www.all-battery.com/TenergyLiFePO4BatteryCharger-01369.aspx?utm_source=GoogleShopping&utm_medium=GDF&gdffi=fb520bc42d4e46cbab702234d35f7d38&gdfms=58521D8DE97640DEAF38BED2760D36D6&gclid=CjwKEAjwjqO_BRDribyJpc_mzHgSJABdnsFW5P8tGT10YF5GFBHJeBKOgnXMOOc1RIUaGDwV8nozwhoCQvjw_wcB


Fall 2016 Velociraptor (Th): Preliminary Design Document

Project Manager – Paul Ahumada

Electronics and Control Engineer – Kevin Armentrout

Manufacturer and Design Engineer – Victoria Osaji

Systems Engineer – Robert Licari

Table of Contents

Program Objectives/Mission Profile

By Paul Ahumada

3rd Generation Velociraptor is a robot developed by the CSULB 2016 Fall Semester class that will expand on previous semester’s designs. The Velociraptor is to be a toy resembling Theropoda dinosaurs. Velociraptor shall compete in a Jurassic/Modern Game: Save The Human with other toys on the last day of class, December 15, 2016. The game will involve Velociraptor chasing another robot through various terrain by tele-robotic communication on the Arxterra Control Panel. The arena the Velociraptor must traverse is developed by the Game Committee and customer. The mission will display the robotic applications of the 3DoT Board developed by Arxterra and Velociraptor’s movement capabilities. – PM Paul Ahumada

Requirements and Verification

Program/Project

By Paul Ahumada

Level 1 Program Requirements

The Level 1 Program Requirements may resemble this:

  1. The 3rd Generation Velociraptor shall participate in the Game: Save The Human proposed by the game committee
  2. 3rd Generation Velociraptor budget shall not cost more than $450.00. This estimate was based upon 2nd and 1st Generation Bipeds [7]  [15]
  3. The Velociraptor shall demonstrate its capabilities on this December 15, 2016 according to CSULB Calendar 2016-2017 [14]

Level 1 Project Requirements

The Level 1 Project Requirements may resemble this

Level 1 Requirements

  1. The Velociraptor shall resemble a T-Rex of the Theropoda Dinosaur class [13]
  2. The Velociraptor shall navigate through the game terrain provided by the game committee. Velociraptor shall:
    1. Navigate on incline/declines no greater than 6.5 degrees
    2. Shall navigate on uneven surface heights no larger than .5 cm
    3. Shall utilize a foot design capable of traction on all surfaces
    4. Battery shall provide sufficient power to robot for duration of the game
  3. The Velociraptor shall statically walk [16]
  4. The Velociraptor shall dynamically walk [16]
  5. The Velociraptor shall use Bluetooth to communicate with Arxterra Control Panel  [17]
  6. The Velociraptor shall use a 3DoT board and implement I2C [17]
  7. The Velociraptor shall use a Portable Power Source

System/Subsystem

Level 2 System Requirements

By Paul Ahumada

  1. Shall implement a control system [PID or State Space] which shifts CoG on axis of legs maintain stability. The CoG shall be changed by two servos. There is one servo to control the head and one servo to control the tail. The acceleration and velocity of the CoG of the head and tail shall not exceed [data to be calculated] in order to avoid having momentum tip over the robot.  [Level 1-1]
  2. Shall implement control system [PID or State Space] which shifts CoG on axis of head, body and tail to maintain stability. The CoG shall be shifted by a servo controlling the platform of the body. The acceleration and velocity of the CoG of the body shall not exceed [data to be calculated] in order to avoid momentum causing robot to fall down. [Level 1-1]
  3. Shall have two legs supporting mass of robot. [Level 1-1]
  4. Shall use leg design that operates with cyclical movement that shall be controlled by a DC motor. [Level 1-1]
  5. Shall implement a control system which shifts the CoG over the planted leg while statically walking. The shifted CoG mass shall be within [to be calculated value] mm center of foot. The distance shall not consider vertical distance, Z. The distance from CoG and center of foot shall be calculated by margin of stability [to be calculated]. [Level 1-3]
  6. Shall implement a control system which tracks X, Y, and Z angles to the [to be found] precision. [Level 1-4]
  7. Shall implement a control system which tracks acceleration in the X, Y, and Z planes to the [to be found] precision. [Level 1-4]
  8. Shall track head and tail position to shift CoG by collecting data of servo angles to the [to be found] precision [Level 1-4]
  9. Shall utilize Bluetooth LE interface to provide Velociraptor commands from Arxterra Control Panel [Level 1-5]
  10. Shall connect head and tail servos via 3DoT Board servo interface. [Level 1-6]
  11. Shall implement an IMU [to be determined what kind] that communicates via I2C at a frequency rate [to be found] Hz. IMU data that collected shall be implemented into control systems. [Level 1-6]
  12. Shall use a CR123A 650mA rechargeable Li-ion battery from 3DoT Board [Level 1-6]
  13. Shall implement a motor controller [to be determined what kind] on the motor shield that communicates via I2C at a frequency rate [to be found] Hz. [Level 1-6]
  14. May use rechargeable batteries to power the Robot. [Level 1-7]
  15. The robot shall be able to continuously operate in game arena for minimum one hour. [Level 1-2]
  16. IMU shall send data as inputs to control systems for dynamic stability when encountering uneven surfaces and incline/declines [Level 1-2.1]
  17. Model of foot [to be decided] design shall [calculated] surface area to provide stability and not impede movements
  18. Traction of foot [to be determined] shall provide enough friction on all surfaces [study to be shown] of game terrain to prevent raptor falling over.  [Level 1-2]
  19. Shall change direction, left or right, by [to be determined arc] while walking. [Level 1-1]
  20. Shall be able to change direction for range 0-360 degrees, left or right, while not walking. [Level 1-1]
  21. Arduino Microcontroller Leonardo shall implement control algorithms [to be made] to be used in stability and user control of robot. [Level 1-7]

Level 2 Subsystem Requirements

Electronics Subsystem Requirements

By Kevin Armentrout

  1. Shall use batteries with a series terminal voltage of 3.7V. [Level 2-12] [4]
  2. Shall use leg motors with a gear ratio to produce a stall torque rating of at least 223 mN-m [Level 2-3] [Appendix]
  3. Shall use a leg design with a primary lever arm length of at a maximum of 7cm [Level 2-3] [Appendix]
  4. Shall use head and tail servos which produce a minimum of 50 mN-m of torque at 80 RPM and 125 mN-m of torque at 130 RPM. [Level 2-1] [Head and Tail Torque Graphs]
  5. Shall use a platform positioning servo that operates with a max speed of 80 RPM and a minimum torque rating of 238 mN-m. [Level 2-18] [Platform Graphs]
  6. Shall use a turning servo with a minimum torque rating of 139 mN-m. [Level 2-19] [Appendix]

Design Innovation

From our Creativity Presentation, we were able to generate ideas on how to talk challenges the 3rd Generation Velociraptor encounters. Major problems we must tackle for Fall 2016 is the ability to turn, CoG shifting along axis of head and tail, and changing the legs to cyclical movements. We have come across different solutions for each of these. For turning, we are thinking of using a servo to help the legs orientate a change in direction. Stabilizing an inverted pendulum will be the basis of our stabilization for the axis along the head and tail. Finally, the legs we are considering using are the UCI linkages because of their unique step pattern compared to Theo Jensen.

Creativity Exercise

Systems/Subsystem Design

Product Breakdown Structure

TBA

Electronic System Design

System Block Diagram

 electronic-interface-min

The electronic interface provides an idea of how the customer provided 3DoT board will move our robot. We used the 3DoT Block Diagram to get started. We will need a motor shield to connect to external devices that cannot fit onto the 3DoT board. Luckily, there is an I2C interface from the 3DoT board that allows us to add more devices. Because we need an I2C interface, we need an I2C chip that can connect to the amount of devices we needed. The I2C chip is explained in the Electronics research under design descriptions. The reason we do not have our DC motors directly connected to the 3DoT board is because it will always blow the polyfuse as determined by the mass of the robot. Further research will go into whether the 3DoT Dual Motor drive is the best fit in our motor shield. The electronics research goes into detail of the torque required to move our mass and the rpm needed.

Interface Definitions

TBA

Mechanical Design

TBA

Design and Unique Task Descriptions

Project Manager Research

As part of the game arena, friction coefficients of the surfaces must be found so our robot can maintain traction throughout the game. The table provided below shows that rubber has a higher static coefficient on cardboard than linoleum. This information helps if we would like to have rubber soles on our robot. Information that would be valuable that could not be found would be using plastic and also a study for friction coefficients on carpet. This information can be found from experimentation of by having a pulley design with one end having a mass dangling in the air and another end having our plastic or rubber mass. As we add more weight to the dangling mass, eventually the plastic or rubber mass on a surface will move.

Case Study Friction Coefficients Static Frictional Coefficient
Rubber on Cardboard .5-.8 Source Cardboard
Rubber on Linoleum .3-.5 Source Linoleum

Electronics Research

By Kevin Armentrout

Leg Motors

Level II System requirements dictated that motors would be used as the locomotive method for the Raptor robot. This is challenging for a number of reasons. First, motor position cannot be accurately controlled to specify angles of motion. Even if motor shaft position was monitored by means of a rotary encoder or other shaft measurement device, starting position would be a challenge. Secondly, motors tend to occupy a larger space and weigh more than servos. [1]

Analysis was performed in R to measure the maximum and operational torque values of various lever-arms, using the weight from the previous semester’s raptor as a basis for analysis. Full analysis code is in the appendix below. This analysis was performed using lever arms from 6 to 10 cm and calculating the maximum operational torque due to gravity and centripetal force. 10cm was approximately the length of the raptor’s head, leg and tail from last semester. Our design would be a modification from the previous semester so it was important to consider other level arm distances that were not used from last semester. This importance was especially emphasized by the fact that the legs will need to be completely redesigned to allow for continuous motion. This brought upon the condition that the primary lever arm of the motors and servos may need to change to conform to motor torque requirements, thus the range from 6 to allow for further lever arm considerations.

Once maximum torque values were calculated, torque over the leg motion cycle was calculated by applying a sin to the position. Cursory analysis of the primary lever arm, which would be exerting the highest magnitude of torque on the motor, showed that the lever arm typically rotated between 210 and 330 degrees [2]. This corresponded to a value, which I identify as a realistic maximum, or sin(60) of the calculated maximum. Logical analysis of leg locomotion confirms this. Using the Y-Axis of your leg as a reference, it typically will not exceed 60 degrees on a single stepping motion. The realistic torque values for the legs at various lever-arm lengths is listed in the appendix below.

leg-torque-min

Head and Tail Servos

The level II requirement that dictated the need to move the head and the tail stemmed from the need to shift the CoG to the planted foot, or maintain in stationary during dynamic movement. To evaluate how the CoG will shift, an analysis on moments of inertia needed to be performed over the full motion of the tail. Disassembly of the previous semester’s raptor to weigh the individual segments was impractical, so an analysis of material density, and weight of the components used on the head and tail segments was done in its place.

Density of ABS plastic, as well as length and width of the tail was taken into account, as well as the dimensions of the battery holder. The batteries used were AAs, and dimensions and weight of the AA batteries were taken into tail and head mass calculations. The torque was based on centripetal speed of the servos. Analysis of 5V servos showed that the majority of servos were in the 80-130 RPM range, which was used for our analysis of torque due to centripetal force.

An additional factor for consideration, similar to the legs, was varying the head and tail radius, and its effect on the CoG and centripetal torque. Servos must be selected with torque rating that is greater than the curve shown below for the specified radius length.

cog-change-min

servo-torque-h_t-min

Platform Servo

The platform servos will be used to move the entire control surface of the body in order to account for changes on the X-Z plane. In order to facilitate movement of the surface along this plane, we will need to account for the mass of the head and tail, as the Body components near the CoM will produce negligible torque due to the lever arm being of a small radius. This simplified the torque calculations to only concern the centripetal force of the motion along the Y axis, and the torque related to gravity. Below is the calculated chart with different servo speeds and head/tail radii. The selection of the Platform servo must exceed these values.

servo-torque-vs-servo-speed-min

Turning Servo

Unlike the other electric components, the turning servo must be able to turn the entire platform left and right to control the robot’s direction. This requires the torque that is applied to the servo to not only be the entire mass of the robot, but also the additional force due to the frictional coefficients of the surfaces of the robot will walk on. The calculated number is the torque on the servo solely due to the mass of the robot. This number, still, is quite substantial, and other solutions may be needed to be explored to allow the robot the ability to turn in a precise manner.

Batteries

Batteries are to be considered for the following purposes. Primarily, their current capacity, as it will provide the necessary resource to power the robot’s electronics and actuators, and secondly, it’s form factor and weight as a method of balance for the robot. Last semester, and the semester previous did a clever design with the batteries, placing them as counter weights on the head and tail. This evenly distributed the CoG along the X and Y axis, and also allowed the CoG to shift as the tail moved.  For this purpose, the AA form factor for batteries was considered as counter weights and primary power, and the slim form factor is considered as platform supplementary power.

Current draw was calculated by use of manufacturer ratings for representative components that fit the requirements for the motors and sensors, as well as the components of the 3DoT board. However, servo current load is not a required manufacturer listed quantity, and as such, is simply not listed on any of the servos we examined. Additionally, all servos listed on Sparkfun, Adafruit, Digikey, and Mouser have a minimum 5V rating. This would change the current-hours equivalent to a Watt-hour equivalent for consistency, as all other components will be powered via the 3.3V bus. For these points the servo calculations will be ignored for this initial power consumption analysis as they are not representative of actual values, and would be a best guess approximation.

The calculations took into account average motor load and peak sensor load to determine the following. Once again, these numbers are representative, and are not the actual final values that will be used for a full power analysis.

I2C

I2C functions in a daisy chain manner similar to USB, but has an address structure that is different. I2C can support up to 127 different addresses, but these addresses are unique and programmed at the hardware level [3]. Thus it is important that these addresses do not overlap in order to have proper sensor and control function. The 3DoT board is equipped with 2 Motor headers, 2 servo headers, and an I2C header, leaving at minimum 2 Servos that would need I2C control, and the IMU which would need I2C communication [4].

Motor Controller

A derived requirement from the number of servos and motors need for Robot operation is the need for an external motor controller shield. If the motors are to be placed on the shield, bi-directional motion would be necessary. This can be accomplished by means of an H-Bridge [5]. For the servos that would be attached, a PWM I2C controller would need to be utilized to ensure proper control over the devices. An ideal solution for rapid prototyping is a board that has both PWM functionality and H-Bridges for motor and servo control.

Inertial Mass Unit (IMU)

The need for an IMU comes from the requirement for dynamic stability of the Robot. In order to maintain the Robot dynamically stable, an accurate accountancy of both angular position on a three dimensional axis, and inertial shift detection by means of an accelerometer [6].  Due to the 3DoT board not having external pin headers except for those listed in the I2C descriptions, the interface for communicating with the IMU must be I2C.

Appendix

Peak Torques (N-m)
Radius 10 cm 9 cm 8 cm 7 cm 6 cm
Component Platform 0.238 0.203 0.170 0.140 0.113
Legs 0.279 0.251 0.223 0.192 0.167
Head/Tail 0.050 0.040 0.031 0.023 0.017
Turning 0.139 0.123 0.108 0.093 0.079


Representative Components Which Met Torque Criteria
Servo/ Motor Torque

(N-M)

Weight

(g)

Cost

($)

NL Current

(A)

FL Current

(A)

RPM Notes
Motors
ROB-12399 0.322 119 24.95 0.095 0.5 101 (@12V) [A6]
Tamiya 72005 0.235 140 13.95 0.15 2.7 51.3 [A7]
Tamiya 70168 – Double 0.223 120 9.25 0.15 2.1 38 [A1]
Servos
FS5103R 0.294 40 11.95 NL NL 80 (@5v) [A8]
EMAX ES08A 0.148 8.5 9.9 NL NL 83.3 (@5v) [A9]
Seeed 108090001 0.197 12.25 21.9 NL NL 83.3 (@5v) [A10]
Seeed 108090002 0.245 19.96 24.9 NL NL 100 (@5v) [A11]


Component Average Current Source
Leg Motors 1.583 A [A1]
Leonardo (3DoT) 0.56 A [A2-A3]
IMU 0.00686 A [A4]
Motor Shield 0.01 A [A5]
Total 2.16 A


R Source Code for Calculations

# Determined by the Servo


stepSize = (pi/180)*(360/3000)

thetaHead = seq(-pi/2,pi/2,stepSize)

thetaTail = -thetaHead

thetaLeg = seq(0,2*pi,stepSize)

# In RPM

MaxSpeed = seq(80,130,.1)


# Max Incline on Y Axis


MaxY = (6.5*pi/180)


# Centripital Acceleration

# http://www.engineeringtoolbox.com/centripetal-acceleration-d_1285.html


A = (2*pi*MaxSpeed/60)^2 * Radius/100


# AA weight is 23g

# AA dimensions are in cm, which is used to determine ABS plastic

# Battery holder mass

# http://data.energizer.com/PDFs/E91.pdf


innerLength = 5.050

innerWidth = 1.450 *2

innerHeight = 1.450


outerLength = innerLength + .5

outerWidth = innerWidth + .5

outerHeight = innerHeight + .5


HolderVolume = (outerLength * outerWidth * outerHeight) – (innerLength * innerWidth * innerHeight)


AA = 23

# ABS plastic weight is .97g/cc

# http://www.stelray.com/reference-tables.html


ABSDensity = .97


# Calulate tail and head weight

# Thickness of 1cm for consistant calculations


tailMass = 2*(AA) + (Radius*(1^2) + (HolderVolume)) *ABSDensity

headMass = tailMass


# Previous Semester’s Robot Mass in grams

# https://www.arxterra.com/spring-2016-velociraptor-project-summary/#Size_Weight


Mass = 657

BodyMass = Mass – tailMass – headMass


HeadPositionX = Radius*cos(thetaHead)

HeadPositionY = Radius*sin(thetaHead)


TailPositionX = -Radius*cos(thetaTail)

TailPositionY = -Radius*sin(thetaTail)


# For moments of mass


TailMassX = TailPositionX * tailMass

TailMassY = TailPositionY * tailMass


HeadMassX = HeadPositionX * headMass

HeadMassY = HeadPositionY * headMass


X_Moment = (TailMassX + HeadMassX) / (tailMass + headMass + BodyMass)

Y_Moment = (TailMassY + HeadMassY) / (tailMass + headMass + BodyMass)


g = 9.8


LeverArm = max(Y_Moment)

# Torque due to gravity (Y Axis)


MaxTorqueHeadY = (headMass/1000) * g * Radius/100

MaxTorqueTailY = (tailMass/1000) * g * Radius/100


# Realistic torque due to gravity


RealisticTorqueHeadY = MaxTorqueHeadY * sin(MaxY)

RealisticTorqueTailY = MaxTorqueTailY * sin(MaxY)


# Torque due to Acceleration (X Axis)


MaxTorqueHeadX = (headMass/1000) * A * Radius/100

MaxTorqueTailX = (tailMass/1000) * A * Radius/100


# Platform Maximum Torque (Y Axis)


MaxTorquePlatform = MaxTorqueHeadY + MaxTorqueTailY + ((headMass/1000) * A * Radius/100) + ((tailMass/1000) * A * Radius/100)


# Frictionless Turning Torque


MaxTurningTorque = ((Mass/1000) * g) * LeverArm/100


# Frictionless Leg Moving Torque


MaxLegTorque = (Mass/2)/1000 * g * LegRadius/100

LegTorque = abs(MaxLegTorque * sin(thetaLeg))

RealMaxLegTorque = abs(MaxLegTorque * sin(60/180 * pi))


Manufacturing Research

Materials Trade-Off Study:

The previous semester, spring 2016, did a very detailed material trade-off study that we liked based on Aluminum and PLA Filament (3D printing material). We found this very useful because we have ideas that we can now build off of. Although, our design may differ in some places and our requirements have changed a bit these are still information we can use because the basics requirements are covered such as walking statically and dynamically and being able to walk up and down uneven surfaces. What I really liked most is that they used the two different material depending on their needs. They used the aluminum for their bottom piece because they wanted to maximize the weight on the head and tail. Then they used the PLA filament for the foot that way the robot could walk statically and dynamically without slipping on different surfaces.

Unique Design:

Victoria Osaji

  1. Create a 3D model of the Velociraptor using Solidworks. Send out to be 3D printed. (4 weeks)
  2. Simulate the model and perform all testing in Solidworks. (2 weeks)
  3. PCB Design on EagleCAD. (2weeks)

Sources

Project Manager:

  1. Spring 2016 Velociraptor: Preliminary Design Document
  2. Spring 2016 Velociraptor: Project Summary
  3. Spring 2016 Verification Test
  4. Spring 2016 Velociraptor Final Project Video
  5. Friction Coefficient Cardboard
  6. Game: Save The Human
  7. Spring 2016 Cost Report
  8. Spring 2016 Work Breakdown Structure
  9. Spring 2016 Completed Schedule Breakdown
  10. Spring 2016 Burn Down Chart
  11. Spring 2016 A-TechTop Research Project
  12. CSULB Health and Safety Documents
  13. Theropoda Picture
  14. CSULB 2016-2017 Academic Calendar
  15. Fall 2015 MicroBiped Final Cost
  16. Definition Static and Dynamic Walking
  17. 3DoT Board
  18. Game: Save The Human
  19. Source Linoleum

Electronic and Control:

  1. http://handyboard.com/hb/faq/hardware-faqs/dc-vs-servo/
  2. http://sites.uci.edu/markplecnik/projects/humanoid-gait/
  3. https://learn.sparkfun.com/tutorials/i2c
  4. https://www.arxterra.com/3dot/
  5. http://www.modularcircuits.com/blog/articles/h-bridge-secrets/h-bridges-the-basics/
  6. https://www.sparkfun.com/pages/accel_gyro_guide
  7. http://daf.csulb.edu/offices/ppfm/ehs/programs/esp/electrical_safety_program.pdf (Working Near Exposed Live Parts section)
  8. https://www.ada.gov/regs2010/2010ADAStandards/2010ADAstandards.htm (Ramps Section)
  9. [A1] https://www.pololu.com/product/114
  10. [A2] http://www.atmel.com/Images/Atmel-7766-8-bit-AVR-ATmega16U4-32U4_Datasheet.pdf (Section 29)
  11. [A3] https://www.arxterra.com/3dot/
  12. [A4] https://learn.adafruit.com/adafruit-10-dof-imu-breakout-lsm303-l3gd20-bmp180/design-files (Each component listed individually)
  13. [A5] https://learn.adafruit.com/adafruit-motor-shield-v2-for-arduino/resources
  14. [A6] https://www.sparkfun.com/products/12399
  15. [A7] https://www.pololu.com/product/74/pictures
  16. [A8] https://www.adafruit.com/product/154
  17. [A9] https://www.seeedstudio.com/EMAX-9g-ES08A-High-Sensitive-Mini-Servo-p-760.html?gclid=CPzajsTKqb8CFYhafgodCKsA7A
  18. [A10] http://www.digikey.com/product-detail/en/seeed-technology-co-ltd/108090002/1597-1199-ND/5488079
  19. [A11] http://www.digikey.com/product-detail/en/seeed-technology-co-ltd/108090001/1597-1198-ND/5488078

Manufacturer:

  1. http://sites.uci.edu/markplecnik/projects/leg_mechanisms/leg_designs/
  2. https://www.arxterra.com/spring-2016-velociraptor-material-trade-off-study-update/
  3. https://www.arxterra.com/spring-2016-velociraptor-hardware-simulation/
  4. https://www.arxterra.com/spring-2016-velociraptor-spring-experiment/

Fall 2016 Game: Save The Human


Gaming Committee Team Members:

Velociraptor (Th) – Paul Ahumada

Velociraptor (W) – Lam Nguyen

Biped – Gifty Sackey

Goliath – Kristen Oduca

Table of Contents

Overview:

Biped has accidentally lost his way in the forest. Unbeknownst to Biped, Velociraptors lurk in the shadows. Biped must flee to the safe haven before the raptors get him. Better pick up a weapon and protect yourself! All robots shall navigate through terrain of the arena.

Rules:

  • Robots start at designated starting zones
  • If Biped makes it to the safe-haven zone, Biped wins
  • If Velociraptors make contact (touch) with Biped or Biped does not reach the safe-haven zone, Velociraptors win
  • Goliath shall only follow Biped
  • Biped can use a sensor to sense a weapon on a space that is 4inx4in. Biped will actuate (something obvious to the Velociraptor teams) that they currently possess a weapon. They remain invincible for 5 minutes. If a Velociraptor touches the Biped while it is invincible, they are given a yellow card. If they do this a second time, they are given a red card and will be removed from game by IA or Professor
  • Time Limit of 60 minutes
  • If a robot falls down during the game due to terrain, they are considered out and will be removed from game by IA or Professor
  • If Goliath accidentally bumps into any of the robots and knocks them down, that robot is removed from game by IA or Professor

View and control:

  • Biped controller shall see via Arxterra Android or iPhone mounted on Goliath and will operate in RC mode
  • Velociraptor teams shall see via cameras in fixed positions in game course and operate tele-robotically from the Arxterra control panel

Terrain:

  • Terrain shall be supplied by the participants
  • Arena size shall be front a 12ftx5ft
  • Terrain shall consist of cardboard
  • Terrain shall consist of no more than 30% of the arena area
  • Surfaces of arena shall consist of classroom floor (linoleum) and cardboard
  • Terrain shall be assembled by Customer and IA without the knowledge of participants
  • Terrain objects shall consist of hills and uneven surfaces made of cardboard
    • Hills shall be a maximum of 1ftx1ft in area
      • Terrain incline/declines shall be no larger than 6.5 degrees
      • Uneven surfaces shall not be larger than .5cm in height when stepping on
    • Uneven surfaces shall be strips of cutout cardboard with an area no larger 1inx1in
      • Uneven surfaces shall not be larger than .5cm in height


Fall 2016 Velociraptor (W): Preliminary Design Documentation

By: Lam Nguyen (Project Manager)

Hal Vongsahom (System Engineer)

Taylor Farr (Controls Engineer)

Aaron Choi (Manufacture Engineer)

Program Objective

Lam Nguyen (Project Manager)

The Fall 2016 Velociraptor is inspired by both the biped Titrus-III robot and the Theo Jansen biped robot. The Titrus-III was developed by the Tokyo Institute of Technology and the Theo Jansen biped robot was designed by the Gakken company. The objective for this year’s project is to avoid utilizing servos by implementing alternative motors to meet the customer’s demand. The most compatiable design for using alternative motors is the Theo Jansen biped robot known to model human giat motion that utlize continuous rotion with linkages.

Mission Profile

Lam Nguyen (Project Manager) 

The Fall 2016 Velociraptor had the wonderful opportunity to be included in this years Game Arena called “Save the Humans”. Representing the dromaeosauridae theropod dinosaur from the Cretaceous period the fall the the Velociraptor will navigate through the game arena terrain and hunt down the Biped robot before reaching the safe-haven zone in a time duration of 30 minutes.

The Fall 2016 Velociraptor will demonstrate its navigation cabablities by operating telerobotically from the Arxterra control panel. With a fixed view of the game arena the Velociraptor will navigate through both flat surfaces and uneven surfaces such as linoleum and cardboard.

Requirements

Program Level 1 Requirements

Lam Nguyen (Project Manager)

  1. According to the CSULB Fall 2016 Academic Calender, the Velociraptor biped robot shall be tested by Wednesday, December 14, 2016, the last day of EE400D [1].
  2.  The Fall 2016 Velociraptor biped robot budget shall be a limit of $400.00 [2].
  3.  The Fall 2016 Velociraptor biped robot shall participate in the game “Save the Humans” defined by the game committee. [3]

Project Level 1 Requirements

Lam Nguyen (Project Manager)

  1. The Velociraptor biped robot shall resemble dromaeosauridae theropod dinosaur from the Cretaceous period. [4]
  2. The Velociraptor shall be able to statically walk on the terrains of the game arena.
  3. The Velociraptor shall be able to dynamically walk on the terrains of the game arena.
  4. The Velociraptor shall use Bluetooth communication with the Arxterra Android or Iphone application.
  5. The Velociraptor shall use a 3DoT board with a custom I2C shield.
  6. The Velociraptor shall navigate through the game arena’s terrain.
  7. The Velociraptor shall use a portable power source for the duration of the game “Save the Human”.

References

[1] Time, B. C. (n.d.). Final Exam Fall 2016 Schedule Charts. Retrieved September 21, 2016, from http://web.csulb.edu/depts/enrollment/registration/final_exam/fall_chart.html

[2] Khoivu0814. (2016). Retrieved September 21, 2016, from https://www.arxterra.com/spring-2016-velociraptor-preliminary-project-plan/

[3] Index of /~hill/ee400d. (n.d.). Retrieved September 21, 2016, from http://web.csulb.edu/~hill/ee400d/F’16%20Project%20Objectives%20and%20Mission%20Profile.pdf

[4] Dromaeosauridae. (n.d.). Retrieved September 21, 2016, from https://en.wikipedia.org/wiki/Dromaeosauridae

System/Subsystem Requirements

Project Level 2 Requirements – System Requirements

Lam Nguyen (Project Manager)

Hal Vongsahom (System Engineer)

Taylor Farr (Controls Engineer)

Aaron Choi (Manufacture Engineer)

  1. The Velociraptor shall walk on two feet and use both head and tail to control the robot’s center of gravity.
  2. The Velociraptor shall implement the head and tail to shift it’s center of gravity on one foot in order to statically walk in the game arena’s terrain.
  3. The Velociraptor shall use an accelerometer and a gyroscope to detect its reference to x, y, z space to adjust it’s center of gravity to dynamically walk in the game arena’s terrain.
  4. The Velociraptor shall use an HC-06 Bluetooth to communicated with the Arxterra Application to control the robot’s movement.
  5. The 3DoT board shall receive commands from the HC-06 Bluetooth and decode the command data, and transmit the command data to the I2C to control the actuators.
  6. The Velociraptor shall provide a lithium polymer battery to provide power for the duration of 30minutes from the game objective.
  7. The Velociraptor shall be able to travel up an incline/decline slope no larger than 6.5 degrees.
  8. In order to navigate around the game arena’s terrain the Velociraptor shall travel on cardbaord and class room floor, uneven surfaces of the terrain shall be no larger than 0.5 cm.

Subsystem Level 2 Requirement

Taylor Farr (Elecontrics Engineer)

  1. In order for the velociraptor to be able to operate properly, an input and output system must be designed. For our inputs, we will be using a digital accelerometer to measure acceleration as well as a gyroscope to determine the position from a neutral point at any given time. [1] & [4]
  2. The accelerometer shall be digital in order to reduce coding(Help from Hal). Trade-off studies shall be conducted in order to find an appropriate accelerometer that is compatible with Arduino. [1]
  3. For actuators, motors shall be use to move the Velociraptor forward and performing actions in order to keep it stable. [2]
  4. Servos shall be implemented in the head and tail to move the head and tail to shift the center of mass 30 degrees in either direction. In order to correlate the sensors and actuators, a microprocessor is required to interpret the data at input pins and then provide the appropriate signals to the output pins in order to activate the motors and servos. [2]
  5. The motors for the legs shall provide enough torque to support the 900 grams. Operating speed shall be determined by how fast the velociraptor needs to move in order to control its dynamic walk. The torque necessary to move the robot and support the 900 grams must be taken into consideration. This calls for a trade-off study of motors and servos in order to pick the appropriate ones. [3]
  6. Based on the speed and torque required, trade off studies shall be conducted to find an appropriate power supply that supplies enough current at the appropriate voltage.
  7. Fritzing diagrams shall be utilized in order to map out circuits connected to Arduino that provide appropriate and accurate data. Once this has been established, we will model the electronics in LT Spice, send the circuits to Eagle, and then design the PCB.

Aaron Choi (Manufacturer Engineer)

  1.  In order to meet the customer’s demand in alternative motors the Velociraptor shall use the Theo Jansen Biped robot’s linkages for continuous movement. [5]
  2.  In order for the Velociraptor to operate the mass shall not surpass 1000 grams.

References

[1] MAV-blog. (n.d.). Retrieved September 21, 2016, from http://tom.pycke.be/mav/69/accelerometer-to-attitude

[2] @. (2014). How a Robot Can Keep Its Balance and Stand up Even if it Gets Kicked – Case Study – Smashing Robotics. Retrieved September 21, 2016, from http://www.smashingrobotics.com/how-a-robot-can-keep-its-balance-and-stand-up-even-if-it-get-kicked-case-study/

[3] http://www.robotshop.com/en/gear-motors.html

[4] MAV-blog. (n.d.). Retrieved September 21, 2016, from http://tom.pycke.be/mav/70/gyroscope-to-roll-pitch-and-yaw

[5] @. (n.d.). Theo Jansen-style Biped Robot kit by Gakken. Retrieved September 21, 2016, from https://www.adafruit.com/product/1841

Design Innovation

The team worked off of the creativity presentation, with ideas bouncing back and forth we considered additional problems and applied our research to find a solution. One of the main problems we have considered are the motors which provides a continous rotion for our Velociraptor. Since the customer demands motors instead of servos, that effects the design of the legs as well. For a model to follow we bought a Theo Jansen Biped Robot for further study of the linkages for the legs. We will create a design for the legs and chassis that with less amount of material as possible for prototyping.

Creativity Presentation

Creativity Presentation PowerPoint

System/Subsystem Design

Product Breakdown Structure

Hal Vongsahom (System Engineer)


Product Breakdown Structure

Figure 1

The image display on Figure 1. the product breakdown structure.  This is a high overview of the structure flowing from the top down to the structure and component of the velociraptor.

Power

The velociraptor shall be power by a portable supply source. The battery will power the systems 3Dot board, I2C, DC motors, Servos, and the Accelerometer/Gyroscope. This can be thought of as the food and energy necessary for the velociraptor to move.

Software

The software required by the customer is the Arxterra app. The Arxterra acts as a friendly user interface that will help control the movement of the velociraptor. The codes will be written in C++ in Arduino. All of the subroutine will be develop to properly control the movements of the velociraptor.

Communication

The main component to the velociraptor communicating properly is dependent on the Bluetooth. The Bluetooth will receive data packets that must be decoded. The Bluetooth will receive data from the Android phone.

Actuators

The actuators for our system are DC motor and Servos. The DC motor will control the legs to perform walking. The servos will govern the head and tail movement for the velociraptor. Another conceptual way to think of the actuators are it is the muscle of our systems.

Manufacture

This can be considered the bones, and the entire body of our system. The manufacture of the velociraptor head, tail, and body will be printed and constructed. The PCB will also be design and printed out to form the blood vessels of the velociraptor.

Reasoning

The customer requires our velociraptor navigate through the game arena with different surfaces and inclines/declines. Therefore, it is important for the design to incorporate as many DC motors or Servos to not restrict movement of the velociraptor.

Electronic System Design

System Block Diagram

Hal Vongsahom (System Engineer)

3dotboard

Figure 2

A system block diagram above shows the corresponding inputs, power, extended peripheral, outputs, and communication devices that will be use on this project. The image shows the input devices that will be sending data to the microcontroller will be the accelerometer and the wireless Bluetooth device. The communication that will contribute to controlling the velociraptor movement will be the Android phone and the Arxterra application. The portable battery device will power both the microcontroller, the I2C, and the outputs such as DC motors and Servos. This system diagram illustrates the important of the microcontroller acting as the brain for all other components to operate properly.

Interface Definition

Interface

Figure 3

3Dot Board

Figure 4

The above image in Figure 4 below lists all the pins in the Arduino microcontroller. It also gives a clear understanding of how much digital pins and analog pins are on the microcontroller. This can then lead to us designate each pin to control the devices needed for the velociraptor to operate successfully.

Assigned Pins for Input and Outputs

Figure 5

Pins for the velociraptor in the above image

System Resource Map

System

Figure 6

The table above list the system resource. A new requirement this semester from the customer is that we are required to have an I2C board. The 3Dot board is utilizing an Arduino Leonardo and the pins for SCL (Clock line) and SDA (Data line) are limited to one each. Therefore, we extend the SCL and SDA with the I2C board to connect the MPU-6050 accelerometer/gyroscope.

In addition, the primary design for our velociraptor will be using 2 DC motors and 2 servos. The DC motors only require a Vcc and Gnd, and the servos require PWM. If our design requires more DC motor or Servo we can add this on the 3Dot board pins or the I2C board. This will overall give us more flexibility.

Resources

[1] https://github.com/Bouni/Arduino-Pinout & https://www.arxterra.com/spring-2016-velociraptor-preliminary-design-document/

Mechanical System Design

Taylor Farr (Elecontrics Engineer), Hal Vongsahom (System Engineer), & Aaron Choi (Manufacturer Engineer)

Leg Design

Previous generations of the Velociraptor utilized servos in the leg design. The controlled angle of rotation from the servos allowed the Velociraptor to walk statically. However, due to the customer’s demands, servos are not to be implemented within the leg design. Therefore, the Velociraptor shall utilize a DC motor. Since the DC motor use a continuous rotation, the Jansen’s Linkage shall be implemented with the leg design. The Jansen’s Linkage utilizes a joint to be driven by a continuous rotational motion.

Theo Jansen Linkage

Figure 3

In the Figure 3 above, the leg mechanism models a Jansen’s linkage. This system utilizes a fixed point and a rotating point to model the human walking gait.

Resources

[1] AMANDA GHASSAEI: HOME. (n.d.). Retrieved September 21, 2016, from http://www.amandaghassaei.com/files/thesis.pdf

[2] What’s The Difference Between DC, Servo & Stepper Motors? (2015). Retrieved September 21, 2016, from https://www.modmypi.com/blog/whats-the-difference-between-dc-servo-stepper-motors

Design and Unique Task Description


Taylor Farr (Elecontrics Engineer)

The previous semester was unsuccessful with dynamic walking due to their sensors. They used an analog accelerometer to measure walking up inclines, and the previous semester did not use a gyroscope. The problem with analog is the converted codes will have tons of lines of codes. Therefore, compile too much memory on the Arduino Leonardo. In addition, there sensors was not accurate because they did not use a gyroscope. Therefore, this semester we are using a gyroscope in our system. This can monitor the displacement of the body from the neutral balance state, and update in real time. Moreover, we will use a digital accelerometer and gyroscope so that the coding will be simpler thus speeding up the processing time.

Sensor Selection

We have selected the MPU0605 as the gyro/accelerometer. The reason we choose this particular device as a sensor is it has both the features of an accelerometer and gyroscope. It also has an analog to digital converter built in.

Motor Selection

Once the sensor has been selected, the next task is to select the appropriate DC motors for the legs. Some options are brushless, brushed, shunt, series, or stepper. From these options, we will conduct trade off studies. Based off these studies, we will select the appropriate motors and servos that satisfy the torque and speed needed based on weight requirements.

Power supply selection

Now that the motors have been determined, we will select the appropriate power supply based on the power consumption of the selected motors. Based on requirements, we will use lithium ion batteries.

Aaron Choi (Manufacturer Engineer)

  1. Project level 1 requirements describe the velocraiptor to statically and dynamically walk. To improve the walking motion, the feet of the Velocraiptor shall implement a toe joint. This toe joint enhances performance and stability of biped robots [1], specifically increasing walking speed [2] and reducing energy consumption compared to a flat foot [3]

Resources

[1] Kwon, SangJoo, and Jinhee Park. “Kinesiology-Based Robot Foot Design for Human-Like Walking.” International Journal of Advanced Robotic Systems 9 (2012).http://cdn.intechopen.com/pdfs-wm/41665.pdf

[2] Ouezdou, Fathi Ben, Samer Alfayad, and Bachar Almasri. “Comparison of several kinds of feet for humanoid robot.” 5th IEEE-RAS International Conference on Humanoid Robots, 2005.. IEEE, 2005. http://ieeexplore.ieee.org/document/1573556/?arnumber=1573556

[3] Sellaouti, Ramzi, et al. “Faster and smoother walking of humanoid HRP-2 with passive toe joints.” 2006 IEEE/RSJ International Conference on Intelligent Robots and Systems. IEEE, 2006. http://ieeexplore.ieee.org/document/4059197/?arnumber=4059197


Spring 2016 Velociraptor: Project Summary

By: Khoi Vu (Project Manager)

Table of Contents

Program Objectives & Mission Profile:

The Spring 2016 Velociraptor biped was inspired by the robot Titrus-III. The robot that was designed and created by Tokyo Institute of Technology. The purpose of this project is to design a Tyrannosaurus class biped robot to be used as a toy. The mission profile is to demonstrate the feasibility of the dinosaur biped as toy product. The objective of this project focuses on a toy with the ability to detect and avoid obstacles. The Velociraptor will be controlled wirelessly by establishing a communication between a Bluetooth module and the Arxterra Android application.


More information including  the Program & Project requirements can be seen in this velociraptor blog:

The Design:

The design of the Spring 2016 Velociraptor focuses on solving flaws that may have caused previous generation Velociraptor to failed. These problems were discovered in a creativity activity using a variety of methods. Some of these methods include brainstorming approach by having the engineers listing out possible reasons that may have caused the last generation to failed, attributes listing of the robot, and Lateral Thinking using a different point of view and as well using the forced relationship technique. The team had narrow the problems to four flaws that could be improved and increase the chance of success for the Spring 2016 Velociraptor. The conclusion of the activity can be seen in Figure 1 below.


IMG_0544

Figure 1: Creativity Activity

More information including the methods for the Design Innovation can be seen in this velociraptor blog:


Size & Weight:

One of the main problems that occurred in the Fall 2015 MicroBiped was that it was extremely heavy. This was due to the facts that everything in the previous generation was printed completely solid. The measured weight of the MicroBiped was 920 grams. With the new design of the Spring 2016 Velociraptor, the team was able to decrease the size but as well as the weight of the robot to approximately 600 grams. In Figure 2b showing the final robot’s actual weight 657 gram.


920grams            IMG_0842

Figure 2a: Fall 2015 MicroBiped                                  Figure 2b: Spring 2016 Velociraptor

This is a 30% reduction in weight from the previous generation. This design innovation reduces the weight of the robot, this also leads to a reduction of stress that is put on the servos. By reducing the stress on the servos we also lowered the power consumption of the robot.  The engineers were able to reduce the weight by reducing the printing material needed to hold the robot together but as well as placing the servos tightly together, this method reduced the amount of material needed to be print. The team also remove the head and tail of the robot completely to reduce the weight and instead using the weight of the battery as the head and tail (Figure 2b).

Center of Mass:

In figure 2a, you can see that all the components of the robot where placed at the body, this created a problem in the center of mass. when the head and tail of the robot turn to one side it was unable to stabilize itself on one foot to change the position of the other foot. This was a critical problem because if the robot is unable to balance itself on one foot it will be unable to meet Level 1 requirement 5, which stated that the robot must be able to statically walk the course. In the new design, you can see that we have change how the robot weight is distributed. First, we remove 2 large item, the head, and the tail. By removing this part we not only significantly reduces the mass but as well as reduce the printing time for the project. Second was to instead of using 1 large battery which was placed  under the body in the previous generation, we split the battery to 2 pieces and used them as the weight of head and tail to counter the weight of the body (Figure 2b).


More information can be seen on this Velociraptor blog:

Servos: 

Servos are designed to provide torque not to hold weight, this was one of the flaws in the Fall 2015 MicroBiped. The weight of the head and tail of the robot were completely held by the servos. In the new design, we wanted to distribute the weight of the head and tail to the body. To accomplish this we designed a triangular shaped frame that held the head or tail. This frame in then connected to the aluminum piece of the body that held all the servos. This design put the majority of the head and tail weight to the lower aluminum body frame. However, we realize that our design still contains a flaw in which the servos still need to provide a lot of torque to lift the head and tail. Therefore, the team went back to the drawing board. To fix this problem we used the forced relationship technique, by forcing the robot to take the attribute of a garage door. The team came up with an idea of using a spring to hold the weight of the robot, this removes the stress on the servos while moving the head and tail.


More information can be seen on this velociraptor blog:

Joints:

The design of the Leg is extremely important for the stability and balance of the robot while walking. In the previous generation, there was a critical error that may have to cause the robot unable to walk. After the team carefully analyzing the Microbiped, the engineers discover that it was missing critical joints that help the robot maintain balance while walking but as well stabilizing the robot. The third joint helps the robot holds its foot parallel to the ground or the walking surface. This design can be seen in the 3D model as well as in the exploded view.


More information on Joints can be seen in this velociraptor blog:


Project Features:

3D Model:

3D model is crucial for designing our robot. Using Solidworks program to draw our model helped our team to visually see and validate the feasibility of our design. Rather than constantly 3D printing components to test for the center of mass and the mass of the legs, by simply using Solidworks mass properties utility we were able to validate and verify. By using Solidworks not only will we be able to test the feasibility of the robot but also decrease printing time and cost.

More information describing the methods of Designing and Manufacturing can be seen in this velociraptor blogs:

Sensors:

Besides the communication Bluetooth HC-06 device, the two sensors used for the velociraptor are the accelerometer and the ultrasonic rangefinder.

Accelerometer:

The choice of orientation sensor used was the ADXL335. It is an analog data type sensor capable of detecting orientation on all three axes, x, y, and z. While a gyroscope/accelerometer combination board is more accurate and inexpensive, it was unfeasible seeing the serial code in the Arduino took up over 50% of program memory, and due to time constraints, this chunk of code was unable to be edited in a short time frame. The ADXL335 accelerometer is not only simple in terms of coding, but also accurate within a couple degrees. The data obtained from the accelerometer will sense whether the velociraptor is going up an incline. Upon receiving such information, the velociraptor will initiate a different walking code moving the center of mass towards the head and allowing the velociraptor to handle walking upwards.

IMG_4814

ADXL335 accelerometer

Range Finder:

The choice of ultrasonic sensor for the velociraptor was the MaxSonar EZ3 MB1030. It is capable of detecting no less than 5 inches and up to 254 inches. There is a resolution of +1 inch due to an acoustic effect and becomes even more accurate at farther distances. It has both an analog and PWM pin for different output types, but the PWM option was chosen here for more accuracy and less noise. The velociraptor will use this sensor so that upon reaching a certain distance away from an object or wall of hindrance, the velociraptor will stop in its steps and wait for the user to choose whether to turn left or right.

IMG_4813

MaxSonar EZ3 MB1030 ultrasonic rangefinder


More information can be seen on this velociraptor blog:

System Design:

Updated Block Diagrams:

System block diagram Final 1.2

Finalized System Block Diagram


Finalized block diagrams including interface matrix and system block diagram showing interface connections and active control circuits for statically and dynamic walk showing what software blocks are being sent from Arxterra to the microcontroller.
More information can be seen on this velociraptor blog:

Microcontroller Trade-off study:

In order to determine what microcontroller that should be utilized for the brain of the Velociraptor, a trade-off study was conducted. On the basis of what pins the components that make up the build of the Velociraptor will utilize as estimated in the systems resource map as presented in the PDR and other important factors as weight, dimensions and cost the Arduino Micro Atmega32U4 microcontroller was chosen.
More information can be seen on this velociraptor blog:

Bluetooth Arxterra Communication:

Bluetooth setup

To control the Velociraptor wirelessly as stated in project level 1 and 2 requirements a Bluetooth communication between the robot and the Arxterra application on an android device needed to be established. This blog post gives an instruction on how to set up first the
Bluetooth connection; download Arxterra application, Bluetooth setup on breadboard and connection to the microcontroller, Bluetooth code in Arduino IDE and lastly configure Bluetooth on android device and Arxterra application for a successful connection. To verify the Bluetooth serial communication with Arxterra app, a setup of four LEDS on the breadboard was built to be controlled by the joystick on the app. This setup was created to show the joystick control of four different LEDS, so the future walking code could simply be implemented into the joystick code and control the Velociraptor to walk forward and turn etc.
More information can be seen on this velociraptor blog:

Experimental Results:

Power: 

The power test was conducted to determine the current draw of the robot, the experiment was done using a single servo with a different mass attached to the servo lever arm. We also completed the actual power consumption of the robot after it was assembled. The total power draw of the robot was no more than 2000mA, this allows us to estimated that with 6000 mAh battery, the robot can be used for about 3 hours.

For more information about the power, the test can be seen on the Velociraptor Blog post.

Incline:

The purpose of the incline test is to determine the maximum angle the robot will be able to stand or walk on an incline. In the test, a variety of angle used to determine at which angle the robot failed to stabilize itself on the incline. Furthermore, the robot also stood in the different position on the incline to determine where the center of mass will fail to land on the robot’s foot.

For more information about the Incline, the test can be seen on the Velociraptor Blog post.

Material Strength:

Material trade-off studies have been done in order to find the suitable material to hold the weight of the head and tail. Our original design to incorporate the PCB and all sensors underneath the robot required us to have a hollow bottom piece. We needed to maximize the space which required thinner chassis for the bottom piece. After doing a quick material trade-off study as well as a material experiment we’ve decided to incorporate aluminum to certain components of our robot to reduce the weight of the robot but as well as maximize the strength of the robot.

For more information about the material trade-off studies can be seen on the Velociraptor Blog post.

Springs:

After assembling the prototype, we’ve realized the weight of the head and tail were giving too much stress toward the servos. We decided to incorporate a new design on the robot, by adding a spring to lessen stress on the servos holding up the head and tail. By adding the spring, not only did it reduce the weight on the servos to hold up, we’ve observed it also reduced the power intake by the servos.

For more information aboutSpring Experiment can be viewed on the Velociraptor blog post.

Acetone Bath:

After finalizing our prototype, in order to unify the surface texture of 3D PLA filament and Aluminum we’ve decided to use Acetone Bath to smooth out the uneven surfaces created due to 3D printing. After few trials to maximize smoothing texture, sanding the 3D materials before acetone bath gave the best results.

For more information about Acetone Bath can be viewed on the Velociraptor Blog post.

Subsystem Design:

Interface Definition:

The interface definition shows the pins that are on the Arduino Micro, the table below show how the Spring 2016 Velociraptor is connected to the Arduino Micro.

Interface matrix FinalInterface Definition

More information can be seen on this velociraptor blog:

PCB Design:

This section will showcase the process of creating and testing the PCB, from the fritzing diagram, to breadboard testing, to Eagle schematic, and finally to the PCB layout.

Fritzing Diagram:

The first step towards the fabrication of the PCB is making a Fritzing diagram. Here, the microcontroller, sensors, actuators, power source, and voltage regulator are laid out. A fritzing diagram is particularly important in pin mapping on the Arduino micro. There is a communication device, a digital ultrasonic sensor, an analog accelerometer, and digitally controlled servos. The Arduino has a limited amount of digital, analog, serial, I/O, etc. pins. Upon completion of the Fritzing diagram, it is noted that there are sufficient pins on the micro to suit the velociraptor needs. Last semester for the MicroBiped, a PWM servo driver was implemented, however unnecessary.

Note the Fritzing diagram does not include resistors, capacitors, and other small elements to be implemented on the PCB in the future. Below includes:

  • (4) 18650 MXJO 3.7V 3000mAh
    rechargeable batteries
  • MIC29510 5A adjustable voltage regulator
  • (8) MG92B 3.5kg*cm @ 6.0V servos
  • MaxSonar EZ3 MB1030 ultrasonic sensor
  • HC-06 Bluetooth module
  • ADXL335 accelerometer

fritzing

Fritzing diagram

Breadboard:

Next, the Fritzing diagram was used as a map to build the circuit on a breadboard. Because the voltage regulator had not shipped in at this point, the servos were powered separately by four AA batteries in series to achieve the optimal 6V. All components ran smoothly, which justifies the Fritzing diagram. As observed, due to the numerous connections needed for the velociraptor, the wiring could get quite messy. Thus, it is important to mount the Arduino micro directly onto the PCB to omit as many wires as possible and thus result in a cleaner project.


breadboard

Breadboard testing

PCB Schematic:

Next, the PCB schematic was created on Eagle. Starting on the bottom left are the inputs for the two sets of 18650 batteries (connected in series to a battery compartment on the head and tail). A large bypass capacitor is implemented near the batteries to reduce current transients required by the device. Small resistors were also connected in between the two batteries to help with a possible voltage offset between the two pairs. The two batteries in series provide 7.4V and these two sets in parallel double the longevity during use. One battery is 3000 mAh, so the series connection increases this to 6000 mAh. It is calculated that the project most likely draws approximately 3A, meaning the velociraptor should ideally operate for 2 hours, a perfect time span for a child to be playing with a toy.

Moving on to the right, the TO-220 package was created and laid out for the voltage regulator. The resistor values were chosen to bias the LDO regulator to output a voltage of 6V, and the recommended layout was implemented as stated in the datasheet. An enable logic conversion was mainly implemented to meet the two PCB IC requirement, but can be utilized in the future. Using two transistors and appropriate resistors, this connection is connected to a digital pin on the Arduino and allows the user to code to enable the use of the voltage regulator. For instance, if the servos are currently not in use, the voltage regulator can be shut off upon request.

On the top left are the servo connectors. There are a lot of wires due to the number of servos, thus, most of the wires were implemented on the PCB. The servos are powered directly from the LDO regulator to optimize the torque rating for the servos.

To the right is the Arduino micro, where the connections to the MCU can be seen.

Lastly to the right are the Bluetooth, ultrasonic sensor, and accelerometer pin connections. None of these will be mounted directly onto the PCB, thus using appropriate phoenix 256 connectors or pin headers will be used to allow communication between the Arduino and these devices.

More information can be seen on this velociraptor blog:


schematicfinal

Eagle schematic

PCB Layout:

PCB layout was done using EagleCad. The dimension of our body was L: 5.60 cm, W: 4.60 cm. We have decided to mount on all the sensors and the Arduino micro on to the board itself by using female connectors. The first priority was to fit all the thru-hole components onto this size of the board while keeping all the sensors as far away as possible from the power supply due to noise. The power supply traces must be short and wide to prevent oscillation or excessive heating and make sure none of the thru-hole components must be under the mounting components to prevent it from heating.  The picture below shows the final layout of the PCB.

PCB layout FINAL

PCB Layout

More information describing the PCB layout can be seen in this velociraptor blog:

PCB Components:

The complete list of PC components is listed in the figure below. The total cost for all capacitors, resistors, NPN amplifiers, LDO regulator, heat sink, and Arduino Micro was $41.24. It is important to not only choose the appropriate packages on Eagle but also purchasing the components accordingly to these packages. There is a total of seven surface mounted parts, and the remaining is through-holes.

Capture

PCB component shopping list

Hardware Design:

Hardware design incorporates the designs we’ve made on Solidworks. When we started building a fast prototype, we’ve realized certain design features such as thickness, length or hole sizes not feasible for our overall design. When we’ve started building our prototype, we’ve observed 2 different possible errors, random & systematic errors. Random Errors are caused by unknown and unpredictable changes because 3D printing is done by building the object layer by layer using heat to melt the polylactic acid (PLA) filament, Although our 3D model part may have a thickness of 0.5 cm, when it print the thickness varies around 10%. Systematic Error usually comes from the use of the machine. There are various settings for the 3D printer which could cause the printing to be more accurate or decrease/increase printing time. By decreasing the print speed or having finer layer height may increase the accuracy of the prints but will increase the printing time.

The previous generation microbiped used 1 servo to hold and control the movements of head and tail to perform static walking. A new feature we’ve added to the Velociraptor was not only using 2 servos to control the head and tail but also attaching a spring to prevent the servos from holding up all the weight of the head and tail. Figure 1. below shows how we’ve attached the spring to the robot.

s1

Figure 1. Servo attaching to the head on the final prototype

For more information about hardware design and the new feature can be seen on the velociraptor blog posts:

Software Design:

Before tying together all the different codes, all of the software files were initially created and tested separately. Integration of the final code includes (and were created in the following order):

  1. Static walking
  2. Stopping upon object detection
  3. Turning
  4. Bluetooth
  5. Walking up an incline
  6. Dynamic walking

One of the most important techniques in the success of static walking is the fact that even though the non-stepping foot is stationary and in place, the servos still move. This not only prevents the velociraptor from dragging this stand-still foot but also propels the body forward. Virtually, all leg servos are always moving.

Due to the SRAM memory limitations, it’s important to store all velociraptor servo angles in flash memory using LUTs. There is about 10x more program memory space versus SRAM. These servo angles were planned and stored in excel and saved as a CSV file. This organizes the data and allows these arrays to be opened up in notepad for easy transfer to the .h files utilized by the Arduino. PROGMEM was the command responsible for the main code reading from these flash .h files.

Some considerations had to be made in designing these servo angles. There have to be small incremental changes in angles to prevent any quick motions that would cause the velociraptor to become imbalanced.  The steps must be designed to be reasonably lengthed for the velociraptor to make any progress in moving. The stepping leg must be able to lift high enough because there is a 0.5cm rubber divider in between the linoleum and carpet of the velociraptor’s mission objective. The angels for a set of legs must be designed so that while re-initializing on the floor, the foot keeps parallel on the floor, and these feet must be move at the same distance per time so that when both feet are on the floor and re-initializing, one isn’t moving faster than the other and causing the velociraptor to make unwanted dragging turns. Lastly, manufacturing engineer Mingyu designed the head and tail max swing so that the center of mass would be centered on top of each respective foot at the maximum capable servo angles allowing for the head and tail to move completely to the left or right.

Static Walking

The static walking was designed so that at any point in time, the velociraptor will be able to balance in place. This is very dependent on where the center of mass is. While both feet are on the floor, the velociraptor will maintain balance whether or not the head and tail are on one side or the other. When the velociraptor is taking a step, the center of mass will be centered above the foot on the floor.

Stopping Upon Object Detection

If the user no longer has a hold on the static forward walking button, the velociraptor will stop. Also, when there is an object detected within the vicinity, the static walking code will terminate and the velociraptor will come to a stop. At this point, the velociraptor will wait until the user enters turning left or right. As long as there is an object in front of the velociraptor, it will no longer pursue static walking.

Turning

There were a couple of brainstormed ideas on how to go about turning for the velociraptor. These ideas included (in order): swinging the head and tail like a baton and using that momentum to turn, one foot taking a step larger than the other, and keeping one-foot stationary as the other one takes a step and re-initializes. The last option was discovered accidentally with the preliminary static walking code and seemed to be the most viable option. Because each leg only has two servos, the ways to implement turning are limited. The cons here for turning is that the foot that is staying still will be dragged, of course. It is important that the floor and the foot have a reasonably low friction coefficient. For instance, this code would not work if both the floor and feet were made of rubber.

Bluetooth

The foundation Bluetooth code was obtained from S&T division manager Alia in a folder named arxrobot_firmware containing many Arduino files. Four buttons will be used on the Arxterra android app: forward (static walking upon pressing down, standing still while not being pressed), left and right (turning), and back (dynamic walking). Four while loops will be implemented to test these button conditions, and the respective codes will be run.

Walking Up An Incline

Upon testing the regular static walking code on the incline, the velociraptor failed and was unable to handle the 6.5* incline on the ramp. Naturally, the velociraptor “became” tail heavy and fell backward. Thus, for the incline code, the velociraptor must move its center of mass towards the front of the body to fight against the gravitational pull backward. New leg servo angles were designed in order to successfully allow the velociraptor to walk up an incline upon accelerometer information.

Dynamic Walking

Instead of using the center of mass to keep the balance at any moment of time for static walking, dynamic walking uses inertia to keep balanced while “running.” Here, the head and tail do not make full rotations left and right, the steps are smaller, and the feet are not lifted as much on the floor. Upon “startup” and “ending,” the velociraptor has to gain momentum by wiggling slowly to its complete dynamic walking loop. Using this momentum, the velociraptor is able to keep balance.

More information can be seen in these velociraptor blogs:

Verification/Validation:

Multiple tests were done to make sure that the Spring 2016 Velociraptor meet all the requirements that were set by the customer. Most of the requirements were completed. However, there were some incomplete requirements. For detail of the test plan click on the link below

Project Update:

Resource Report:

Power Report:

For the final updated power report, the project allocation was changed after the PDR equally to the mass report and a new project allocation of 5000mA was set. The actual current draw of the Arduino microcontroller and the voltage regulator was not possible to measure after mounted on the PCB and instead the total current draw of the final build of the Velociraptor was measured as to 1735 mA this is what the batteries need to provide power for. The MXJO IMR18650 3000mAh -3.7V- 35A batteries chosen for power supply does, therefore, prove to be sufficient to power the Velociraptor.

Final Power report copy

Power Report

Mass Report:

For the final updated mass report in figure 2, the project allocation has been changed since the PDR. In order to set a more realistic allocation, the resources/parts masses was added up and a contingency of 100g was set. Likewise, for the mass report as for the cost report, the original idea of the final frame cut in all aluminum acted as the heaviest post on the budget and therefore the group decided to change that to a hybrid chassis to minimize the total weight of the Velociraptor. Cutting only the bottom part holding the servos, the head and tail in aluminum reduced the weight of this post from 344.70g to 154.00 g. By printing the legs in 3D PLA filament only added another 88g to the weight of the chassis adding up to a total weight of the chassis at 242g rather than the 344.70g. The actual weight measured of the batteries turned out to be much less than the expected weight and therefore added to minimize the total weight of the Velociraptor to 560 g and thus successfully stay within project allocation.


Final mass report copy 2

Mass Report

Cost Report:

Due to the cost heavy aluminum frame post on the cost budget presented at the PDR, the total expected cost exceeded the project allocation of $400 and thus the change of parts was necessary in order to reduce the budget and stay within the limit. The final budget for the Velociraptor Spring 2016 shown in figure 2 has been reduced by changing the material used for the chassis of the robot. Instead of utilizing all aluminum for the final frame, the group decided to make a hybrid chassis made of aluminum for the bottom part holding the servos, the head and tail and print legs and feet in 3D filament Polylactic Acid (PLA). The change of parts successfully reduced the final cost of the project to a total of $257.48 and thus the final costs stays within project allocation.


Final cost report copy 2

Cost Report

Work Breakdown Structure:

The work breakdown structure (WBS) is critical to any project as it defines the roles and responsibilities of each engineer within the project. Creating a clear WBS can help a team move forward quickly because each engineer will know their purpose for the position and this will make management much easier.

Picture1

Work Breakdown Structure

Project Schedule & Progress:

The chart below present the task that has been completed by the Velociraptor team, overall the team was able to complete about 98% of all the tasks assigned. However, we were not able to finish the final walking code giving the robot the ability to walk up an incline. Therefore, leaving us at only 85% completed on the walking code task in the testing category.

CaptureSpring 2016 Velociraptor Completed Schedule

Project Burn-down:

During the critical design review (CDR) our team was extremely behind due to a delay in creating the schematic and laying out the final PCB design. This is seen below where the blue line separates from the red line during the first week of April. However, a week after CDR the team was able to fix all the problem as well as assembling the final product. When all the problem were fixed, we also finish assembling the robot. This allowed us to get back on schedule which is shown in the Final Burn-down chart below.

Screen Shot 2016-05-07 at 10.16.40 AMFinal Burn-down Chart

Project Video:

The final video presents the engineering methods and the process of creating the Spring 2016 Velociraptor biped. To see the process using the engineering methods click on the image Spring 2016 Velociraptor or the link below.

IMG_0854

Spring 2016 Velociraptor

Velociraptor Walking the figure 8

Final Video: Spring 2016 Velociraptor Final Video

Concluding Thoughts:

  1. Before starting a project, the team should find all the problems and find ways to improve the project.
  2. The key to of having a successful project is to make sure you are always ahead of the planned schedule. There will always be obstacles that will slow your project down. If you are ahead, these obstacles will not affect your deadline significantly.
  3. Have your first prototype within the first month of class. This will help you find the problems in the early designs and fix it before any decision are made with a faulty designs.
  4. Teamwork is critical, the project cannot be completed by an individual with the given time. Make sure that everyone are following due dates.
  5. In the case when the project falls behind, request help immediately.

Project Resources:

Kevin Lundberg – 3D Printing & PCB parts

Mingyu Seo – 3D Printing

Khoi Vu – Wood Workshop

Banggood – Robot’s Parts

Parallax – PCB Parts

Mouser – PCB Parts

Osh Park – PCB Fabrication

Spring 2016 Velociraptor: Verification & Test Plan

By: Camilla Jensen (System & Test Engineer)

In order to verify the level 2 requirements, a verification test plan has been created to test each component for the build of the Velociraptor before incorporating it to the build. The components are tested against its limitations as specified in datasheets and the level 2 requirements and consists of mostly physical test performed with a ruler, protractor, scale, stopwatch etc.


The validations test plan is created to test that the build of the Velociraptor lives up to the costumers expectations as stated in the level 1 requirements, i.e. Perform statically/dynamic walk, turn, detect an obstacle, walk up an incline and resemble a tyrannosaurus class of dinosaur.


Follow this link for full Verification and Validation Test Plan:

Verification & Test Plan

Spring 2016 Velociraptor: Updated Walking Code #3 (Final)

By: Ashlee Chang (E&C)

Table of Contents

Fulfilling Requirements

Level 1 requirements #4 is stated as follows:

The Velociraptor shall be able to statically walk on all surfaces of the course.

Level 2 requirements #9 is stated as follows:

For the Velociraptor to have the ability to travel up a 6.5-degree incline, an accelerometer shall be implemented to preserve the chassis balance.

Level 2 requirements #10 is stated as follows:

An ultrasonic sensor shall be implemented to the build of the robot to detect obstacles at a range of 20 cm.

Level 2 requirements #11 is stated as follows:

To fully accommodate the movement of a turn, a total amount of 8 servos turning the robot at a an angle of min. 45 ° degrees(referring back to requirement 10) to avoid obstacles.

Level 2 requirements #11 is stated as follows:

To fully accommodate the movement of a turn, a total amount of 8 servos turning the robot at a an angle of min. 45 ° degrees(referring back to requirement 10) to avoid obstacles.

Level 2 requirements #13 is stated as follows:

To establish the wireless connection between the Arxterra Application and the Velociraptor in order to control the robot a Bluetooth communication shall be executed into the system’s robot design.

These requirements were to be met through C++ coding done through Arduino’s software editor. However, due to the load of work in such tight time constraints, the dynamic walking is incomplete and the incline walking code is unfinished. This will be explained in the concluding remarks.

Final Arduino Folder

Below is a link to the final folder. The entirety of the folder will be broken down in this blog.

arxrobot_firmware FINAL

The original Bluetooth folder passed on utilized 20% of program storage memory. Some unneeded files were removed to conserve memory in the arxrobot_firmware folder: battery_selector and fuel_gauge. This brought down the program memory to 14%.

xxx

Contents of the final velociraptor folder

Look-Up Tables

As explained in the Walking Code #2 blog, servo angles were moved to Flash memory to compensate for the SRAM limitations. The majority of the code is within the cells from 1-170. Originally over 400 cells long, the LUT size has been optimized in trade-off with more if-then statements throughout the code. The LUT size could be shortened further.

aaa

LUT explanation

In cells 1-40 and 81-120 in the excel spreadsheet, the left leg and right leg will take a step. In 41-80 and 121-160, all leg servos are re-initializing as the head and tail sway directions. Lastly, 161-170 are dedicated to pre- and post-turning arrays. The point here is to bring the body closer to the floor so that the velociraptor could grasp the floor more roughly while turning.

Turning

For this blog, the turning code has been implemented. There were several approaches the group has brainstormed to accomplish this. By accident, it was discovered a turning mechanism could be a dragging mechanism where one leg drags behind as the other scoops backwards. It not only proved to be an effective turning method, but also the LUTs used for walking were also capable here. Originally, the turning code for each foot was over 100 cells long and took up 65% of program storage space. By using the same LUT values for static walking and turning, the space was optimized so that only 48% of program storage space was used.

afteroptimization

Program storage space optimization results

Object Detection

The velociraptor head measures 7 inches long. Thus, it was coded so that any object 6+7=13 inches in front of the ultrasonic sensor (half  of a foot from the head) would prohibit the velociraptor from moving forward. The user would have to hit the left or right turn button and go on from there.

Capturex

Upon passage clearance, the forward button will work

Bluetooth

Only four buttons were needed for our project: forward, left/right turn, and dynamic walking. Only the third and fifth element of the package were used in our particular application, which basically dictates which button is pressed. Additional coding was needed to make up for the fact that the Arduino Micro is a Leonardo device. Below shows one of the many modifications made by the S&T division manager to allow our Bluetooth to communicate with the Arxterra app.

serial

Leonardo device modification

Unfinished Business

Time constraints disallowed the further progress of the velociraptor as of the due date. In the LUTS, cells 171-355 (un-optimized size) are dedicated to dynamic walking. It was an in-progress task that was ultimately unsuccessful. A demonstration could be done, but the user would need to hold the robot as it jerks from side to side. It was difficult to code the velociraptor using momentum to keep afloat–finding that sweet spot between balance and imbalance.

The analog accelerometer is capable of sensing incline and using that data to initiate a new walking code that would bring the center of mass towards the head. This would require a completely new walking code with new angles: due to the geometry of the legs, just “re-positioning” all leg servos by the same angle would not in effect allow the velociraptor’s original walking code to walk any longer. A new set of angles need to be discovered where these changing angles would stay perpendicular to the floor. Not to mention, there arises a problem on how the velociraptor will react once it slowly reaches the 7* incline (i.e. before hitting the full 7* incline, the velociraptor already starts tilting backwards).