Goliath Spring 2018 – Final Blog Post
By: Ernie Trujillo (Project Manager)
Approved By: Miguel Garcia (Quality Assurance)
Table of Contents
Goliath Team:
Ernie Trujillo (Project Manager)
Ryan Nguyen (MST Engineer)
Tai Nguyen (E&C Software Engineer)
Milton Ramirez (E&C PCB Engineer)
Daniel Guerrero (M&D Engineer)
Introduction
This document provides resources to all major tasks that were completed by the Goliath team in the Spring 2018 semester. It also provides a summary of the objectives placed by the customer and links to other documents on detailed topics.
Executive Summary
Mission Objective
The goal was to redesign the Goliath tank and follow a concept design from the Goliath 303 Tank while retaining the same goal as the Fall 2017 semester. The Goliath Tank needed to navigate through a 2-D maze made from cloth. The first time through the maze the robot is remote controlled through the Arxterra App while recording every decision made in the maze and the second time it would play-back the unique path that was recorded. The final objective was to test the robot avoidance software of the robot and see how it overcomes having other robots in the way of its path through the maze.
Project Requirements
Work by Ryan Nguyen (MST Engineer)
Level 1 General Requirements
- The robot shall be completed by May 15.
- The robot that is to be designed shall be done in such a way that it is relatively inexpensive, less than $250, preferably a laser cut model or 3D printable design.
- Since robots are to be operating through the maze simultaneously, the design should ensure that collisions are to be avoided in all situations.
- When printing 3D models for the project, any prototype print shall obey the 2/2/2 rule and shall take no more than 6 hours in sum. Projects may request a waiver with justification.
- Robots shall utilize a version 6 3DoT boards powered by the 3.7V RCR123A battery. Projects may request a waiver with justification.
- The robot will be designed in such a way that there are no dangling or exposed wires. Connectors will be used between all electronic and electromechanical components. Jumper wires will not be used, ribbon cables are preferred; the gauge of wires should be consistent with the current.
- Good construction techniques: all moving and rotating parts shall use bushing or bearings, hinges shall be interlocking and include a latching mechanism. No gaps shall be greater than 1 millimeter, immediate access shall be provided to all external connectors (USB, switches).
- The robot shall record the user’s input and be able to repeat the previous route defined by the user. The software algorithm is defined in 400D E&C lab sequence.
- During teaching mode, ArxRobot app via mobile devices shall be used to teach the robot to navigate the maze.
- During the playback mode, the ArxRobot app shall transmit live video feed and telemetry to the Arxterra control panel, including battery level.
- The Robot disassembly time shall be 10 minutes. Projects may request a waiver with justification. All 3Dot boards will be clear of electronics, motors will be disconnected, all sensors will be disconnected.
- Reassembly time shall be 10 minutes. Projects may request a waiver with justification. All teams will be allowed to use a cable tree as well as an assembly diagram as necessary. All robots will be tested after reassembly to confirm its functionality.
Goliath Level 1 Requirements
Project:
L1 – 1 The Goliath will drive on flat surfaces, such as cloth, paper, linoleum.
L1 – 2 The Goliath shall be operational for 1-hour duration.
L1 – 3 The robot shall be a scale replica of a Goliath 302 Tank. The scale factor will be 1:11.5 with a mean
square error (MSD) over all three axis (x, y, z) of no greater than 10%.
L1 – 4 The total cost of the goliath shall be no greater than $200.
L1 – 5 The Goliath shall have easy access to charging and programming hookup.
L1 – 6 Goliath shall house a custom PCB and use control telemetry shall to navigate the maze.
Program:
L1 – 7 The Goliath should make tank noises.
L1 – 8 Goliath shall detect and avoid other robots in the maze.
Goliath Level 2 Requirements
System:
L2 – 1 The mass of the Goliath shall not exceed 400 grams. Goliath L1-3
L2 – 2 The Goliath shall be smaller than 5x4x3 inches. Goliath L1-3
L2 – 3 Goliath shall use IR range finder to detect objects. Goliath L1-7
L2 – 4 Goliath’s final version shall be printed with ABS plastic. General 3
L2 – 5 The Goliath shall be power by a single 3.7v RCR123A battery. General 6
Subsystem:
L2 – 6 Main PCB shall have two UV sensors, UV LED, Gyro, and connectors to range-finder. Goliath L1-6
L2 – 7 Arx-robot App will have different operating control modes and direction pad to control Goliath’s
movement. Goliath L1-6
L2 – 8 Goliath shall have 4 x 10 mm cut out on back of Goliath to provide access to charging and
programming hookup. Goliath L1-5
L2 – 9 The Goliath will not have any electrical parts mounted outside. General Level 1-7
L2 – 10 The Goliath should have a latched lid. Interlocking mechanism. General Level 1-8
L2 – 11 The Goliath shall detect objects 10 inches in front. Goliath L1-8
L2 – 12 Goliath will have all-terrain tracks. Goliath L1-1
L2 – 13 The Goliath shall have 10 gears. Goliath L1-1
L2 – 14 The Goliath shall have 2 motor(s), located in the back of the chassis. Goliath L1-1
System Design
Work by Ryan Nguyen (MST Engineer)
System Block Diagram
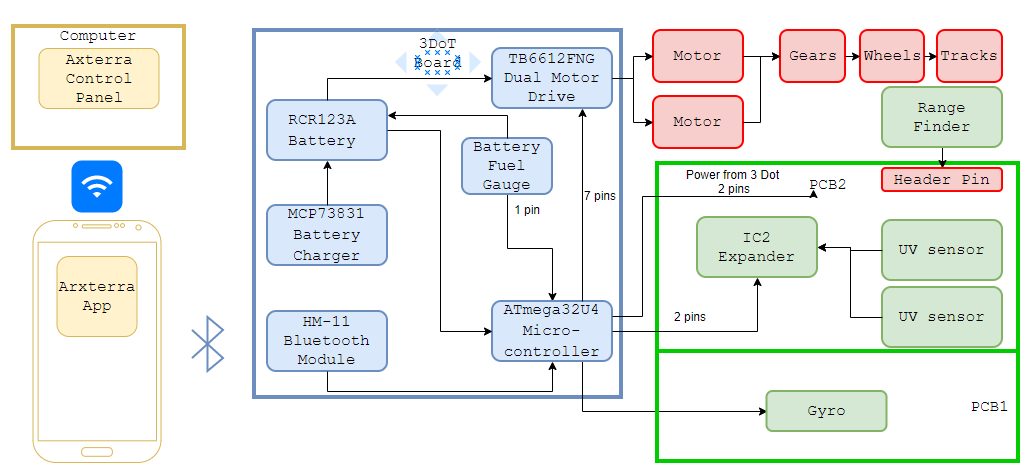
Figure 1 – System Block Diagram for the Goliath Tank.
The system block diagram illustrates how components of the Goliath communicate and connect with each other; from the control panel that uses Wi-Fi to talk with the mobile app to the wheels and treads. More detailed specific components such as the HM11 Bluetooth model is added, and various parts on the PCB parts are laid out; more items are expected when the E&C engineer completes trade off studies.
System Resource Reports
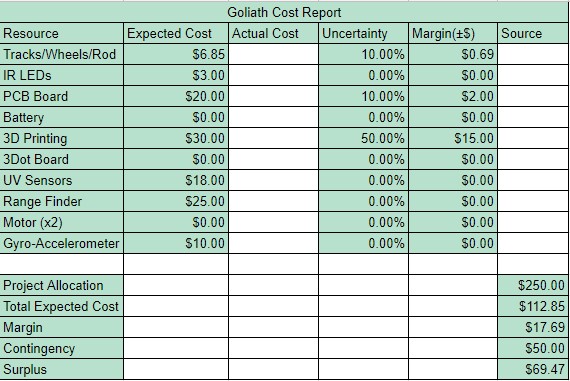
Figure 2 – Spreadsheet for expenditures for the Goliath Tank.
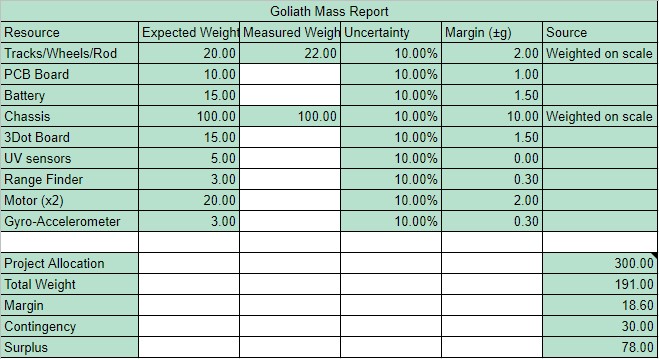
Figure 3 – Spreadsheet for the mass of the components.
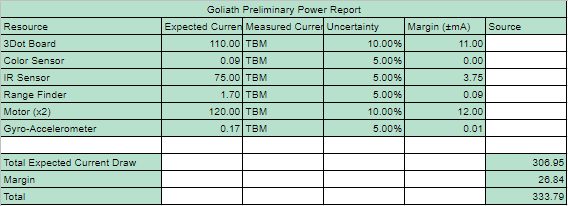
Figure 4 – Spreadsheet for the power consumption of the components.
These tables represent the three resource reports (Cost, Mass, and Power) that were made for the Goliath Tank.
Manufacturing Design
Work by Daniel Guerrero (M&D Engineer)
Initial Design
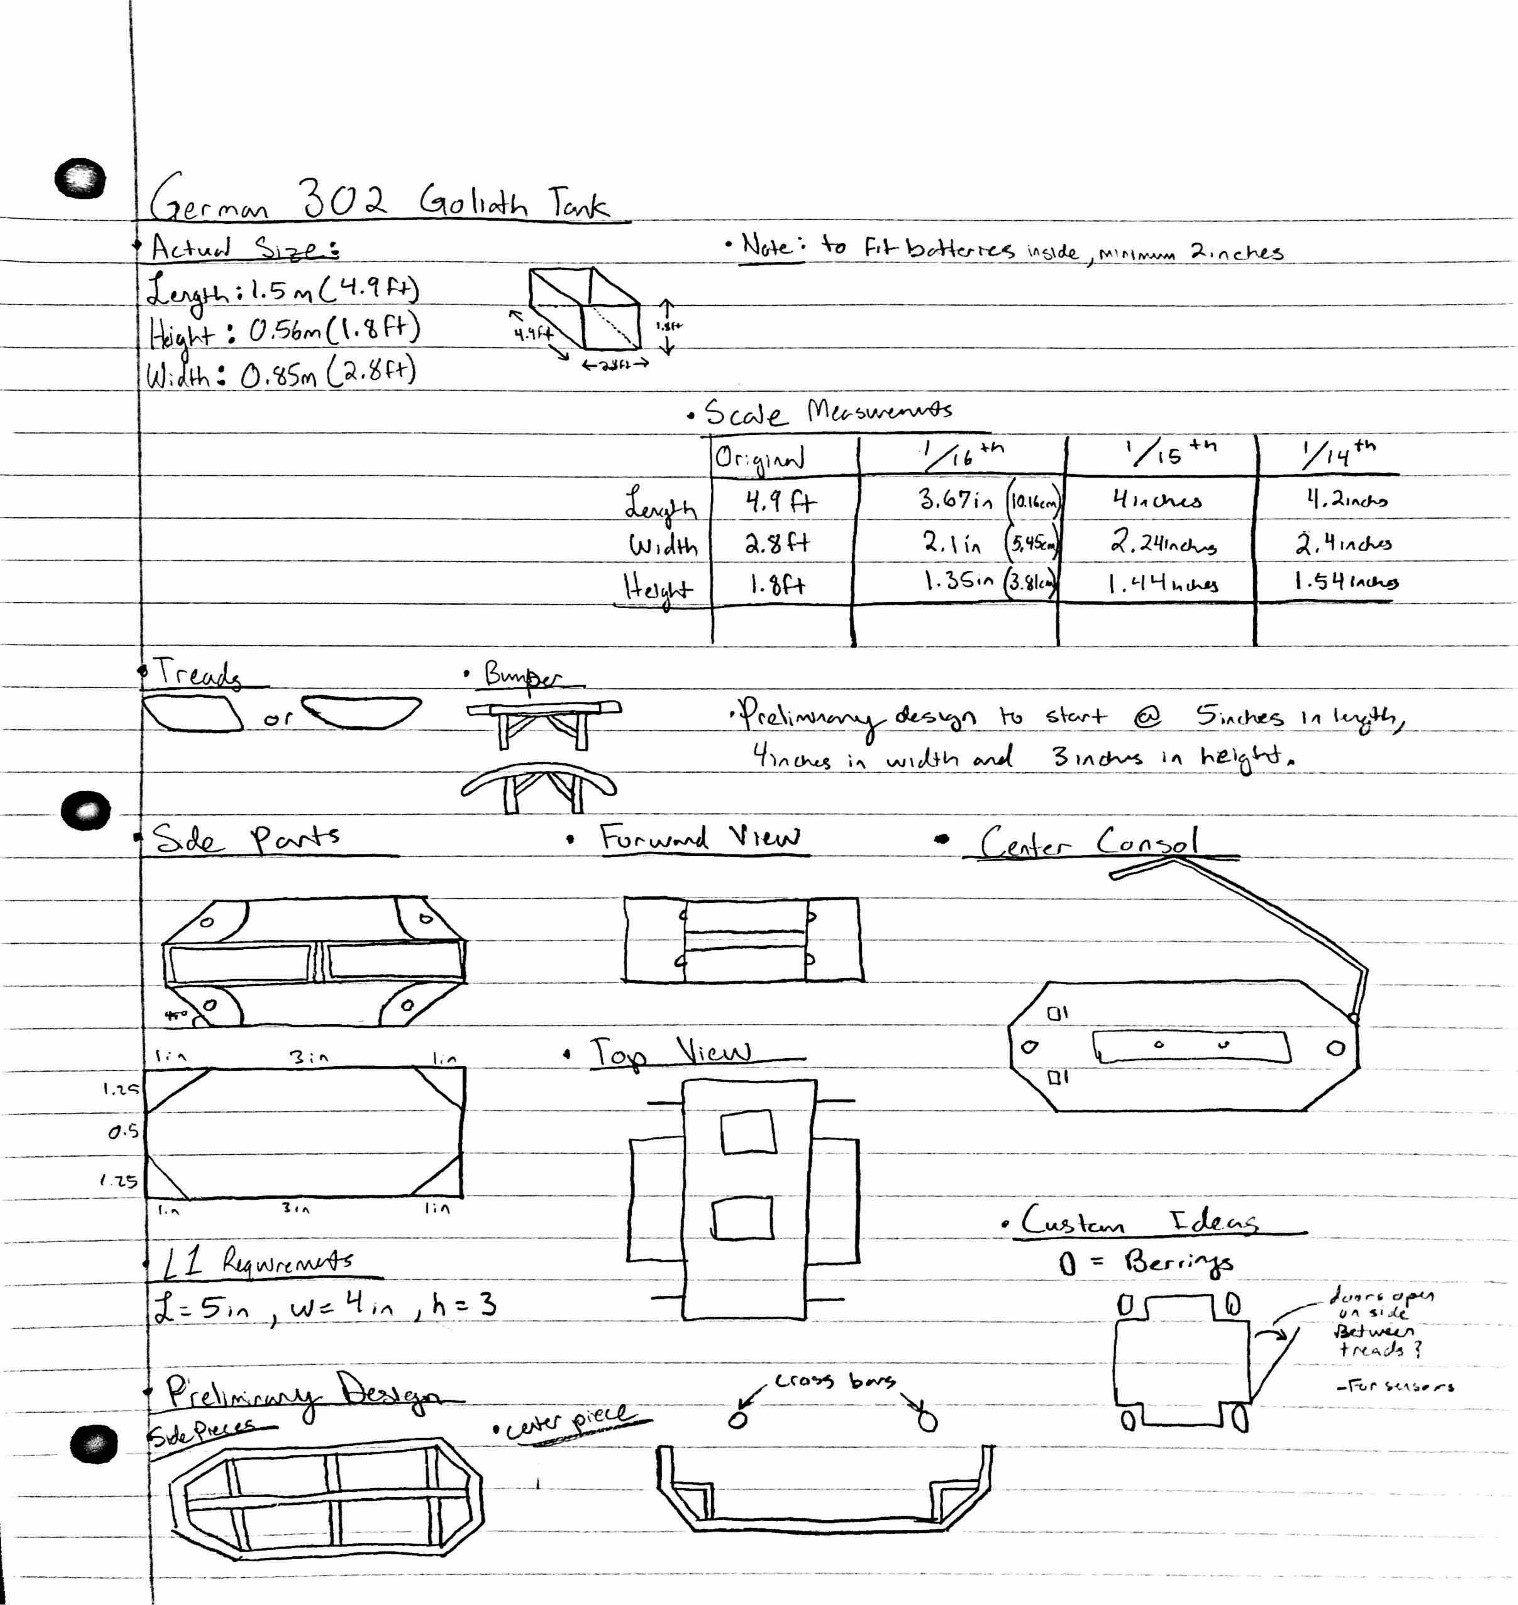
Figure 6 – Preliminary sketches for the Goliath Tank.
The initial designs of the Goliath Tank were modeled after the 302 Goliath Tank, however close to half way through the semester the customer suggested that we follow the design of the Goliath 303 Tank.
Rapid Prototyping
Throughout the semester the design of the Goliath Tank made drastic changes. The progression of the design for the Goliath Tank can be researched in the following link:
Final Design
The final design is not a perfect model. There were still modifications that the M&D Engineer could have made, if more time was allotted, to make the Goliath Tank better (such as a design that maintains the treads better). Provided are the STL files to the Goliath Tank that was used on the day of the Verification Testing (day of the final).
PCB Design
Work by Milton Ramirez (E&C PCB Engineer)
In order to make the interior of the Goliath Tank less cluttered a custom PCB was created for the sensors. The components that were designed within the PCB were the I2C expander, two UV Sensors, and the gyro. For further information proceed to the blog post on the system schematic and the custom shield layout:
Provided are also the Eagle files for the Custom Shield PCB:
Software
Work by Tai Nguyen (E&C Engineer)
Line Following
Before the robot can navigate through the maze, the first objective that must be accomplished is having it follow a line. Even though UV sensors were used, the IR capabilities were being utilized to follow a black line. For further information on the software application to line following proceed to the following blog post:
Robot Detection
To avoid collisions, the Goliath used a ToF Range Finder that would detect any objects that were in front of its path. The following blog post goes into detail on how the Range Finder works and how collisions with obstacles are avoided:
Final Code
The final code is provided in a zipped folder with all the libraries required and code to navigate through the maze:
Verification Test Plan
Work by Ryan Nguyen (MST Engineer)
The verification test plans were a was to evaluate how well the final project did in terms of mission and customer objectives. One of the main objectives of the MST Engineer is to create these plans. On the day of the final the tests plans were given to Professor Hill and he would evaluate whether the project passed or failed a given objective. Provided are the Verification Test Plan for Goliath:
Spring 2018 Verification Test Plan V2
Lessons Learned
For students that proceed to take this class the following is advice that is offered in order to ensure that the project is successful:
- Ask anyone who has taken this class and this will be one of the first things they say, make sure you do research prior to beginning the project. This website has years of knowledge that was done by other students. Utilize it and you will do yourself the favor of saving time. I’ll get into more detail about this point but time is your most valuable resource to this class.
- Make sure that prototyping the design begins immediately! The biggest issue that the Goliath team had was that the first fully built tank was not given for the rest of the team to work on until extremely late in the semester. As one would expect, the first design will have serious issues that need to be fixed (For our team it was that the treads were having trouble staying in place). If the first design was completed weeks in advanced then modifications could have been made to resolve the problem.
- In terms of 3D printing, make sure that you rely on multiple services to create your prints. Maker’s Society is a great place to start but also see if you can find anywhere else as it does take time to get prints done and the quicker you can receive them the faster the robot can be built.
- For the PCB, before sending it to be manufactured double check that every trace on the PCB is mapped correctly and that there isn’t any connection missing. We were unable to use our PCB due to small oversights in the circuit schematics, so make sure multiple people from the team look over the PCB Layout.
- Start working on the software early. There is a lot of trouble shooting that goes into writing the software and every time a new component is implemented there is a high possibility that things will not compile.
- If the E&C Engineer has not taken EE444 he/she will be at a slight disadvantage. Two students from my section had taken that course the semester prior and it was evident that both were very knowledgeable on how to implement the software and how to tackle the objectives that were placed in regards to navigating the maze. That does not mean it is impossible to be a successful E&C engineer, I believe all people in that position have to follow the same lab sequence that is offered in that class, but you will need to work much harder.
- When Professor Hill was talking about how designing the 3DoT board was going he brought up a point that resonates with me still as I write this. For any task, you will give it an expected time to accomplish. Once you have that time you want to double it, then you double it once more and that is close to the real amount of time that it will take to complete that certain task. My point is that this class is not as straightforward as you will map it out to be. Always be prepared for set backs and unforeseen obstacles. Time will go by quicker than you imagine and if you squander it the project may not turn out successful.
Project Video
Created by Ernie Trujillo (Project Manager)
More Info
If you are interested in researching further into our project check out the Preliminary Design Review done for the Goliath Tank:
Resources
www.arxterra.com/goliath-fall-2017-final-blog-post/