Spring 2016 A-TechTop Seizure Watch Subgroup Solution for Decreasing Size

By Marena William (Manufacturing Engineer)

Introduction

After the group was debriefed on the Critical Design Review (CDR), we realized that our housing dimensions (maximum dimensions) need to be changed. Throughout the course of the semester our goal was to have a fully functional seizure watch however after the PCB layout was done this goal seemed unachievable. This post discusses how we approached this problem.
Read more

Spring 2016 3D SMD: Z-Axis Linear Slide Actuator

By Henry Nguyen (Electronics and Control)

Introduction

For our Z-Axis actuator, we found that our thread drive will constantly cause our nozzle to shift towards the left when going down and towards the right when going up. This was caused by the two 4mm rods and the thread screw we were using. A slight solution was to attach a rubberband to our nozzle to prevent it from shifting. The following Youtube video shows the problem our nozzle has when going up and down:

https://www.youtube.com/watch?v=Rw_LVb8K-G4

We found that in order to prevent this type of error, we had to have a completely new design for our Z-Axis actuator.

Linear Slide Actuator

We found a cheap linear slide actuator as shown in the title picture on eBay. After purchasing this sliding unit, we found that the slide will be sturdy enough to attach our A-Axis stepper motor as well as keeping the nozzle in a linear fashion. I needed to design a new bracket that will screw into the sliding unit as well as attaching to our red nut on the lead screw.

Figure 1. Linear Slide Bracket Sketch

Figure 1. Linear Slide Bracket Sketch

For my bracket design, I would attach the linear sliding unit to the top of my bracket with the four holes. The red nut will go through the large circle in the middle. The two screws on the bottom will allow us to attach our A-Axis stepper motor bracket. The last screw hole on top of the A-Axis stepper motor bracket will allow us to screw into the red nut. This will keep the red nut in place and allow us to move the hole unit up and down.

Figure 2. Linear Slide Actuator Bracket

Figure 2. Linear Slide Actuator Bracket

For the bracket, I had to apply some silicone to the red nut in order for it to stay in place. The screw did help to keep it in place; however, I wanted to make sure the red nut is completely stationary.

Figure 3. Full View of Linear Slide Actuator

Figure 3. Full View of Linear Slide Actuator

Figure 4. Side View of Linear Slide Actuator

Figure 4. Side View of Linear Slide Actuator

I uploaded a Youtube video showing the linear slide actuator in action.

https://www.youtube.com/watch?v=UqnxF44cEr8

Conclusion

Overall, this linear slide actuator is a success. It completely eliminated all wobbling caused from our old thread drive kit from Makeblock. We are able to go up and down smoothly as shown in the Youtube link above. This will allow us to rerun all of our accuracy tests to ensure that we are as accurate as possible when picking up surface mount components.

Spring 2016: 3DoT David Software Design

BY: Christopher Hirunthanakorn (Missions, Systems and Test Engineer)

Introduction:

The purpose of this blog post is to summarize all of the work that has been done for the software design of the 3DoT David and inform the reader of the final state of the software. It will cover the software flow chart to introduce the tasks the software has to accomplish and then explain the different modules in the software block diagram. Finally, a brief overview of how each module works in the final version of the code will be provided.

Related Level 2 Requirement:

  • The 3DoT David shall be controlled by the Arxterra App used on a smartphone.

Table of Contents

Software Flow Chart


CDR Software Flow Chart

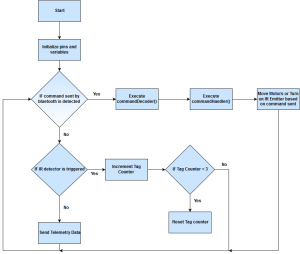
The software flow chart shown here shows what the modified Arxterra firmware that will be programmed to the 3DoT board will do. The program will start by initializing all pins and variables used such as the pins for the Sparkfun Dual Motor Driver TB6612FNG, the IR emitter, IR detector, and speaker. Next, it will check to see if a command is sent via bluetooth from the ArxRobot App. If a command was sent, the commandDecoder and commandHandler functions will be executed and the action related to the command sent will be done. When no command is detected, the program will check if the IR detector has registered a tag from an opposing robot. If it is tagged, a sound will be made and the tag counter will be incremented. When the tag counter reaches three, a song will play, the robot will be disabled for 10 seconds, and the tag counter will reset before the loop continues. If there was no tag detected, the program will send any telemetry data that is required. Currently, there was no requirement for the 3DoT David to send any telemetry back to the ArxRobot App.

Software Block Diagram

CDR Software Block Diagram(1)(1)

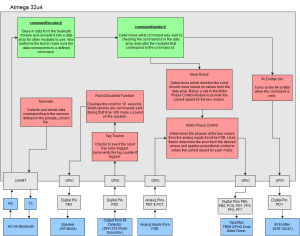
The software block diagram shown here explains what the different modules do and the types of inputs/outputs of each module. The modules are the commandDecoder, commandHandler, Move Robot, Motor Phase Control, IR Emitter On, Tag Tracker, Robot Disabled, and Telemetry.

CommandDecoder Module

For the commandDecoder module, the input is the command data that comes from the ArxRobot App through bluetooth. This data is sent one byte at a time and the commandDecoder module saves this data into an array. Once the entire array is received, this module verifies that all of the data was sent correctly using a state machine and that the command ID matches one of the defined commands. It outputs this array for other modules to use.

CommandHandler Module

For the commandHandler module, the input is the data array containing the command information sent from the ArxRobot App. This module will check the command ID from the array and then execute the corresponding functions for that command. Those functions must be defined individually. If there are any custom commands that need to be added, a corresponding if statement is required to modify the commandHandler module to handle that command ID. There are no outputs from this module.

Move Robot Module

For the Move Robot Module, the input is the command data that comes from the ArxRobot App through bluetooth. This module includes all of the functions required to move the 3DoT David and is only executed when the move command is sent from the app. It uses the functions defined in the sparkfun_TB6612FNG.ino file and a custom function that operates the motors based on the direction of the move command that was sent. The outputs of this module are the control signals for the Sparkfun dual motor driver and the PWM values for the motor speed, which are designated as digital pins PB5, PB6, PC6, PD7, PF5, PF6, and PF7.

Motor Phase Control Module

For the Motor Phase Control module, the inputs are the current outputs from the flexible resistor sensors. This module processes those inputs using the code that was provided by the Electronics & Control Division Manager Jeffery Cool. It will compare the two inputs and determine if one of the motors is moving faster than the other. This works because the two inputs will be equal if the motors are in phase. The module will make the two motors in phase by changing the speed of the motors. The output of this module are the PWM values for the motors.

This module was tested and had a slight improvement to the movement of the 3DoT David but it was determined that it was not necessary. It is not implemented in the final version of the firmware because of the limited number of pins that are readily available on the 3DoT Board.

IR Emitter On Module

For the IR Emitter On module, there are no inputs. It will only be called by the commandHandler module when the correct command is received. The purpose of this module is to send the command signal to turn on the IR emitter and attempt to tag the opposing robot. It is not always on and will only be turned on when the correct command is received. The module outputs the control signal to the digital pin PD1.

Tag Tracker Module

For the Tag Tracker module, the input is the current output from the IR detector. If the signal that is being detected at the digital pin PD0 is low, that means a tag has not been detected. When the signal is high, this module will increment the tag counter which starts at zero. After the tag counter reaches three, this module will call the Robot Disabled module and then reset the tag counter to zero. This module will also create a 5 second delay before it checks the output from the IR detector to prevent consecutive tags. There are no outputs from this module.

Robot Disabled Module

For the Robot Disabled module, there are no inputs. When it is called by the tag tracker module, this module will prevent the robot from responding to any commands for 10 seconds and play a short song to indicate that the 3DoT David is disabled. There are no outputs from this module.

Telemetry Module

For the Telemetry module, the inputs will vary depending on what type of telemetry needs to be sent back to the ArxRobot App. This module will collect the current values from the sensors on the robot and send that information back to the app. It should be called at a maximum frequency of 1 Hz in order to prevent data overload. The output of this module will be a data array that is sent via bluetooth. For the 3DoT David, there was no telemetry that was required.

Implementation of modules

For the Move Robot module, the existing code was designed for operating a rover and needed to be modified to fit our robot’s movement system. With the new movement system design, both motors will need to be controlled at the same time in order to move because each motor is driving one set of three legs. Additionally, the smoothest movement of the legs required the PWM value to be set to the maximum of 255. If it was any less, the motion of the 3DoT David would look very slow and feel weird. Because of the way the ArxRobot App is set up, the user has to press and hold the direction button to increase the speed of the motors to move in that direction. The code was changed so that the PWM value would be a constant 255 and that the leg movements would be fluid.

For the IR Emitter On module, it was decided that the IR emitter will be turned on whenever the 3DoT David is moving and is off the rest of the time. This is because the ArxRobot App can only send one command at a time and the alternative method of controlling the IR emitter would be using a slider on the app to turn it on or off. Implementing this in the code was easily done by incorporating the command into section of the commandHandler function that executed the move commands.

For the Tag Tracker and Robot Disabled modules, code was added to the main loop to check the output of the IR detector and if the 3DoT David should be disabled. The code is executed after the commandHandler function is called and checks if the robot has been tagged. If so, a counter would be incremented and if that counter reaches three, the robot will be disabled. When hit, the speaker will make a sound and the robot will not check for tags for 5 seconds. When the robot is disabled, it will not respond to any commands for 10 seconds and play a short song to indicate this change. All of this is done by using a flag variable to keep track of whether or not a tag has occurred. The flag will be cleared after 5 seconds have passed. When this has happened three times, the code will enter a loop that keeps it from responding to commands for 10 seconds.

Additionally, all of the extraneous code that was a part of the latest version of the arxterra firmware was removed. This includes all of the telemetry and sensor definitions that were left over from older projects that are not being used for the 3DoT David. All of the code used for debugging and testing were also removed or commented out to make sure additional processing time was not being used up. Comments were also added to help future students understand how the code functions.

The final version of the Arxterra Firmware (click here)


Critical Design Review Debrief Spring 2016 UFO

Posted by: Luis Valdivia (Project Manager)
Written by: Anthony Becerril (Mission, Systems, and Test Engineer)


This blogpost will cover the debrief to our group after presenting out Critical Design Review. Next to every topic is the grade received along with feedback from our instructor and division managers. Click here to access our Critical Design Review.

Table of contents:
-Title
-Exec. Summary
-System Design
-Experimental Results
-Interface Definition
-Connection Wiring Diagram
-Custom PCB
-Hardware Design
-Software Design
-Verification and Validation
-Project Update
-Demonstration


  • Title: 10
    • Well put together


  • Exec. Summary: 9.13
    • MultiWii versus Arduino when testing?
    • Was the MultiWii going to control servos?
      • Code of MultiWii can be modified to control servos via servo driver
      • Tricky to mess with code, but if confident you can change without problems then go ahead
      • Minimal impact on CPU to avoid problems with MultiWii
      • Concern: no capability indicated on CDR about servo driver being implemented


  • System Design: 8.4
    • System Block Diagram
      • PCB wasn’t as detailed; could have gotten more details on how PCB is connected with everything


  • Experimental Results: 8.5
    • Overview slide gave list of tests but with no results; was later presented but a bit unaligned in presenting
    • Current test was done nicely; curve fit was well done
    • Torque test data well presented
    • Curve fitting is an art; don’t let excel do it for you rather find an equation; explain more as to why the curve equation is what it is
    • Intuitively it seems a straight line works; maybe curve fit with 1/x (find evidence behind equation)


  • Interface Definition: 7.44
    • Missing LED in list of pins


  • Connection Wiring Diagram:  
    • Missing wire lengths


  • Custom PCB: 8.81
    • Design should have prototype with servo driver
    • Solid, clean design
    • Need to be able to test ITC


  • Hardware Design: 7.06
    • Missing calculation regarding cancelling/countering yaw rotation; data was presented but no evidence on what will counter


  • Software Design: 5.38
    • Missing; no linkage; could have used it during servos
    • Big chunk that wasn’t there
    • Block diagram was not accurate and not overlooked compared to original draft
    • Presentation confusion regarding block diagram
    • Software testing was done via arduino not MultiWii


  • Verification and Validation: 7.5
    • Having aesthetically friendly shell was a “favorite” (not quantitative)
    • wasn’t sure if there was requirement for lightshow
    • Verification was passed but no data with completed tests
    • Validation looked similar to verification; more into detail on customer want
    • Looks like it might be missing requirements; not sure if it could all be met
    • Some test seemed as if they could have been completed already but wasn’t sure??
    • These matrices will be used for day of final to check off pass or fail; SUBJECT TO CHANGE FOR FINAL
      • Go through matrix, go over each requirement; consider adding these as a column:
        • Functional ~50%
          • Should mainly consists of flight
          • Create functional requirements
        • Nonfunctional ~50%
          • Rather static tests, qualitative
          •  Scrap the light show! He doesn’t care!
          • Requirements overall good


  • Project Update: 8.85
    • Looked good! Actually acknowledge being behind schedule
    • Resource Reports
      • Uncertainty 100%?? (resource reports)
      • Power report could use more info on the battery; otherwise fine


  • Demonstration: 7.39
    • Various videos provided regarding progress
    • Curve fitting wasn’t strong due to excel use


  • Overall:
    • Degree of difficulty: 1
    • CDR: 7.95

Project Update/Review:

  • As mentioned in CDR, weight is an issue -> tests done to see what weight that can be lifted
    • Videos provided
    • Weight classes:
      • No attachments
      • Legs
      • Legs and servo holds
      • Legs, servo holds, servos
  • Solutions:
    • No attachments and new fans aren’t approved
    • 5th Fan & smaller battery
      • Will 5th fan thrust match yaw rotation?
      • Smaller battery how?
      • Add tail rotor
  • Notes:
    • Weight with no attachments: 1287
    • Calculated possibility: 1300
    • PCB now what? With servos ditched and light show not cared for, no need for PCB
    • Save mass on:
      • PCB
      • Shell
  • DO:
    • Test old fans VS new fans
    • Tail rotor
    • Smaller battery
    • GET IT TO FLY! THAT’S IT! STABLE FLIGHT AND THAT’S IT
      • Credit only comes from flight. That is it.

Spring 2016 RoFi: Mechanical Design Rev. 3

Christopher Andelin (Project Manager)

Mario Ramirez (Systems Engineer)

Qui Du (Manufacturing Engineer)

Andrew Laqui (Electronics and Controls Engineer)

Henry Ruff (Electronics and Controls Engineer)

Table of Contents

Final RoFi 3D Modeling

Qui Du (Manufacturing Engineer)

Introduction

In Mechanical Design Rev2, https://www.arxterra.com/spring-2016-rofi-mechanical-design-rev-2/ RoFi’s head contains both the PCB and Arduino Mega.

I redesign the head to contain the PCB because my team implemented the Arduino Mega chip onto the PCB board. I also, changed to a smaller size screw for the head from M3 to M2. Since the size of the head covers is 5mm thick, having smaller screw holes give the frame more strength and they make the head look cleaner. Weight is also important therefore, I made the head as light as possible by carving holes, curving parts, and made some parts thinner.

figure 1

Figure 1: Head Update

figure 2

Figure 2: Exploded View


Additional frames updated

Some of the servos come loose because they slide into the frame and do not attach to the frame; to fix this problem, I designed servo locks to lock the loose servos into place.

figure 3

Figure 3: Loose Servo

figure 4

Figure 4: Servo Lock


Mass Report Update

My new mechanical design has a mass of 1651.51 g which is below the mass report allocation of 1745 g found here, https://www.arxterra.com/spring-2016-rofi-preliminary-project-plan/. We prefer lower mass because our current mass in conjunction with our low quality servos, RoFi tends to spasm which causes RoFi to fall over.

figure 5

Figure 5: Mass Report of RoFi’s Frame

figure 6

Figure 6: Components Mass Report

figure 7

Figure 7: Part Name Label


Completed Design

Note: The Arxterra Logo is just for decoration and will not be on the final product.

figure 8

Figure 8: Bonus RoFi Design

All SolidWorks 3D modeling parts and assembly can be found here, Google Dive Link

Disclaimer: All parts were created in SolidWorks 2016; older versions of SolidWorks might not open the files. I included the STL files to allow students with older version of SolidWorks to view or print parts.

Trade-Off Study: Microcontroller

By Chelsea Mediavilla (Electronics and Control)

This trade-off study compares the performance and features of two microcontrollers. The cost, power and communicative capabilities of each MCU is considered.

Read more

Electronic Design

By Chelsea Mediavilla (Electronics and Control)

In this post, the electronic design of the final printed circuit board is discussed. The Fritzing Diagram, breadboard prototype and Eagle schematic are summarized.

Read more

Electronics and Control: Software Design

By Chelsea Mediavilla (Electronics and Control)

I discuss the software design for the two main electronics on the CubeSat. The Arduino code controlling both components is explained and provided.

Read more

RC Control Spring 2016

Posted by: Luis Valdivia(Project Manager)
Written by: Kevin Nguyen(Electronics and Controls)


Table of Contents:
– Introduction
– Transmitter and Receiver
– Setting up the MultiWii
– MultiWii GUI
– Arming and Disarming


Introduction:
Being able to use the RC controller early on in this project will be very beneficial since it will make testing safer and more efficient. Since EDF’s spin at very high rpms, it is not a good idea to keep your hands on the quadcopter while testing. The RC controller will allow you to test the quadcopter at a safe distance. An added benefit to using the RC controller is that it doesn’t add that much weight to your system. All that is needed for the quad to communicate with the controller is the receiver. This blog will guide you through setting up RC control.


Transmitter and Receiver:
The RC controller that we used is the HK-T4A V2. This comes with a transmitter and a receiver. Most likely, you will be using the same controller as us so they would already be binded, but if not, follow this video to bind your devices. The transmitter will be from the remote controller. It will send a 2.4Ghz signal to the receiver on the MultiWii. The RC signal is much more reliable than bluetooth and is capable of transmitting at much further distances.
The transmitter controls the throttle, yaw, pitch, and roll of the quadcopter. The left joystick controls the throttle and the yaw; Vertical direction controls the throttle, horizontal direction controls the yaw. The right joystick controls the pitch and the roll; Vertical direction controls the pitch, horizontal direction controls the roll.

rc controller


Fig 1.1 RC Controller

The receiver is connected to the MultiWii. Each channel on the receiver corresponds to a command on the controller. The transmitter sends out signals in the form of radio waves and the receiver converts those signals to electrical signals for the MultiWii to read. The connections on the receiver must be connected to the appropriate pins on the MultiWii in order to control it properly. Refer to this blogpost for MultiWii connections.

rc receiver

Fig 1.2 HK-T4A Receiver

Setting up the MultiWii:

To set up the MultiWii to be compatible with your quad, you need to download the MultiWii source code here. After getting the source code, go into the config.h file and select the appropriate configurations based on your project. To select an option, simply remove the comments(//).

For our project, we used:
#define QUADX
#define MINTHROTTLE 1150
#define MAXTHROTTLE 2000
#define I2C_SPEED 400000L
#define INTERNAL_I2C_PULLUPS
#define FREEIMUv035_BMP

Copy and paste this anywhere into the config.h file:
#define MAG_ORIENTATION(X, Y, Z) {magADC[ROLL] = -Y; magADC[PITCH] = X; magADC[YAW] = Z;}

Some things to mention are that the minthrottle should be kept as is. The quadcopter needs to be under a certain throttle to arm and if the minthrottle is set too high it won’t reach that arming point. Another thing is that for the board options, the MultiWii isn’t listed there, using FREEIMUv035_BMP would work as well.

MultiWii GUI:
The zip download for the source code included a GUI as well. The gui can be used to change the PID settings and calibrate the sensors. The GUI only monitors the sensors, you can’t control the device through it.

Arming and Disarming:
The most important commands for controlling the quadcopter is arming and disarming. Arming connects transmitter and receiver so that you can begin communication. Disarming disconnects the communication. If it flies out of control during testing, you can disarm to stop the motors from spinning. Typically, to arm you pull the throttle down and yaw to the right. To disarm you pull the throttle down and yaw to the left. This is convenient since you can arm and disarm with one joystick. The arming and disarming commands can be changed in the config.h file.

Works Cited:
https://www.youtube.com/watch?v=JyAyM1f_O3Q
https://www.arxterra.com/multiwii-esc-and-receiver-connections/
http://dl.btc.pl/kamami_wa/hk_27033_2.pdf


Single Event Upsets

By Chelsea Mediavilla (Electronic and Control)

This post discusses single event upsets (SEUs) and their effects. The choice in SEU monitor and implementation for the Spring 2016 SPARCCS project is explored.

Read more