2016 Spring 2016: 3DoT David CDR ppt and CDR Debrief

BY: Omar Mouline (Project Manager),

On 04/20/2016 the the professor Gary Hill and with the assistance of the President gave us a debrief on our CDR. in the link blow is the CDR power point that was presented on the 04/06/2016 :

3DoT David CDR

Table of Contents

First slide:

Screen Shot 2016-04-25 at 8.58.19 PM

Remark:

Points were deducted For the picture used in the title page. The picture had to be a picture of our design.

Experimental Result

Screen Shot 2016-04-25 at 9.02.17 PM

Problem: 

The RPM calculation did not look right. The values were too large for the gear ratio we are using.

Solution:

The RPM calculation was recalculated and documented in this Blog Post:

  1. Gear Train

Subsystem Design: PCB Schematic

Screen Shot 2016-04-25 at 9.10.11 PM

Problem:

Capacitor value is too big for the PCB. what was the justification for the 2200 uF capacitor?

Solution:

The Electronics engineer worked with the division manager and they are planing to change the capacitor

President Remarks:

Create a training document on bypass capacitor.

Look at similar boards and copy them.

Hardware DesignScreen Shot 2016-04-25 at 9.17.20 PM

Problem:

Worried about the gearing and motor torque.

Solution

We were very precise on the correction of our studies on the subject and we have it all explain on these blog posts:

  1. Servos and Motor Trade-off Study Servos and Motor Trade-off Study
  2. Gear Train

Software design:

Screen Shot 2016-04-25 at 9.23.25 PM

Remark:

Detector code looked weak. This code was used just to test if the IR components functioned. The actual detector code will be developed and tested once the prototype is assembled.

Power report

Screen Shot 2016-04-25 at 9.33.10 PM

Problem:

All values on the power report are under no load conditions. These values will change when the robot is operating.

Solution:

We will get the actual measurement of voltage and current for each component when it is operating.

Project Update

Screen Shot 2016-04-25 at 9.25.58 PM

Problem:

Lot of work were done over spring break, still more problems to solve.

Solution:

For the burndown the 50% for starting a task and 50% to complete the task does not give us an exact ready. The change of project design made us rush the tasks to come back on time. We finished a lot hard task in a very short time, we did our best and we were not on a little bit behind time, but since we were starting all the tasks and accomplished some it showed that we were in a good schedule.

General Remarks

  • Nice project schedule, does not look like on schedule.
    • it is normal since we changed the design.
  • have 3 caps for incoming power
  • Double check if the motors will work with system restrictions.

Spring 2016 RoFi: Debriefing

Christopher Andelin (Project Manager)

Mario Ramirez (Systems Engineer)

Qui Du (Manufacturing Engineer)

Andrew Laqui (Electronics and Controls Engineer)

Henry Ruff (Electronics and Controls Engineer)

Debriefing

Christopher Andelin (Project Manager)

Introduction

This debriefing gave students the opportunity to go over their CDR performance, relay project updates, get suggestions and ask questions.

Comments and Suggestions

Comments and suggestions discussed include:

  • when center of mass is high, dynamic walking is preferred
  • when center of mass is low, static walking is preferred
  • use the gyroscope and acceleromerter to determine position of RoFi and to allow RoFi to adjust balance
  • research into real time complementary filters and running average
  • research EE444 lab 5
  • talk to Dr. Shahian or Chad regarding proportional controllers
  • research MPU 6050 PID control


Spring 2016: 3DoT David Gear Instability

BY: Andrew Saprid ( Manufacturing Engineer)

Introduction:

By assembling the gears into the bottom plate, making the connection was going to be an issue of stability and movement for the gears. The project manager and manufacturing engineer went to Lowes to buy screws for the connection. But turns out that the holes on the bottom plate did not print the exact measurement on Solid-works, making the holes too small or big.

Some tests were being made for the small motors and big motors by the electronics engineer and manufacturing engineer.

Requirements

Level 2 system requirement follows:

  • The 3DoT David shall use two micro motors for the movement system of the robot.

Testing #1

The project manager suggested that the screw would fit exactly on the gear, but make the hole a little bit bigger on the bottom plate, so that the gear would rotate on the bottom plate. The manufacturing engineer drilled the hole on the bottom plate, but broke some of the planks that were super glued into the bottom of the bottom plate. He cut off the screw to cut the weight of the screw, which may not make a difference for stability. He noticed the friction of the bottom plate may affect the movement of the gears.

cutted_screws  whiteboard
Gorilla tape was used to tape the planks to the bottom of the bottom plate. With using the small motor that the project manager bought in Amazon, they tested the motor to see if it will work, and it turns out that the friction, the screws, and the gorilla tape were causing problems with the motor turning the gears.
testwhiteboardsmall motor
Testing #2: White gears

Since red gears may be heavy for the small motors to run, white gears are placed on the wooden prototype for testing. They tested them with the small motor the project manager bought. They were running smoothly. The white gears were light. Driving a nail through the center of the hole of the gear will insure stability if the nail is driven to the wood straight downward. The small motor will run well with these gears, but the project manager wanted to use the red gears because they were stable and strong to withstand the weight of the legs. With legs and the joint attached to the white gears, the leg was putting weight into the gears, which caused instability of the gear train.

whitegearsboardleg_woodenboard

White Gear Testing With Motor VIdeo Link

Testing #3:Testboard, Oil, and Washers

In order to make the gears move freely on the bottom plate, washers and oil will be added. These were bought at Home depot.
washersoil

TestBoard

A test board was made in Solid-works to test the gear stability, movement, and friction. The original test board was not documented. The test board below has been tested, and the results of the testing have damaged the cylindrical extrusions by hammering a nail to it to make the gears stay in place as the motors drive the gear. By putting oil into the plate, and washer underneath the gear, the gear was able to move freely. The cylindrical extrusions did its job stabilizing the gear train. Finding a nail, screw, or etc to hold the gears in place is in progress.

originaltestplatetestboard

Conclusion

The electronics and manufacturing engineers did 3 tests for the white gears, red gears, and the extrusion of the bottom plate. The white gears are not going to be used because they are too light. The red gears will be used instead. They will be able to withstand the weight of the legs. Kent used the big motors. Big motors were able to move the red gears. Motors are still being investigated and researched by the electronics engineer for a small motor with more torque to the turn the gears better.Testing #3 could be the solution to the gear stability, friction, and movement. In order for the gears to move properly, perfection and accuracy is key.

Red Gear Testing With Motor Video Link


Spring 2016: 3DoT David Rapid Joint Connection (Between Gear and Leg)


BY: Andrew Saprid ( Manufacturing Engineer)

Introduction:

The joint implemented will be lightweight and easier for the motor to operate the legs of the 3Dot David as it completes its mission. In addition, it must be able to rotate the legs for free movement.

Related requirements

Level 2 system requirements follow:

  • The 3DoT David shall use two micro motors for the movement system of the robot.

Printing a joint in Solid-works

A joint is made in solidworks to be 3D printed. The problem with this design is the shape of the joint may interfere with where the screw, or nail is going to be placed at through the center hole of the gear. It would require a lot of sanding.

jointprinted

Tube from a mechanical pencil as a joint

Another solution was to use a tube that holds the leads inside of the mechanical pencil as a joint. The tube had to be sanded in order for it to fit inside the hole of the gears. However, the tube gets stuck on the gear, so the tube does not rotate on the gear. A lot of labor would be put into for sanding those six tubes as the joints.

mechanical_pencil

A Joint in one of the white gear bag

We found a joint solution in one of the parts in the white gear bag. This joint has a length of about .939 centimeters. It’s diameter on the bottom of the joint is about .487 centimeters. The diameter of the hole on the bottom is about .196 centimeters, which the screw will go into the hole.
whitegearsScreen Shot 2016-04-25 at 7.28.21 PM

We went to Jk electronics to buy screws and washers to create the joint. The screws cost $2.49, and the washers cost $3.75. The hole of the diameter is about .287 centimeters. The diameter of the screw is about 0.2 centimeters. The length of the screw is 0.753 centimeters.
screw_joint_washerThe joint is then assembled together. The washer with the screw is placed on the bottom side of the gear. That way the joint does not come out of the gear as the joint rotates in a 360 degree motion. This would not require any hard labor of sanding to fit it into the gears, saving a lot of time.
joint-gear   screw_gear

Conclusion

The part in the white gear bag will be used as a joint as it was able to rotate on the red gear.


Spring 2016: 3DoT David Servos and Motor Trade-off Study

BY: Kent Hayes (Electronics and Control)

Introduction

A servo is an assembly of 4 different things: a DC motor, a gear-reduction unit, a position sensing unit, and negative feedback to control the motor’s speed/position. Unlike the DC motor, servos use a 3 wire connection for the power, ground, and control. The servo receives a control signal (PWM) that represents a desired position and powers the motor until its shaft reaches this desired position. They are typically able to rotate 200 degrees back and forth.

A DC motor uses only 2 wires, through which all of the power is supplied. The power level is controlled by PWM which is a ratio of the on time and the off time or the duty cycle. So if the power is on for half the time, then the motor operates with half of the power of its full-on operation. However there are various types of motors, so in the resources section you will see a link which has nice summaries of the different motors and which ones will be of the best use to the reader.

Types of Servos:

  • RC Servos. The most common and economical type of servo motor that normally come with 180 degree range for rotation. You can drive these through servo controllers or through GPIO pins from a microcontroller. A major disadvantage of these is that there is no feed back to the program of which you use to control them, so one cannot be entirely sure that it is operating properly.
  • Analog Feedback Servos. Come with an extra feedback wire that you can connect to an analog input pin in order to get feedback to the user’s program.
  • Continuous Rotation Servo. They are “hacked” RC servos, meaning that the controller feedback is hard-wired to believe that it is always at a middle position, resulting in a reversible, speed controlled gear-motor. A disadvantage is that it can be difficult to find the neutral point in the control signal where the motor stops using all together.

Types of Motors:

  • Brushed Motors. The most common type of motor because they are light, inexpensive, efficient, and have reasonable torque at low speeds. Can be used in toys, RC servos, and even gear motors.  
    • A gear-motor is a brushed motor with reduced speed but increased torque through the use of a gear-train.  The reduction of speed is actually an advantage because most DC motors spin too fast. A disadvantage is with the extra resistance, the gear-trains will become unresponsive at lower voltages.
  • Brushless Motors. Replaces the brushes with electronic communication to switch the current flow to drive the motor, while maintaining its efficiency. Typically used in laptops as fans and quadcopters. The main disadvantage is that it normally requires a separate controller for operation.
  • Stepper Motors. DC motors that move is discrete steps so they have much more precise speed control. Another advantage includes having a reasonable low-speed torque. The main disadvantages include reduced efficiency and being subject to missing steps if overloaded.

Servo Trade-off Study Guiding Factors

The purpose of the servo was to control the rotation of the head, while the motors would control the movement of the legs. In choosing a servo, we would need it to rotate 360 degrees continuously within our voltage range of 3.7V to 5V. In addition, it should be lightweight, small in size, and inexpensive so that it not bring us over our budget. The following table are the results from what Kent was able to find online:

Motor Trade-off Study Guiding Factors

After reading about the different types of motors, I  began to look at motors that would work for the 3DoT David team. The main factors that contributed to his search were the following: size, cost, and voltage rating. The size is important to our project since the mechanical design has been shrunk in size compared to previous generations of spider bots. Our budget for the project is not supposed to exceed $80.00 so it is best to be aware of how much each type of motor will cost. Finally, it is important to have a motor that can operate within 3.7V~ 5V since the 3DoT board will allow us to operate within this range. After searching online, the only motors that were able to fit our specifications were of the brushed motor type. All other stepper motors and brushless motors were either too large or had too high of a voltage rating. In addition, they both require separate controllers and are much more complicated to control.

Update:

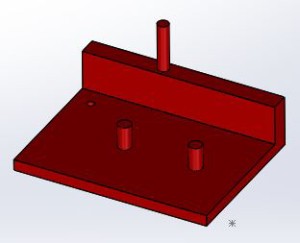
After our team team received new gears, we began testing to see if the motors would still be able to work. Unfortunately, they did not have enough torque to turn our gear train. Kent then began to test with the DC hobby motor, which did have enough torque but was too heavy and bulky to work with our design. He then turned to the E&C division manager for possible solutions and he recommended that we take a second look into geared motors.

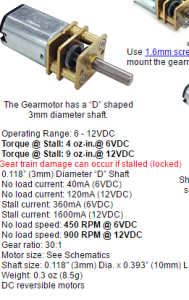
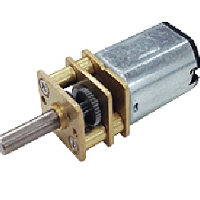
After looking online, Kent found a list of micro geared motors from the Servo City website. They had various motors from 45RPM to 2500RPM and as the speed increased the torque decreased. Therefore when searching, we had to make sure we had enough torque at a speed that would make our legs rotate at a reasonable rate. We agreed that 2 cycles/sec would be an appropriate speed to enable the spider to walk. In order to acheive this, hr did the following calculations:

2 cycles/sec * 60 sec/min = 120 cycles/min (RPM)

The gear ratio we are using is 3:1 so,

120 RPM * 3 = 360 RPM

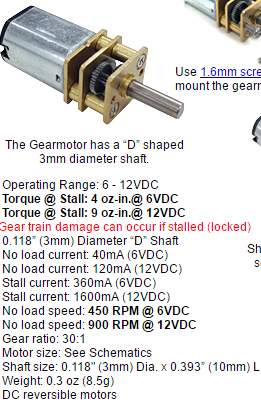
So 360 RPM is the minimum speed we need motor to rotate in order for the micro geared motor to rotate our legs at 2 cycles/sec. Therefore we purchased 2 micro geared motor that have 450 RPM at 6V. We will not reach 6V due to our board only being able to supply 5V, so as the PWM signal gets closer to 5V we should be able to reach 360 RPM if not greater. Once they arrive, we can begin to test to see how reliable they are and if we will need to choose something else.

Trade-off Studies Tables

Servo-Trade Off Study

Requirements Met Servo Name Price

Torque

(kg)

Speed

Voltage (V)

Weight

(g)

Dimensions
-Supply voltage is realizable since we can do anything between 3.7 and 5V. Single Cell 3.2g / .16kg / .10sec Digital Ultra-Micro Servo $7.95 .16 ~.19 .1s~.08 sec/60 degrees 3 ~ 4.2 3.2 28mm x 9 mm x 22mm
-Supply voltage is realizable since we can do anything between 3.7 and 5V.

-Weighs less than 2 g

Ultra Micro Servo 1.7g for 3D Flight $4.34 0.08 0.12 sec/60 degrees 3.7 ~ 4.2 1.7 12 mm x 21 mm x 0mm
-Supply voltage is realizable since we can do anything between 3.7 and 5V.

– Affordable since it is less than $4.00

-Weighs less than 2 g

HK-5330 Ultra-Micro Digital Servo 0.17kg / 0.04sec / 1.9g $3.64 .12 ~.17 .06~.04 sec/60 degrees 2.8 ~ 4.2 1.9 20 mm x 6 mm x 23 mm
-Supply voltage is realizable since we can do anything between 3.7 and 5V.

-Affordable since it is $3.99  

-Weighs about 2 g

HK-282A Single-Screw, Ultra-Micro Servo 2g / 0.2kg / 0.08sec $3.99 0.2 0.08 sec/60 degrees 3~4.8 2 23mm x 8mm x 20mm
-Can rotate 360 degrees Continuous Rotation Micro Servo FS90R $7.50 1.3~1.5 110~130 rpm 4.8~6 10 32mm x 12mm x 30
-Can rotate 360 degrees Continuous Rotation Servo – FeeTech FS5103R $11.95 3~3.2 .18sec/60 degrees 4.8~6 40 37mm x 20mm x 54mm

Motor Trade-Off Study

Name Requirements Met Rated Volt Max Volt Min Volt No load Current Stall Current No Load RPM Power Rating Weight Size Price
DC Toy/ Hobby Motor Cost effective 6V 9V 2V 70mA 500mA 7300~10900 420 mW 17.5 g 27.5mm x 20mm x 15mm $1.95
Hobby Motor -Cost effective 3V 12V 1V 110mA N/A 6000~7200 330mW 26g 2.75cm x 2.75 cm $1.95
3.7V 50,000 RPM Small Colorless Motor 716 -Operational voltage is reachable.

-Cost Effective

-7mm diameter

3.7V N/A N/A 100mA 1.35A 50000 5W 2.5g 16.5 mm x 7mm $1.95
FA-GM6-3V-25 Micro Motor Mini Motor -6mm diameter 3V N/A N/A 100mA N/A 1200 300mW 1.2g 20 mm x 6mm $9.00


Conclusion

  • Servos are excellent in terms of precision of control which is why we first considered using them for our robot.
  • In addition, they have a great amount of torque for dealing with heavier loads.
  • However, after looking into greater detail, we realized they might not be as useful to our project as we previously thought.
    • They are much too bulky to fit inside the spider.
    • Their price is quite unreasonable when being compared to the motors.
    • Would only be able to get the CR servos(for the 360 degree rotation of the head)


  • The 3.7V 50,000 RPM Small Colorless Motor 716 has more advantages for our application when compared to the rest of the available options.6
    • Its rated voltage is realizable since our battery is going to be 3.7V,
    • Max(stall) current is 1.5A which is excellent since our motor driver will might output 1A maximum
    • It is only 2.5 grams
    • Reasonably priced, $1.95
  • Only disadvantage of this motor is that we do not know the torque specifications and will have to do my own calculations based on the information given. These calculations will be placed in a separate blog post  if you wish to see them.
  • Project Update
    • The mechanical design of our 3DoT david changed in order to make the assembly much simpler than before, and will therefore not require us to use servos. The new design has it set where one motor will control the right side of the legs and the other will control the left side.

GearedMotor_Pic_BlogPost

Resources:

https://learn.adafruit.com/adafruit-motor-selection-guide/types-of-motors

https://www.adafruit.com/products/711

https://www.sparkfun.com/products/11696

http://www.seeedstudio.com/depot/37V-50000RPM-Small-Coreless-Motor-716-p-1884.html

https://www.firgelliauto.com/products/mini-motor-micro-motor

https://www.servocity.com/html/micro_gearmotorblocks.html

http://www.hobbyking.com/hobbyking/store/index.asp

http://handyboard.com/hb/faq/hardware-faqs/dc-vs-servo/

https://learn.adafruit.com/adafruit-motor-selection-guide/continuous-rotation-servos

https://learn.adafruit.com/adafruit-motor-selection-guide/rc-servo-control


Spring 2016 Pathfinder: Current Drawn Test

2

by:

Tuong Vu (Electronics & Control – Sensors, Actuators and Power)

Table of Contents

Introduction:

            This blog post will be explaining the total current drawn from the batteries by the motors. The amount of currents drawn from the batteries are resulted of the wheels experiencing at different friction forces. Different friction forces  correlated to different terrains that the pathfinder traveled on. For example, rocky  or sandy  terrains  required the pathfinder to exert more torque on its wheels in order to move which corresponds  to more current  being drawn from the batteries. The friction force is much larger on sandy or rocky terrains compare to smooth cement terrains. The  more  currents  being  drawn by the pathfinder lead to shorter batteries life (refer the previous blog post about batteries life).

Test  procedure:

Components:

  • R.S.E.717 Multimeter
  •  Samsung S7 cell phone
  • Motors :  Pololu motors

Using  the DMM in series with the motors shield would allow currents  drawn from the batteries by the motors  to be observable.  As the pathfinder conducts its route, collecting the currents being drained from the  batteries is an issue. A smartphone was  attached in the back of the pathfinder to  record the  currents  being drawn  from the batteries as  the pathfinder goes through its route.

Current  drawn:

  • Moving back and forward  do  not  require  high  amount of  pressure  on the wheels  which  current was  drawn was  the low,  refer to figure.1.

1

Figure 1

  • Turning left and right required more than the average current drawn,so the battery life is shorter, refer to figure 2.

2

Figure 2

Different  load &  road environment :

Torque  is the ( N*M)  as  N is the force  and  M as  mass  of the total load. Amps is the current  drawn by  the motors. As  the  pathfinder  undergoes a  route through rocky  terrain, more torque  is required to turn its wheels.  Travelling on rocky terrain deplete the batteries much  faster than travelling on smooth surface, current drawn from the motor is linear proportional to the motor torque, refer  to figure 3.

3

Figure 3

Conclusion:

The amount of currents drawing from the batteries is related to the terrains that the wheels of the pathfinder travels upon. Rocky and sandy  terrains require the pathfinder to exert more torque on its wheel in order to move which corresponds  to more current  being drawn from the batteries,so turning left and right draw more current than going forward and backward.


Sources:

  1. http://curriculum.vexrobotics.com/curriculum/speed-power-torque-and-dc-motors/dc-motors              DC Motors


Spring 2016 3D SMD: Critical Design Review Debrief

By Bao Loc Doan (Project Manager)

Table of Contents

Introduction

The Critical Design Review presentation was supposed to be a time where the 3D SMD group could show the customer and the review board how far along we’ve gotten since the PDR. It was expected that we should have the core design aspects of the project, in manufacturing, systems, and electronics, finished and ready to present. The customer and review board gave us a debrief on areas that we could improve on and move forward. The CDR will be linked below:

Critical Design Review Presentation

Executive Summary

The customer noticed we were missing one aspect on our requirements; what is the heaviest chip that the SMD pick and place machine can pick up? It was decided that the 32U4 chip would be the heaviest, and we will be adding that to our requirements moving forward.

System Design

The weakest feature on our system design was the cabling tree. We neglected to put any cabling tree into our CDR and it dinged us considerably. We understand how important the cabling tree is to the project due to the need of an efficient and tidy cabling tree to avoid any unwanted stress on our wires which could ultimately cause failure of our project launch. A lack of a cabling tree could lead to unorganized wires which is also not very attractive to look at, and is another key point since we want our project to appeal to our customer.

Experimental Results

The format of our experimental results was confusing to the review board and the customer. One of the issues mentioned was the lack of a list of the experiments that were conducted. The 3D SMD group agrees with this assessment, and will move forward by placing an introductory list in the final documentation of the experiments conducted if we need to present anything in the future. Another issue that was brought up was that our experimental results resembled more closely to assembling certain parts rather than testing the prototypes for certain things like speed and accuracy. The 3D SMD group also agrees with this assessment.

Interface Definition

There was negligible comment in regards to improving our interface definition.

PCB

The PCB was not required for the 3D SMD group for Spring 2016.

Hardware Design

Due to the manufacturing division manager being absent at the time of our debrief, there were little comments about our hardware design. We will try to meet up with the manufacturing division manager and assess what we can do better for our final documentation. The customer did mention that there should have been the photo detection circuit model in our Solidworks. At the time of presentation, the 3D SMD group do agree with this assessment. As of right now, since we are moving towards a different design, we will not be implementing the photo detection circuit moving forwards.

Software Design

The code that we presented was a little confusing, admittedly. We had named our A-axis rotation to “B” in our Arduino modules due to compatibility issues in our JAVA GUI. We tried to make this clear in our presentation, but we can see how this can be confusing. The president also mentioned that in the future, we could show where we added each subroutine exactly into our code, which was a good idea. The reason being is that a future semester should be able to look at our software and know exactly what we changed in case Makeblock decides to update any of their software in the future. Moving forward, the 3D SMD group has decided to put comments onto our software or somehow making a visual effect (the president mentioned a program being able to highlight all changes that were done) to show any changes to the code.

Verification and Validation Test Plans

Thanks to our wonderful systems engineer, Christine H. Vu, we had no issues in this category.

Project Update

There was negligible comment in regards to improving our project update. We will try to follow our schedule and hope to have a successful launch.

Demo

Our demo did not do as well as we had hoped. The review board and customer pointed out that our “PCB” at the time was just double sided tape, our nozzle slowly reverted to original position due to it being taped on, the overall appearance of our machine was janky since everything was zip tied and electrical taped together, and said there was definite room for improvement. The 3D SMD group wholeheartedly agrees with all the comments and we hope to make the launch have none of these issues.


Spring 2016 3DOT Goliath, SMD Soldering

By: Jerry Lui (Manufacturing Engineer)

The reason for this post is to create a guide on how to solder SMD components onto your fabricated board.

By the last quarter of the semester, custom PCB’s should have been fabricated and all components on hand. Our PCB is shown above with a total dimension of 1’’x1.425’’. The majority of the components are SMD with the exception of the 2 through hole dielectric capacitors, piezo speaker, and phoenix pins.


First the PCB should be cleaned thoroughly with at least 70% rubbing alcohol (preferably 90%+) by soaking either Kim-wipes or cotton swabs.


1


Next flux should be applied to the contacts of the board. Generally use a no-clean water based flux for ease of cleaning but a typical rosin based flux will suffice. These come in small containers to syringes to pen applicators.


2


Now that the flux has been applied each contact pad has to have solder paste or normal solder.

3


A stencil can be used but it needs to be fabricated so the next step will be hand application


4


DO NOT put too much solder paste. There only needs to be enough to thinly cover the pads. For the multi-pin packages like opamps, a thin line of solder paste can be applied perpendicularly to the pads instead applying it to each pad individually. Once all the pads have been covered in solder paste it’s time to add the components.

5


Here I use tweezers to place the SMD components onto the prepared board. To help with placing the SMD properly, grip the components from the top or use a  angled tweezer. The components don’t need to be pressed all the way down, give them a light press and the capillary effect of the solder will automatically align them.


To have a proper solder joint the board needs to be warmed up properly. An increase of  will be fine. If a reflow oven isn’t being used a hot air station is adequate as well.

6


Set the temperature to around 310C (depends on the flux paste used) with the air setting to 1~3 and hold the hot air reflow gun 3~5 inches over the board while rotating the gun for a few seconds. The point of this is to heat up the board (especially the ground plane) and to allow the components/leads to come up to the proper temperature. Once the board is warmed up (the paste will also start to become more fluid) hold the reflow gun 1~2 inches over the board while wiggling the gun. The solder will start to melt and align the components to the pads.


7


Once the board is completely soldered, clean it again with rubbing alcohol and kim wipes or cotton swabs.

8

Conclusion:

Soldering surface mount components is very straightforward and isn’t as hard as many people believe it to be, especially with a hot air gun or reflow oven. As long as you have a steady hand (for hand soldering) and patience (hot air gun) you’ll be able to solder SMD components with ease.


EEvlog has great tutorials on how to re-flow:

How to re-flow


Spring 2016 3DOT Goliath, Mission Objective Update

By:  Tae Min Lee (System)

Mission objective also known as Con Ops was needed to set the rules for the laser tag game.  Both systems engineer from the SpiderBot (Chris Hirunthanakorn) and the Goliath (Tae Min Lee) discussed and finalized the rules for the laser tag game.  The list of rules that are listed below will allow us to have a clean and fair match.

Con Ops:

  1. The game will last for three rounds. One round ends when a robot is hit three times and is disabled. This may last up to 10 or 15 minutes.


  1. A robot is considered disabled if it is unresponsive to commands for 10 seconds after the final tag.


  1. At the end of one round, both robots will return to their starting positions.


  1. The game will take place in a 6 ft x 6ft area on the linoleum floor of ECS 315. If any robot leaves the designated area, they are not allowed to attempt to tag the other robot and must re-enter the game area.


  1. An Infrared LED emitter and Infrared detector will be used as the tagging system.


  1. The maximum distance for detecting a direct hit will be 5 ft. This means the IR emitter is hitting the detector in a straight line from 5 ft away. Whatever voltage is outputted by the detector will be the minimum threshold for defining a hit. (need to define that voltage here once we figure it out)


  1. Collisions between the two robots is not allowed. If a collision does occur, the robot that caused it will take a penalty hit. Once the penalty hit is taken, the robots move back to their starting positions.


  1. A buzzer will make a noise to indicate when the robot is tagged and when it is disabled.


  1. When a robot is tagged, it will make a sound and it will be deactivated for the next 5 seconds. This will allow the robot to move out of the way and not cause multiple tags at once.


Current Draw spring 2016

Posted by: Luis Valdivia(Project Manager)
Written by: Kevin Nguyen(Electronics and Controls)


Table of Contents:
– Introduction
– Shunt Resistor
– Results

Introduction:
We encountered a problem while measuring the current draw of the motors; the motors were drawing too much current for the multimeter to read. To solve this, we used a shunt resistor setup to measure the voltage across the resistor and calculate our current draw. Using this method, we can avoid directly measuring the high current which could damage our multimeter.

shunt resistor123

Fig 1.1 Shunt Resistor Setup

This setup is used to measure the current draw of high powered devices. Our load would be the motors and the supply is a 14V source.


Shunt Resistor:
The specs of the shunt resistor is 300A, 50mV. That means that the resistor would have a 50mV voltage drop at the maximum current of 300A. Since Ohm’s Law says that the voltage is proportional to the current across a resistor, we can simplify that to 6A per mV. Knowing this, we can calculate the current draw by multiplying the measured voltage by 6A/mV.

Another alternative to calculating the current draw would be to calculate the resistance of the shunt and divide that by the measured current draw. Using Ohm’s Law we can calculate the resistance of the shunt to be:

50mV = 300A*R

R = 50mA/300V =  0.1666mOhms

Shunt Resistors typically have very small values so that it doesn’t affect the circuit. The tolerance is very small, 0.1%, for accurate measurements. To measure the current draw using this method, we divide the measured voltage by 0.16666mOhms.


Those two methods described above are 2 ways of realizing an identical solution. Multiplying by 6 is the same as dividing by 0.16666.

shuntcomponent123

Fig 1.2 Shunt Resistor

Low Resistance, Low Tolerance resistor that serves many applications. One of its purposes could be used for measuring high current.


Results:
Using this method we were able to accurately measure the current draw of our high powered motors. The results we got was that each motor drew approximately 11.85A at full throttle with our setup. 4 Motors would draw a total of 47.4A. Using this data, we determined that our battery was safe to use with these motors. The battery we have is capable of safely supplying 135A continuous load current which is far above what we require.